Hi Daydreamers!
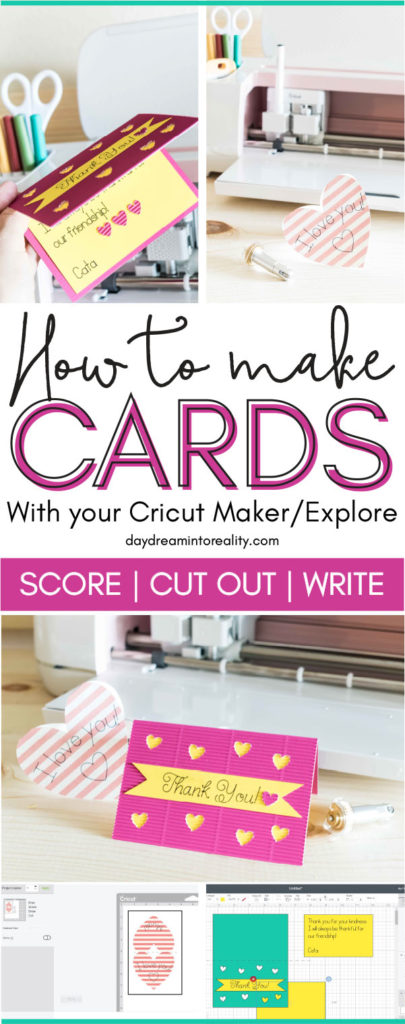
Sit tight because today, you will learn how to make beautiful custom Cards for any occasion with your Cricut Maker or Explore!
Yes, today, you are ditching store-bought cards and embracing your creativity to show your loved ones how much you love and appreciate them!
Ok! I am not saying that you don’t care if you give someone a store-bought card. I mean, not everybody has the time to make custom cards.
Right?
Here’s the thing, some people enjoy card making, and if you are one of those and you have Cricut! You will have so much fun creating cards for those you love.
What can you expect from this article?
I will take from the most straightforward card you could make to a fairly advanced one. Here, you will learn and be empowered to make a Custom Card for every occasion.
I also have multiple articles on making and personalizing cards with your Cricut for just about any occasion. If you are looking for specific holiday cards, check out these other excellent tutorials for other great ideas.
Making Custom Cards – What no one is telling you!
For me, this is personal!
If you’ve read any of my older articles, you might’ve noticed that I like to bring as much value as I can. That’s why some of my articles are very well explained and detailed.
I needed to learn too!
When I read a post, I really couldn’t find all the possibilities with my Cricut. All I could see were very simple examples and/or Ready to cut projects from Cricut Design Space.
Don’t get me wrong. I think this is great. However, I want to inspire YOU; I want you to develop a creative brain and develop ways to build your ideas and designs.
How do we do that?
The best way to create the perfect card is by THINKING OUTSIDE the box!
Here are some tips I usually use before I decide to design something!
- Think big, and think colors. When you buy a store bought card you will see that there’s a lot of things going on. You see Text, beautiful phrases, images, colors, patterns, glitter, etc.
- Most cards come in a square type form. Try different shapes like starts, hearts, hexagons, etc.
- Think of different materials as well! Did it come to mind to just use white cardstock? What about corrugated paper, glitter cardstock, vinyl, etc.
- Last but not least, think of the occasion.
- Are you celebrating an anniversary? Maybe your card should have extra red, pink and white.
- Are you celebrating a birthday? Then balloons, cake, confetti, and or banner type of designs would look great on a card.
- Graduation? Then hats, diplomas, and also balloons would make your card very beautiful.
Card-making is all about choosing the right colors, materials, and designs. That’s why a beautiful card at Target can cost you more than 7 dollars!
Now, let’s get off the cloud that card making with Cricut will be cheap; It’s not, maybe if you make them in bulk. I think that card making can be an expensive hobby. However, it is a beautiful and rewarding one. And that, my friend, is worth gold!
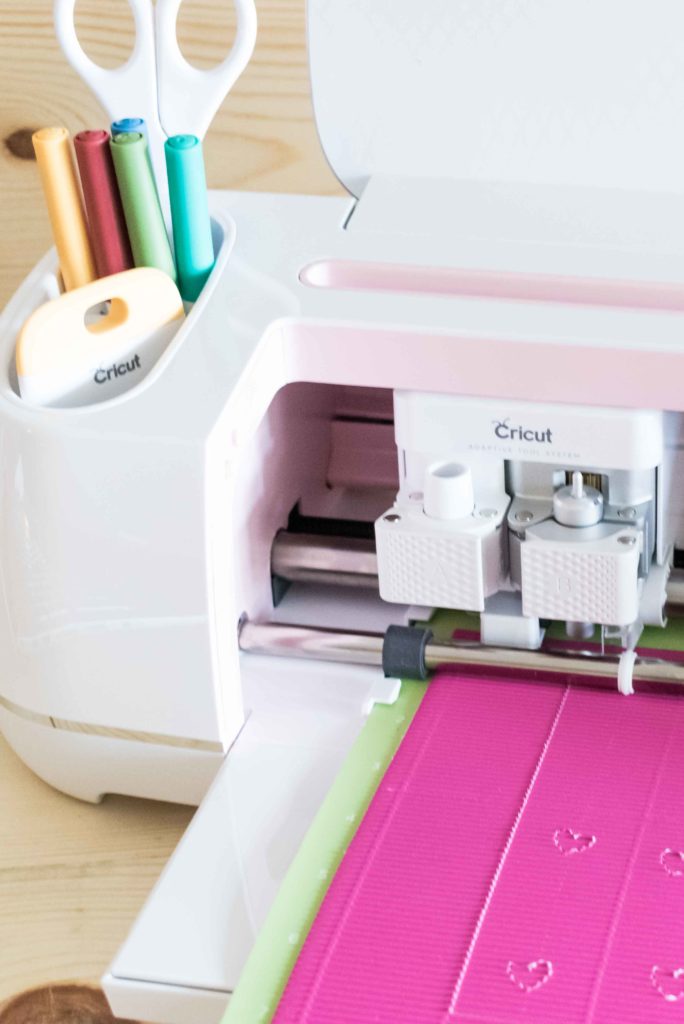
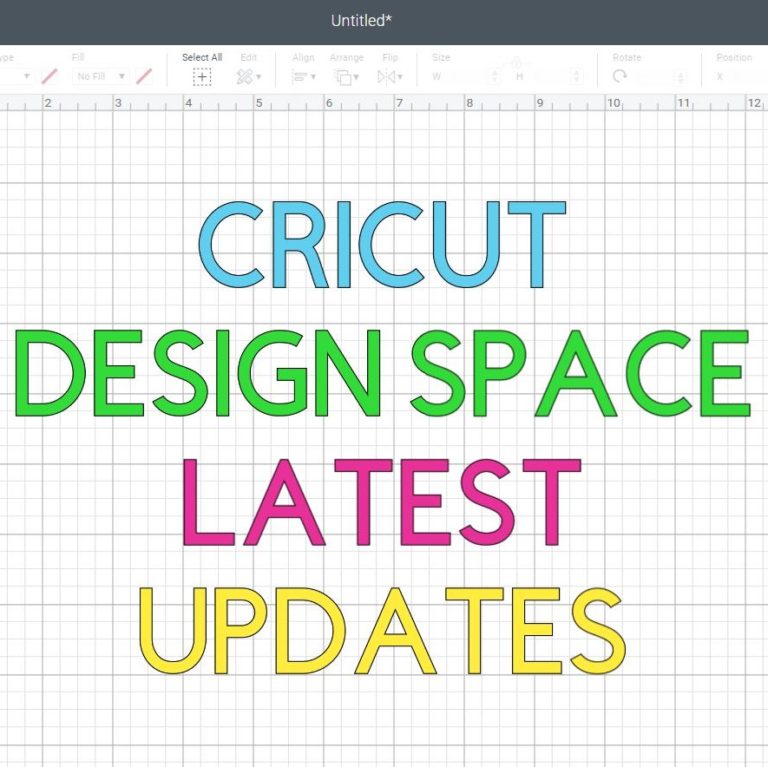
Materials & Cricut Design Space Features
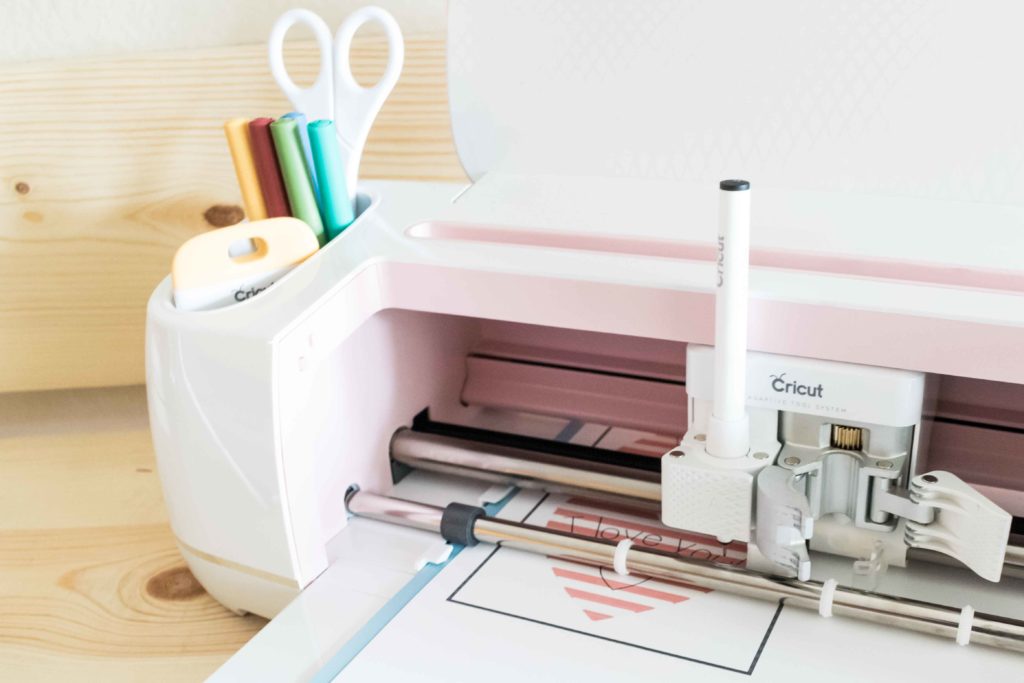
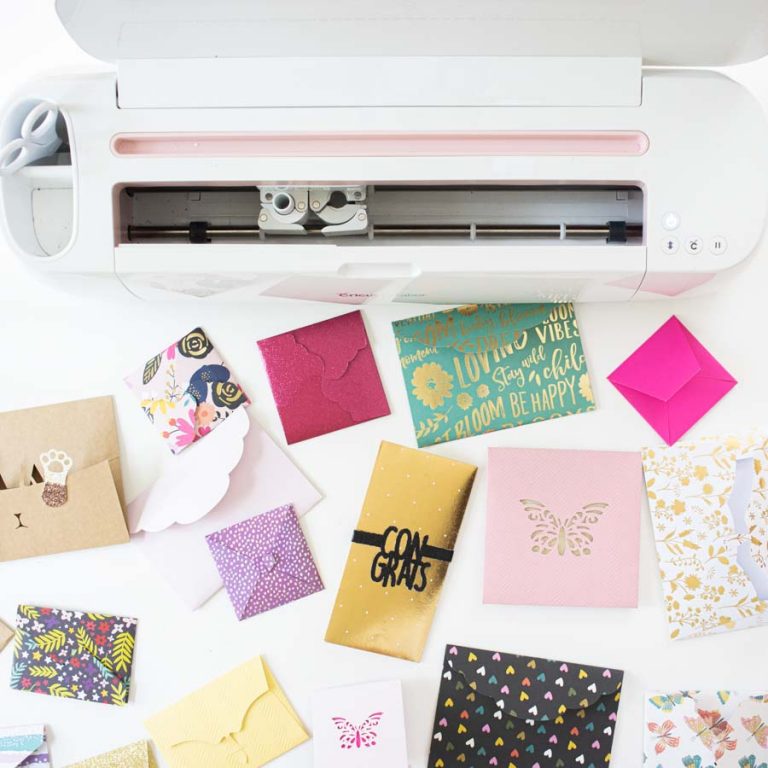
I know you want to get your hands on card making right now, but before we get started and if you’re going to follow along – and what I recommend – these are the materials I will be using across this post.
- Cricut Machine: Any of the Maker or Explore machines will work. For Cricut Joy take a look at my card makint tutorial with the card mat.
- Fine Point Blade
- Scoring Stylus or Scoring wheel Note: the wheel only works with the maker machines.
- High quality paper, for this tutorial I used pink corrugated paper, and white and yellow cardstock.
- Light and Standard Grip Mat (Blue & Green)
- Black Cricut Pen 0.4 tip
- Home Printer for *Print then Cut cards.
For this tutorial, we will be using many features from Cricut Design Space. If you don’t know how to use any of them, I highly recommend you to read my beginners guide, so you learn all the things Design Space has to offer.
- Shapes: You will learn how to make cards in different types of shapes
- Flip: to reflect shapes and create different types of greeting cards
- Weld: to convert two independent designs into a single one.
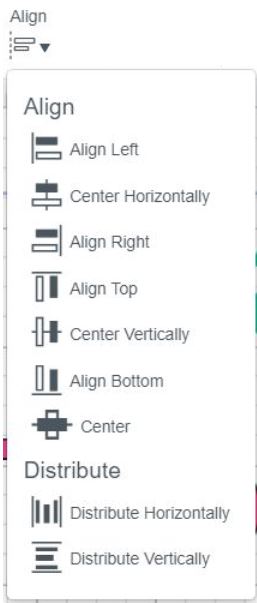
- Alignment: Align scoring lines on your card to perfection
- Arrange: to visualize the position of your elements at all times.
- Rotate: rotate elements to a precise angle. Perfect for horizontal score lines.
- Operation: But for cutting and print then cut.
- Fonts: learn, what type of font is ideal for cards and how to curve it!
- Writing: Write text on your cards by using Cricut Fonts
- Scoring: learn to create score lines so you can fold your card very easily.
- Attach: extremely important when you send a project to be cut. Otherwise things will be cut all over the place.
Ok!…
Now that you know all of the features we will be using let’s make some cards!
Making a Simple Card
We will start from zero, then apply all of the techniques to the next steps.
Making a simple card with no design and just a score line is very easy. The squares in pink will show you where to find and how to modify your card.
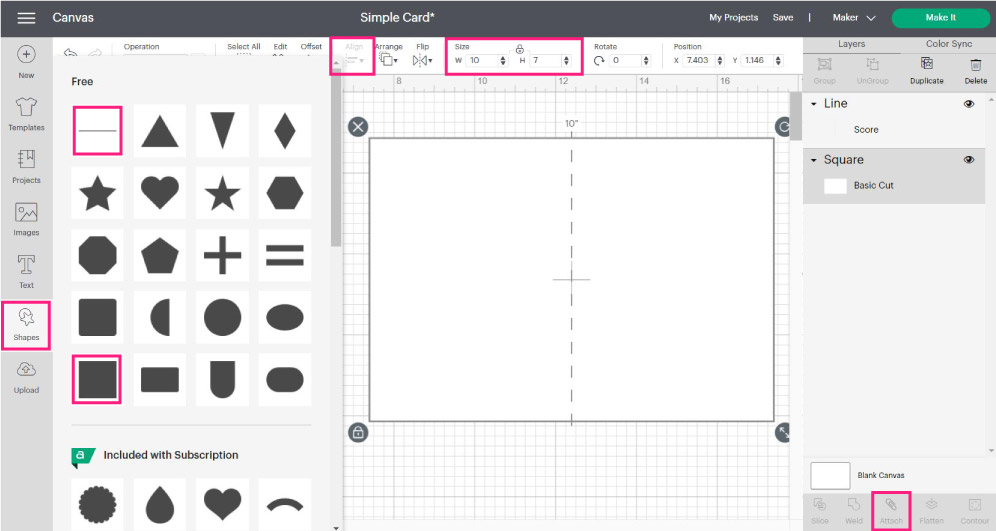
Step 1 – Add square and Resize it
Click on “Shapes” located on the left panel and add a square. The square that appears on the canvas area will be equilateral – all sides are the same length – however, we need each side to be different.
To achieve that, look at the size option on the top panel, and then click on the little lock between Width and Height to modify each variable on its own. You can also unlock proportions by selecting the square on the canvas and then clicking the little lock located on the lower-left corner of the selection.
After unlocking proportions, go ahead and size the card according to your preferences. Something to consider is that if you wanted to make a 5 x 7 in. card, you would need a 10 x 7 rectangle because you will be folding it.
After folding it, the size of this card would be 5 x 3.5 in. Therefore the square size would be 10 x 7 in.
Note: The default color is grey. I changed the color by selecting the square and then changing the “Operation” color to white.
Step 2 – Add Scoring line and Align
After sizing your card, click on “Shapes,” again and this time select the option “Score line.”
After clicking, a dashed line will appear on the canvas. This line means that you will be creating a fold – or score – instead of cutting.
Go ahead and resize the line to fit the square you created and select both the square and the line, and align them by clicking on the “Align” tool located on the top menu.
Note: select the option “center.”
Step 3 – Attach – Most important Step!
When you attach two elements, you tell your Cricut that those objects go together. Colors in your project represent different materials and mats that you will be using when you send your project to be cut.
However, some elements like scoring lines or pens need to be assigned to the area where you want to place them. Otherwise, your Cricut will Assign a different mat for the score line.
This will happen if you don’t attach the square and score line.

We don’t want that! We want both designs on the same mat, just like we designed them in Cricut Design Space.
To do that, you need to select both elements on the canvas area and then click on the “Attach” button located at the bottom of the layer’s panel.
This is how it would look when you send your card to be cut. Everything is right where it’s supposed to be!
Using Shapes to create different Card Styles
Here I want to teach you how to make Cards with other shapes! I think this is so cool and is one of the reasons I just love my Cricut!
Achieving this look is very easy. Look at the following screenshot and read the step-by-step.
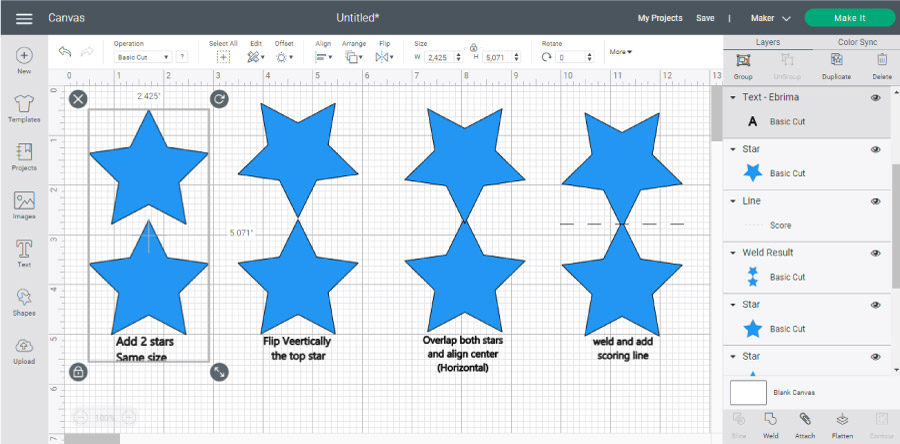
Step 1: Add two stars of the same size by clicking on the shapes option and selecting the star.
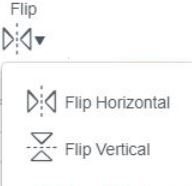
Step 2: Select the star on the top, click on Flip – located on the top panel area – and select the “Flip vertical.”
Step 3: Overlap both stars and then align them horizontally.
Step 4: Select the already aligned and overlapped stars and click on “Weld” to make a new shape. The “Weld” option is located at the bottom of the layer’s panel.
After welding, insert a score line; the scoring line is always vertical by default. Select it and type 90 on the rotate tool to change this.
Select the welded stars and score line, center align, and attach them.
Experiment with other Shapes + Patterns
Repeat the process you just learned but with other shapes! I tried it with hearts and hexagons!
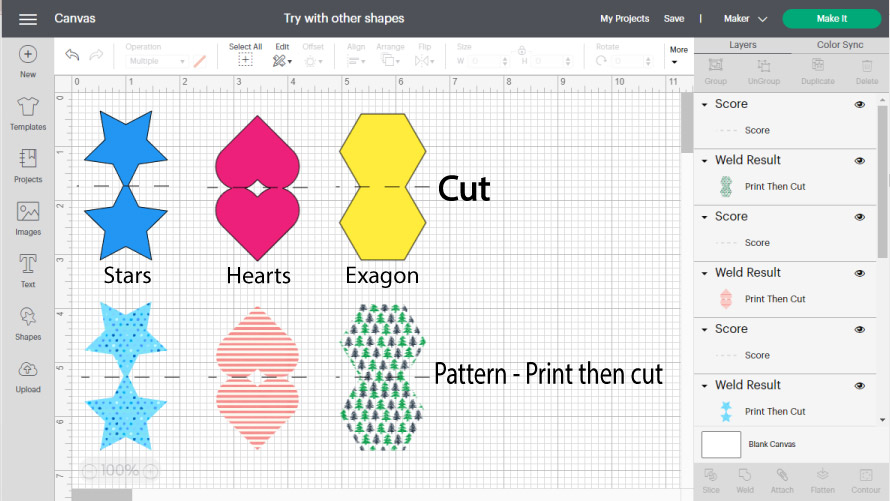
If you don’t have patterned paper and want that effect, you can achieve this with Cricut Patterns. Some of them are free, and some of them cost money, and if you have Cricut Access, your possibilities are pretty much endless.
Note: Patterns will be sent to your home printer and then cut with your Cricut.
If you don’t know what Cricut Access is, make sure to read this guide.
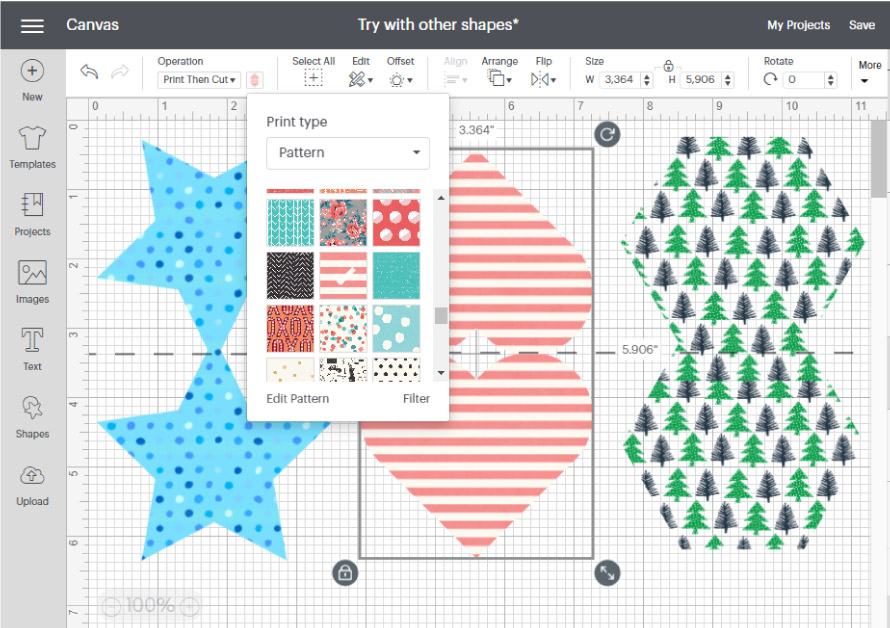
To add patterns to your card, select it – just the card, NOT the scoring line – and then change the operation to “Print then Cut.”
Next to “Operation,” there’s a little color box where you can change colors. When you click on the little box, there’s a drop-down menu called “Print Type;” click on it, select “Pattern,” and choose your favorite one.
For our next learning step will be using the patterned heart card!
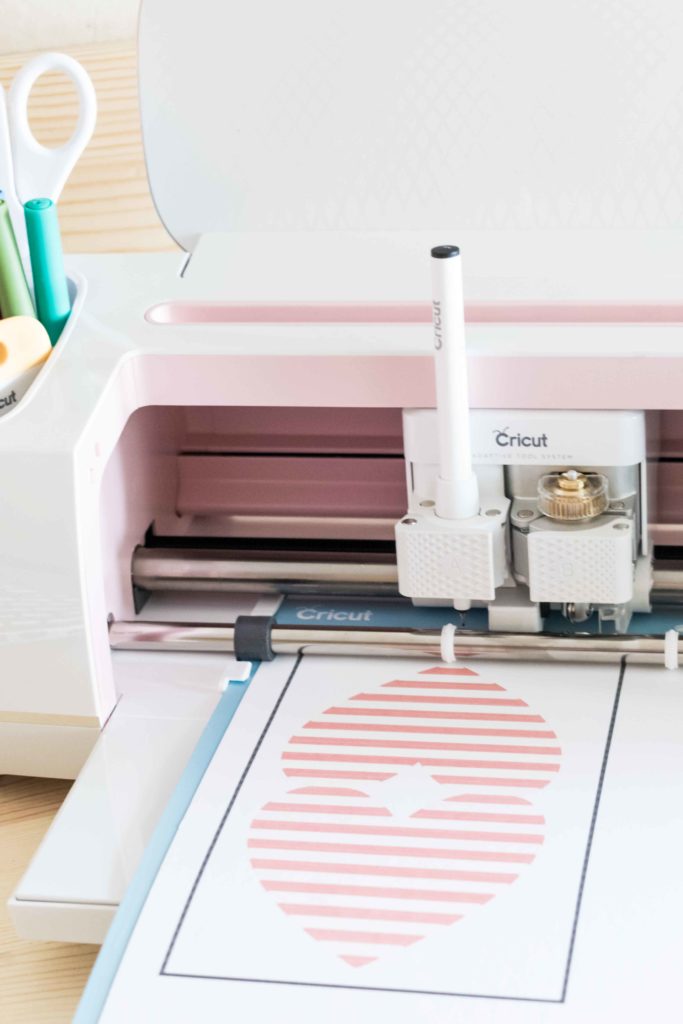
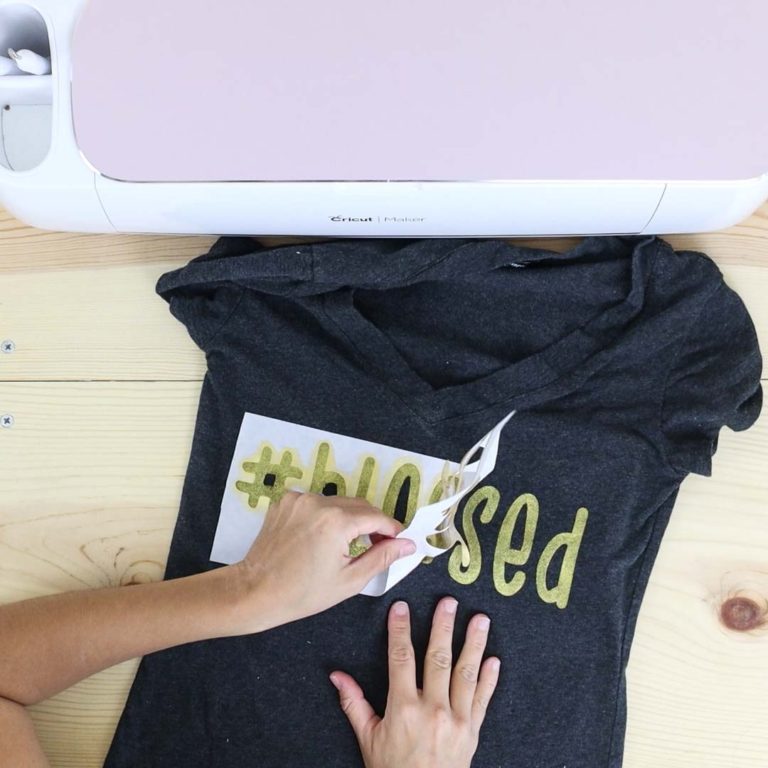
How to write on a Card + Print then Cut
One of the Coolest things Cricut has is the ability to write! Adding text to your card will add an extra touch of love and awesomeness.
In the last step, you learned how to make cards with other shapes and fill them with beautiful patterns from Cricut.
Now let’s learn how to write on them and Cut them with the Print then Cut option.
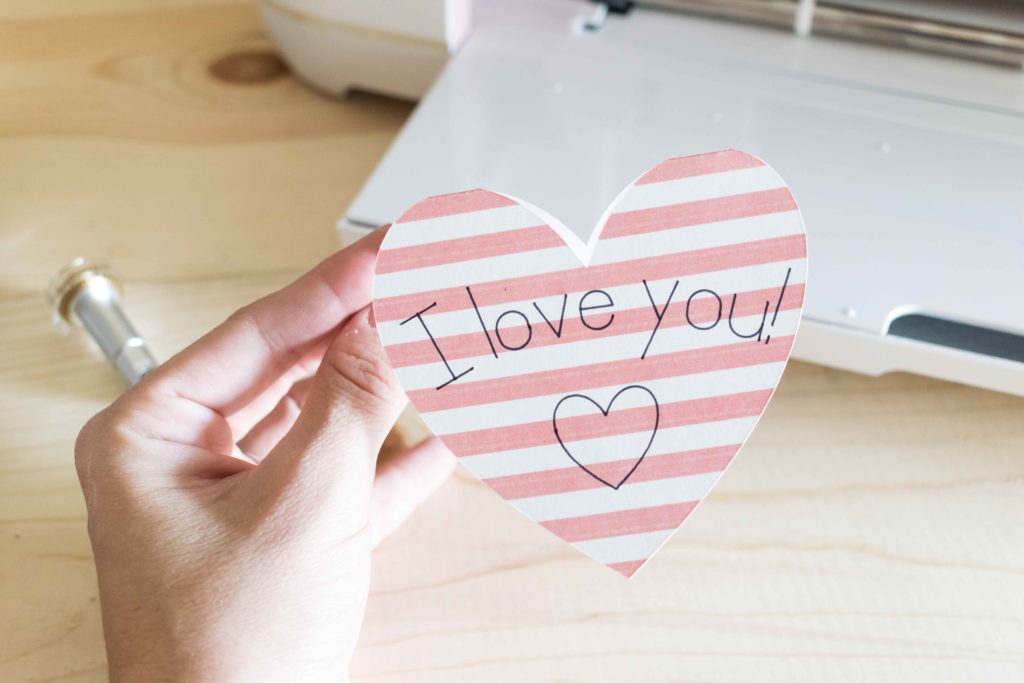
Repeat the same process you learned with the star, but this time with a heart.
Then fill it with your favorite pattern; I used the white and pink stripes.
Tip: The image below will show you the rest of the features from Design Space I used.
Don’t forget to add a score line and rotate it. But don’t attach it yet. (The screenshot doesn’t show the score line)
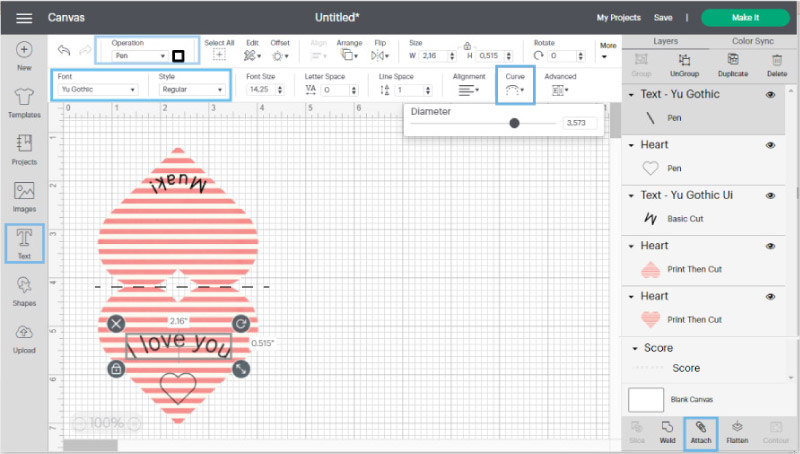
Step 1 – Add text
To add text, click on the text icon located on the left panel; A box will open on the canvas area to type your desired text.
I wrote two lines of text: I love you and Muak!
Here’s the thing – PLEASE pay attention to this point…
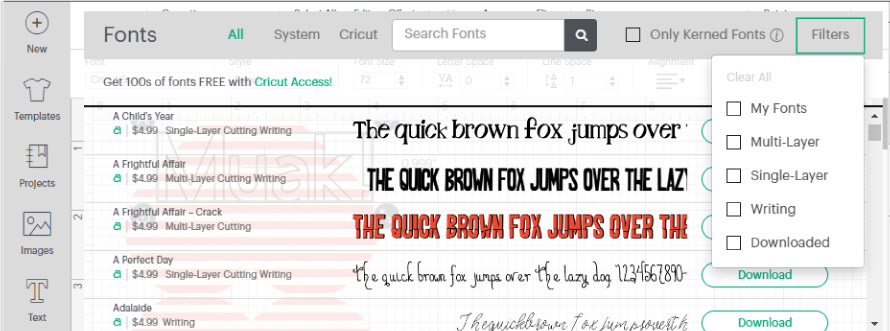
In Cricut Design Space, you have your “System fonts” and “Cricut Fonts.” Your system fonts won’t do a writing effect, and they will look outlined if you choose to use your Cricut Pens.
However, many Cricut fonts DO have that option; they were designed with that purpose. So if you want to write like the screenshot, you must use Cricut Fonts.
Here’s the problem: they usually cost money; you can either buy them individually or come with Cricut Access.
Bummer, right! Not so fast I have a good tip for this
I noticed that they give you a couple of fonts for free with your machine. To find them, select your text, then click on the font and filter them by choosing “My Fonts + Writing.”
Make sure to select a font that has a writing style.
For this tutorial, I picked “Yu Gothic.” You can change the color of the pen by changing the operation to “Pen” and selecting the pen color on the little “color box next to “Operation.”
I have a whole article on how to edit text, and if you are just getting started, it will help you become a Pro!
Step 2 – Flip and Curve Text
We have two lines of text:
- I love you: select and curve it – this option is on the top panel – by moving the little slider to the right. Play with it, and curve it as much as you would like.
- Muak!: Select it and then click on Flip and flip vertically. We need to flip this text because this is the back side our card, and if we don’t then the text would look upside down. After flipping, go ahead and curve the text, but this time move the little slider to the left.
Tip: I added an extra heart to spice things up. To do this, add a heart shape, resize and then change “Operation” to “Pen.”
Step 3 – Attach + Make it
After you are done writing your text, go ahead and select all of the elements along with the score line, click on “Attach,” and then click on Make it.
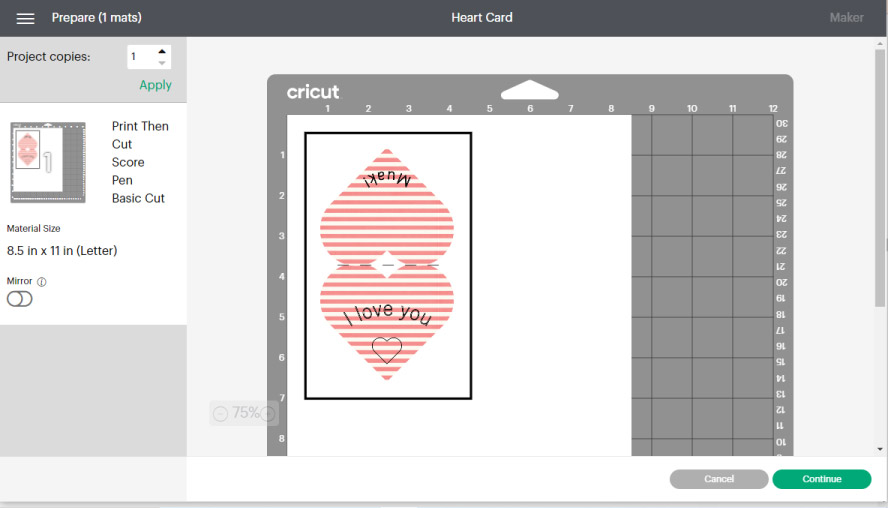
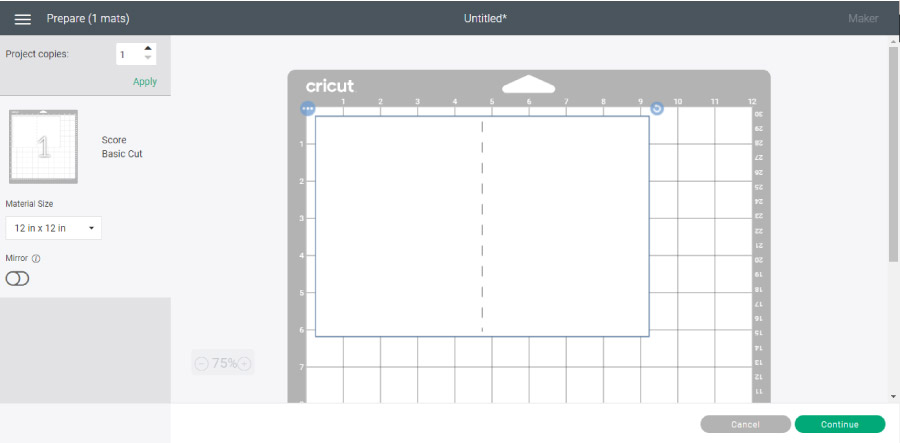
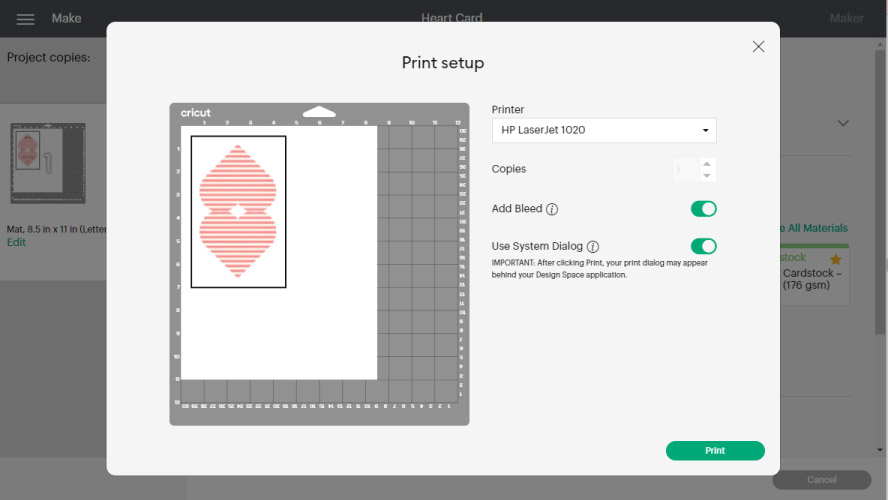
The mat preview shows you how you need to put your design on your mat before printing it. On the left-right, after project copies, you also have a tiny mat preview that says what the steps are.
We have Print, Score, Pen, and Basic Cut for this case.
Click on “Continue” to select materials.
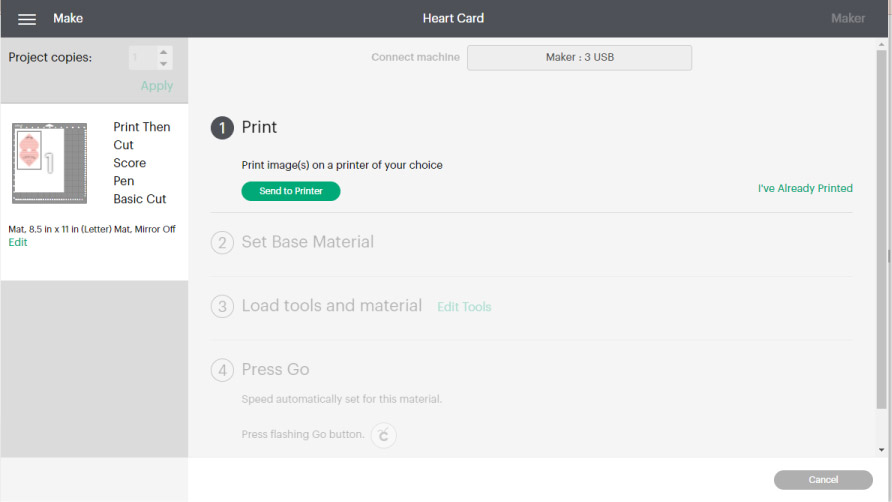
Print: When you click on send to the printer, you will be prompted to select your printer – make sure it is on and connected to your computer – and then click on Print.
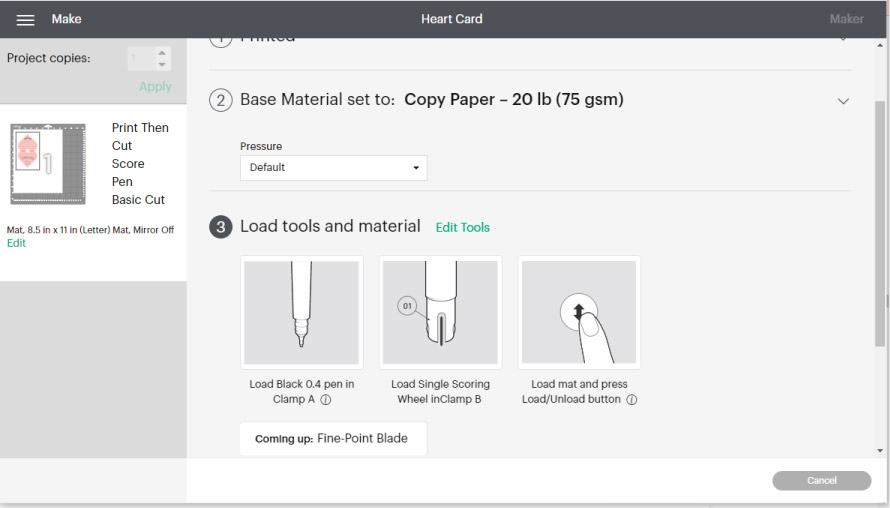
Set Base Material:
If you have a machine with a “Smart Set Dial,” move it to custom and select material from Design Space to follow along with the screenshots.
If your material doesn’t appear on the most popular ones, you can browse all materials by keyword or alphabetically.
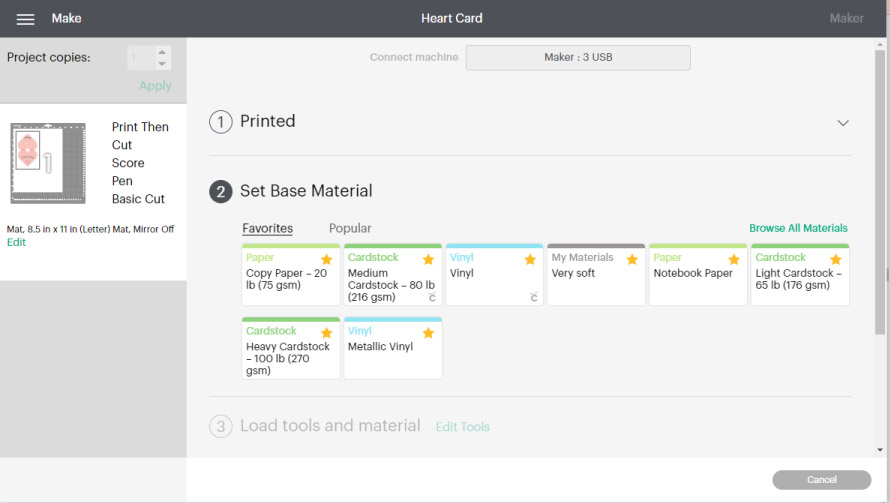
I printed my card on light cardstock.
Load Mats and Tools: For this project, since you will be scoring, writing, and cutting your printed project, you will need a Cricut Pen, Scoring Stylus, or Wheel – if you have a maker, and the fine point blade.
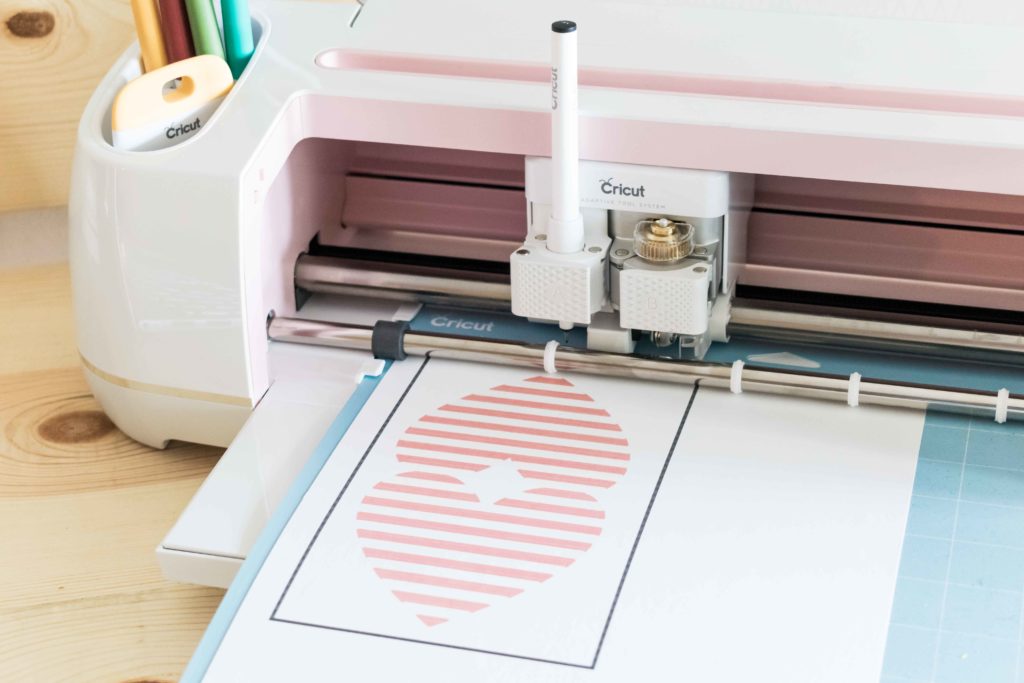
When you are using more than two different tools throughout your cutting process, you will need to change them at some point.
For example, I used the Scoring Wheel – I have a Maker for this tutorial – and when that process was completed, Design Space brought up a notification saying that I needed to change the wheel for the Fine Point Blade.
If you have an Explore machine, your Cricut, after either scoring or writing, will prompt you to change the scoring stylus for the Cricut pen or vice-versa.
So, no worries, you will be just fine if you follow the cutting instructions!
Press Go: Tap the flashing go button and see the magic happen right in front of your eyes!
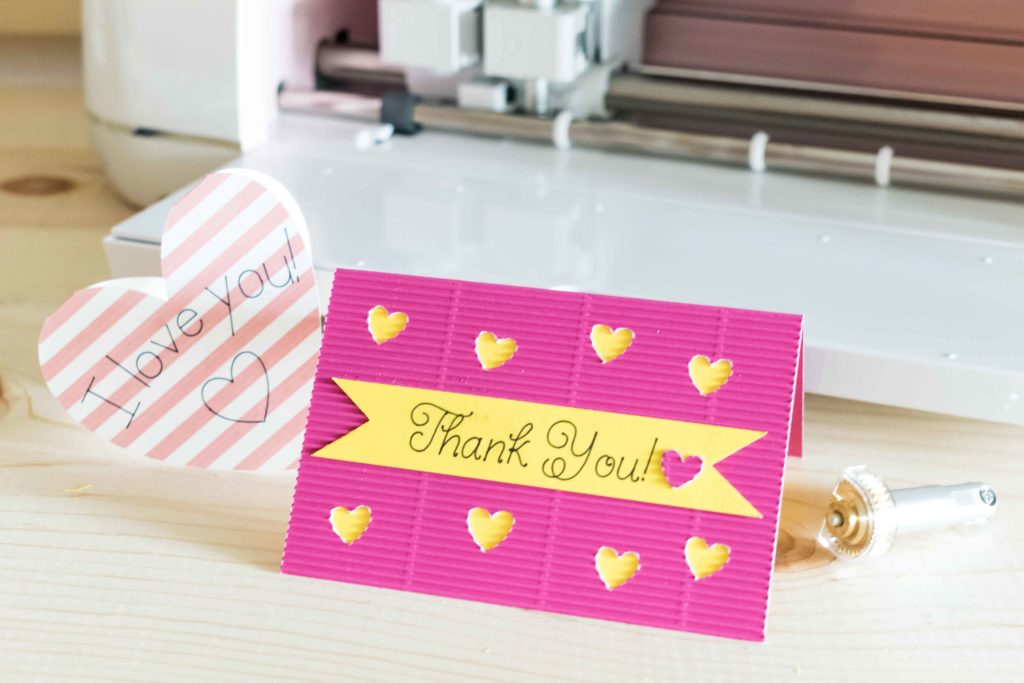
There you have it! A little heart-shaped card!
How to make a Cut Out Card?
This is the last step, and after this, I think it will be safe to say that you are ready to make ANY greeting card!
Here you will be making a cut out card!
We will be using many of the techniques learned throughout this post. So I truly recommend you to check it out. Although, if you are very familiar with Design Space, you will be just fine.
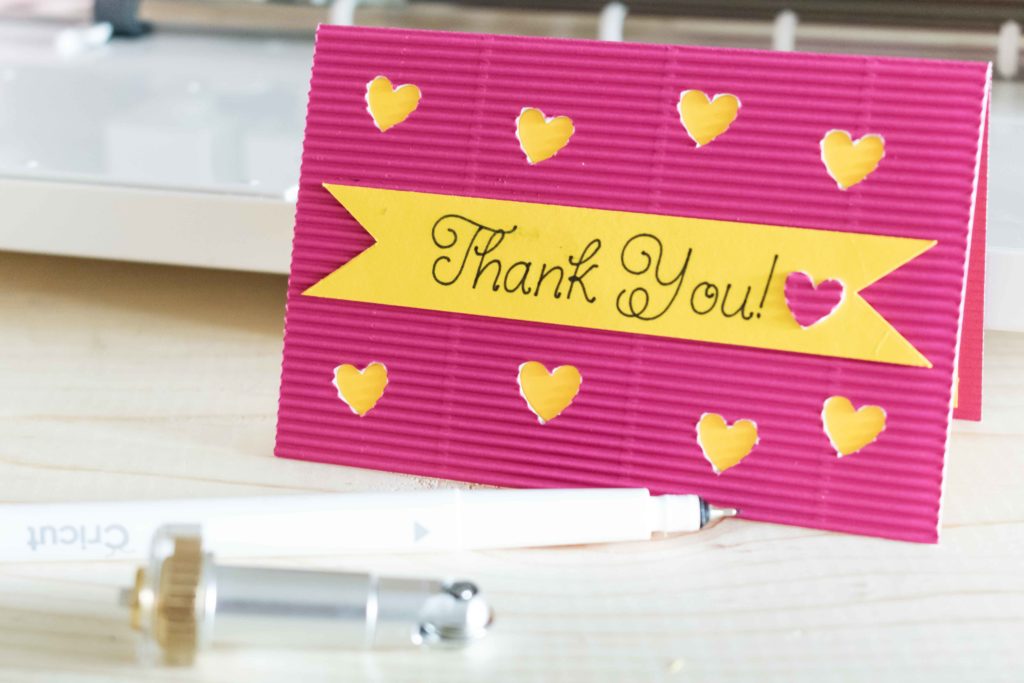
A cut out card is where you cut some pieces out to show another material, texture, color, etc.
It’s extremely easy to make, so let’s get out hands on it!
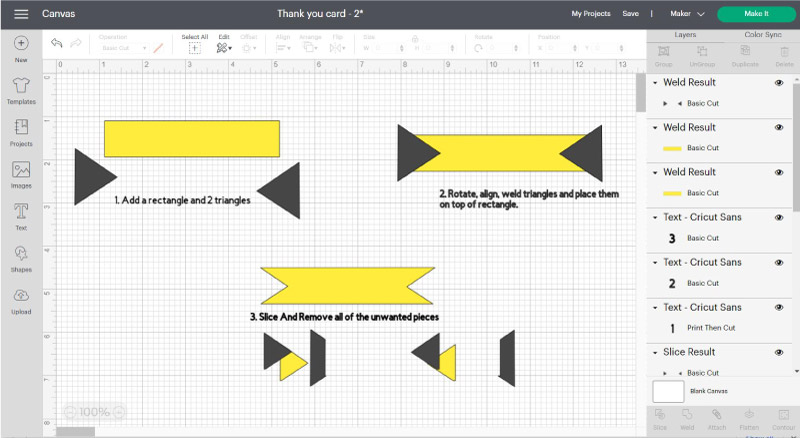
Step 1 – Add Card & Elements / Weld & Slice
We are going to make a horizontal card. So first, make a rectangle, drop a scoring line, and rotate it to make it horizontal. Don’t attach anything yet!
I also added another square that I planned on gluing inside the card. This square should cover all of the parts you want to cut out and be a little smaller than the card itself.
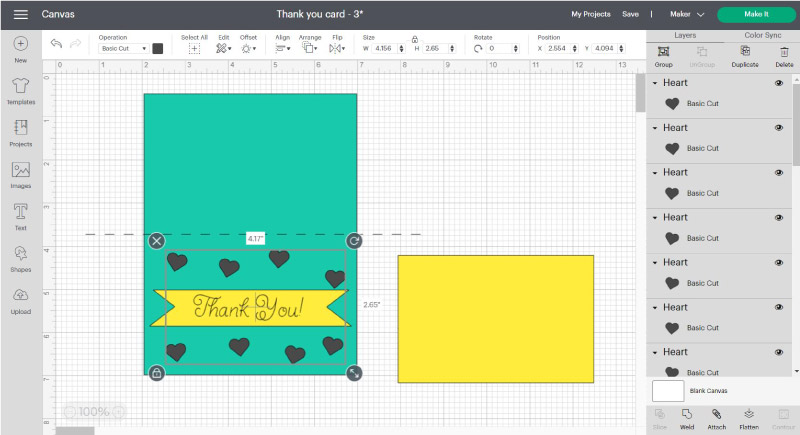
For this card, in particular, I just wanted to cut out some hearts; I added one, resized it, and then copied and pasted it – also rotated them a little bit until I had eight hearts in total.
After adding the eight hearts, I selected them all and clicked on “Weld.” That is because you can only slice ONE shape at a time against another one.
So if I didn’t weld – convert into one shape – I would have to slice eight different times!
Annoying… Right?
To cut out the cards’ hearts, select the already welded hearts and the blue card and click on “Slice” at the bottom of the layer’s panel; then delete the unwanted pieces.
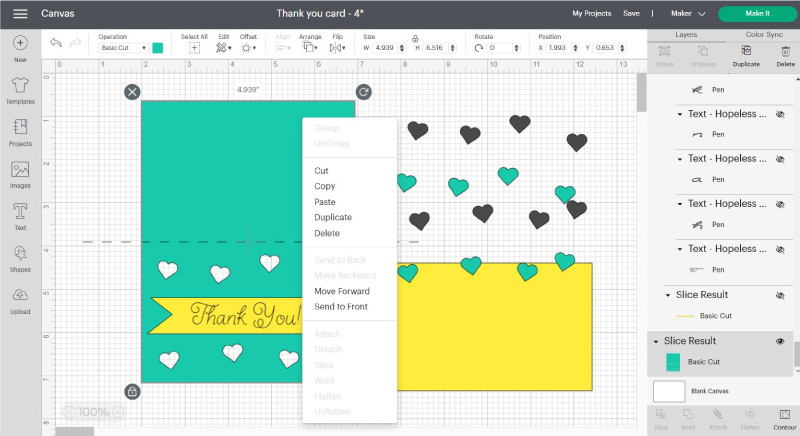
Tip: you will notice that elements get on top of the other ones when you slice something. Right-click your mouse and arrange your design by moving elements back and forward to cope with this.
Step 3 – Add Writing + Attach
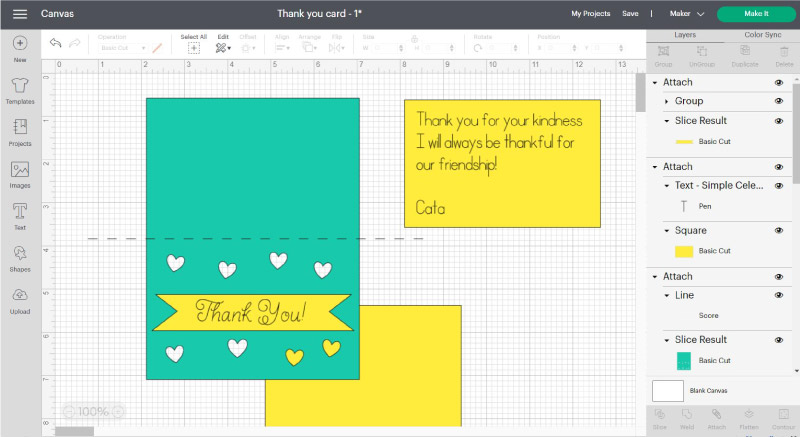
Besides the “Thank You” line and other yellow elements, I added an exact copy of the yellow square and typed some text to make my card extra cute.
I used Hopeless Romantic for Thank you and simple celebrations for the paragraph. Both fonts are in Writing mode as a Font Style.
Before sending your project to be cut, we need to make two attachments. First, we will attach the writing with all of the yellow pieces, and then we will be attaching the teal card with the scoring line!
Step 4 – Cut and Assemble
I won’t go into details of how to cut again because I just described the process of using the “Print then Cut” method.
However, I do want to teach you something different. As you can see on the following screenshot, there are two mats (yellow and teal). But for each color, we will be using a different material as well!
Yellow is for regular cardstock, and teal will be corrugated paper, and since I am a little rebel sometimes, instead of teal, I used purple color in real life.
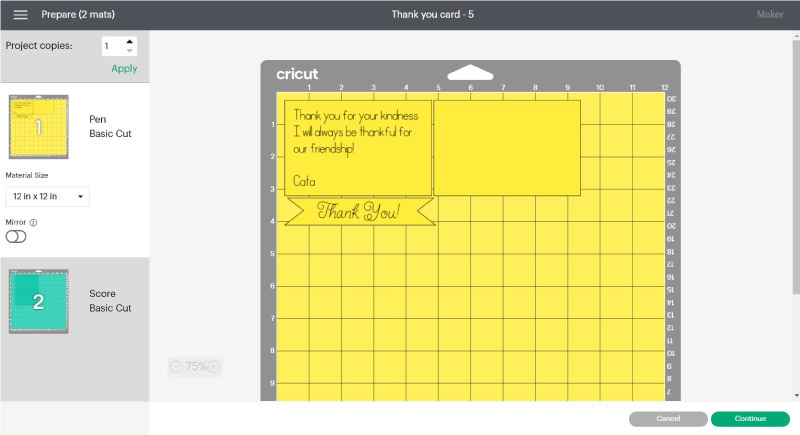
Once you are done cutting the first mat, you have to CHANGE the material for corrugated paper!
Once you are done cutting all of the pieces, it’s time for you to assemble the card. Always use high-quality glue. Otherwise, the paper can get wet and bubbly when it dries.
Glue the thank you note to the top of the card and both of the yellow square pieces inside the card.
Tip: I used some of the cut out hears to decorate my card a little bit extra
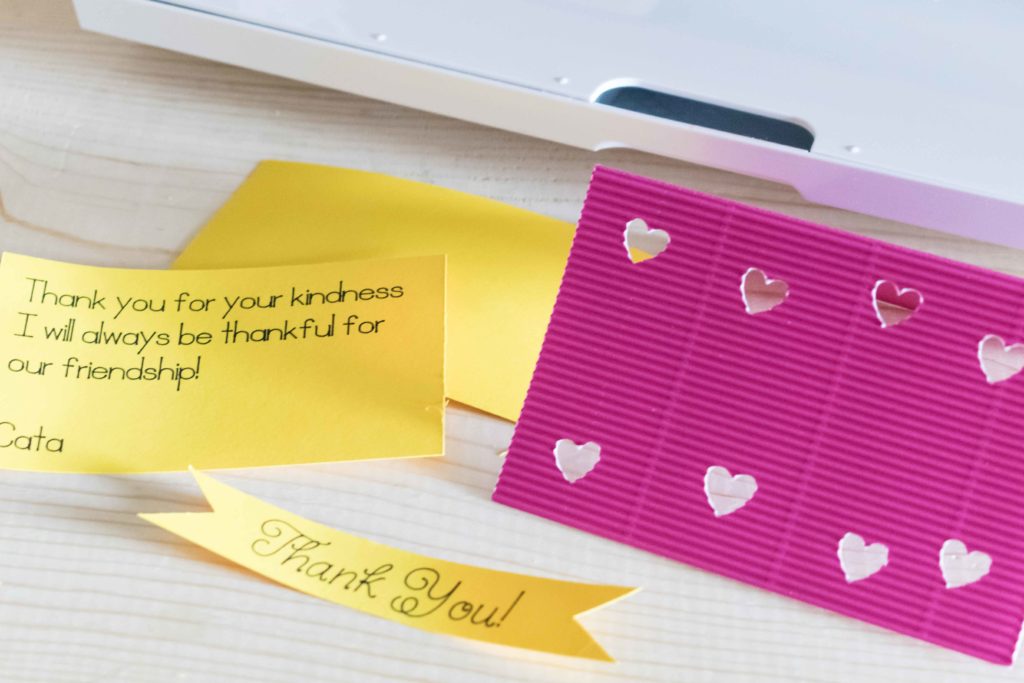
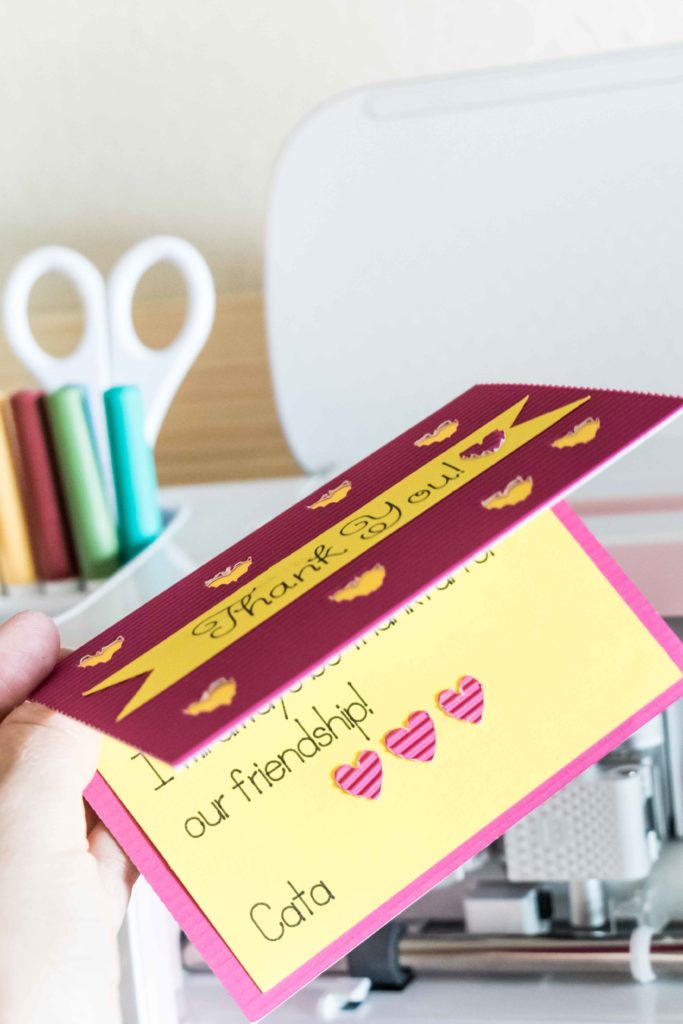
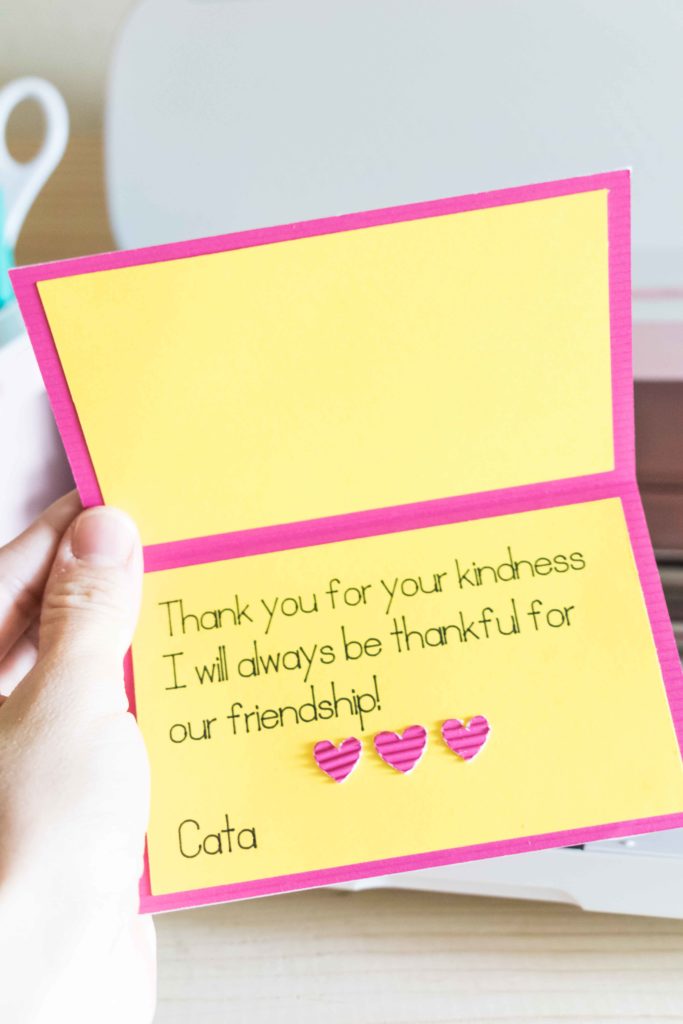
There you have it, a beautiful cut out card!
You are now a PRO at making Cards!
If you followed along with this post, I am sure that you are ready to make any card for any occasion with a little bit of extra creativity on your part and some trial and error.
Think big. You got this. I am here to cheer you up along the way!
Oh!
Just so you know, I also have a library full of free SVG files and Printables for all my subscribers, a.k.a. Daydreamers. You can see a preview right here or get access by filling out this form.


Thank you so much for this wonderful and easy to follow tutorial! You saved my project 🙂
Thank you thank you! I followed your steps to make my first two cards! One is a heart, the other a rounded rectangle.
I’m having an issue I hope you can help with, though. I selected an image (in this case, a US flag) from the Cricut Design Space that is for Print Then Cut. I want to use it to make a card, with that as the front flap and just a plain white rectangle as the other side/back. But of course, when I go to weld them, it makes them all one color. Is there a way to make a card like that?? 🙁 Thanks so much.
Don’t use weld. You must flatten 🙂
@Catalina, It worked!! Thanks so much! I can make my own cards to send to deployed soldiers now. Yay!
@Catalina, I’m so frustrated! LOL That one worked. I’ve done several others now too. But I am hopelessly stuck on one that I can NOT get to work. I don’t know what I’m doing wrong!
okay so I’ve been DESPERATELY trying to figure out something about the pens and the print then cut option and I’m almost to the point of not even trying to ask anyone else to figure it out lol, And I’ll try explaining the best I can.. So you know how you can use the print then cut to make stickers, Well I don’t have a printer I can regularly use and my daughter has a sticker obsession & asks me to make some almost every other day so I was going to use the pens and sticker paper to just draw some that she could use with just the simple drawn image or color like a coloring page, But here is the problem I’m having with that, How do I get it to draw them on my sticker paper and then cut them out perfectly after like it does when you use print then cut usually? Literally the 1 thing I cannot do to save my life is cut anything remotely straight, Even using the paper trimmer, just won’t happen…But sorry for the story just wanted to make sure i explained it all to try and help you understand what I’m trying to explain lol. I haven’t been using my maker for long now so it’s all still so much to learn and remember, hopefully you can just give me a way to do it or even just an answer saying it’s not possible, thanks
Check out my Cricut pen tutorial, where I have a step-by-step project.
Thank you! Fabulous.
Thank you so much for all your amazing posts I am learning so much from them!
I am still stuck though 🙁 and wondered if you could help?
I am trying to do a logo for a t-shirt for my hubbys work, I’m trying to save on vinyl so doing a white logo onto a black shirt.
I have done a circle which I have sliced to hollow out giving me a white ring. I am writing inside the ring which I want to cut (hollow) out so the writing will actually be the black t-shirt rather than the vinyl(if that makes sense!). I have tried welding/slicing nothing seems to work.
If you can point me in the right direction/let me know if it is doable i would be sooo grateful
Shelley x
You need to use the offset tool to create an outline of the letters and then slice. I have a great tutorial that explains how to do this with text about halfway through the article.
@Catalina, Thankyou so much????
This looks like a great tutorial but it is very distracting having to deal with so many ads throughout the blog. Is there some way to get this information without the interruptions ? Thanks so much for the dedication to helping beginning crafters,
I know. Ads support the free content. I have an ebook that will teach you how to work on design space. Not necessarily how to make cards, but to master the software.
I love your blogs. thank you so much!
This is a great, clear Cricut tutorial! Thank you so much!
I have followed the instructions but can not seem to get it right. Not sure what I am doing wrong. I made my card template, added the scoring line and the hearts but when I try to weld the hearts it removes them and the slice option doesn’t ever become available. What am I doing wrong? Thanks.
Your hearts shouldn’t disappear after welding unless you’re selecting the card as well. First, weld the hearts, then select the hearts and the cards and click on Slice. I hope this helps!
Thank you for the card making tutorial. Very helpful
You’re very welcome.
I think your tutorial is the best I have read, and I have read many! Thank you. I want to use blank 5 x6.5 store bought cards. Would I choose a square from the image choices and size it to 10×7. I am still a bit confused about using my own cards! I have ruined quite a few already!
You can use your own cards of course. The designing process will be a little different than making a Card from scratch though! Hopefully, I will be able to write a tutorial about this soon!
this is a great tutorial! i would love to be able to print it for my reference book. If i can’t do that i will certainly bookmark!!
thanks so much!
Please print away 🙂 Don’t forget to return and see more tutorials 🙂
I want to thank you for your great tutorial. It has been so helpful and has taught me how to get started. It was exactly what I needed!
Very happy to hear!
Thank you! Your tutorial answered a lot of questions for me. And I was able to make two birthday cards after reading it. All the best to you!
This makes me very happy! 🙂
Try creating a rectangle – the same size as your card, create your text, and attach it to that rectangle where you would like it to be, (probably right side, part way down) then go ahead and send through the cricut. It will print the words, then just hit pause -before it begins to cut the rectangle out- , unload, and there you have it.
Thank you so much for this tutorial! I just got a Cricut Explorer Air 2 and have been trying to wrap my head around how to do this.. This just made my life SO mcuh easier! Thank you for this!
I am happy I can help! 🙂
Thank you for your tutorial! Is there a way to print a note on the inside of a card that you have already cut? I can’t seem to find what I need to do to get the print stay in the right spot? I’ve attached and welded but those aren’t working. I didn’t really want to have to print on another piece of paper and then glue it to the inside. Thank you!
Hi Jeni. Printers move the paper a little bit every time you print something. I Have a cheap printer and I haven’t been able to do this. Maybe if you take both copies to Office Depot?
And making graduation invitations that are already pre-cut. So how do I just write on them and not have them sent to the printer?
If they are pre-cut, just write the text (measure the area where you want to write on your physical card), resize it, and make sure that you place the text on your mat preview, where you want to write. Take your time, so you don’t ruin your materials.
Sometimes you may have to write on card on your own, just so you can look at the logic of where the text is going. Use the numbers on your Cricut Mat, so you can get an idea of where the text needs to go.
I just came across this and really like the way your tutorial goes from simple to more complicated and each part builds on the parts before it. It makes it very easy to learn for me, because that’s the way I approach learning, from basic to more advanced, step by step. I’ll be following you and looking for more tutorials like this, and thank you for making Cricut projects fun and easier to do.
I am so happy you are learning! I think the best way to learn is from simple to complex too!
I am a visual learner and your step by step instructions will have me using my cricut explorer air more thank you so much
So happy to hear my tutorials are helping you!
I have a lot of pre-sized cards. Can I use them on the Cricut Explore or does it want to cut the card size every time? It seems such a waste of card at the moment. I am using A4 card (US Letter size) and the machine cuts them down every time wasting card and making the cards smaller than I require.
Hi Dorca, I hear what you’re saying. Design everything in Design Space (including the card), then when you are done delete (or hide) the layer that represents the card and send your project to cut. Place your card and cut in a way that everything will be matching.
When you work like this. You can’t slice against the card. You can to place the elements on top. The card in Design Space will be more of a template. I hope this makes sense!
Have a great day!
This is by far the best tutorial I have read!! You totally wrote this on my learning style method. You made me understand every step. I want to thank you for this. A lot of tutorials I find to completely understand the whole concept and have to do trial and error as I am a hands on learner usually. Excellent job! ❤️?
Thank you! You’re welcome 🙂
Maybe i have missed this, but i am looking for instructions on how to size cards and envelopes that are part of a cartridge. I cant seem to figure out how to make then in a 4.25 x 5.5 or a 5 x 7 card. I am completely lost. If i size it the size I want it is too big. Is I cut it as it is when i bring it in to Design Shape, it is too small. I have many Anna Griffin multiple layer cards and I really want to use quite a few of them. Do you have instructions for this?
Your instructions are wonderful and well written. Did I just miss the ones on this topic?
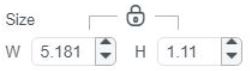
Hi Linda, I see what you mean. If the Card is bigger than 11.5 x 11.5 Cricut will make the file smaller on the canvas. In this tutorial, I explain that if you want a 5×7 card you will need a 12×24 mat. If you have one, and Design Space still makes your Card smaller when you add it to the canvas, resize it again to your needs.
I hope this helps.
Actually, a 5×7 card would only need to be 10×7. There’s no need to fold it in both directions!
Thank you!!! Lol it makes sense! Will correct the article!
I wanted to make my first card tonight and I had no idea where to start. Your tutorial was detailed and easy to follow and my heart card turned out great! Thank you!
That’s amazing Jessie, I am glad I was able to help!
Hi Catalina, i was so excited to see your post on Pinterest, i loved your tutorial, i have had all the cricut’s since they have come out. the only one that i do not have is the cricut maker. How does the maker compare to the cricut explorer air before the maker? the reason i am asking is do you think the maker is worth paying for it? the other reason i am excited when i saw your post, is when you said that you are a follower of the only true God, i am also a follower of God. you don’t see or hear of others who believe in God actually tell others that they are followers of God also.
Hi Tami!
I am really to happy see that my post was helpful to you! I always like to glorify God, and this blog means nothing, if people can’t see HIM through all I write! Regarding your question I have a whole article that answers it. I am sure you will know if you need it or not. https://www.daydreamintoreality.com/cricut-maker-vs-cricut-explore-air-2/
I saw you posted, other info, I had to remove because I want to protect your privacy! Have a lovely night 🙂
Hi Catalina,
I will be buying a explore air 2. This will be a Great sacrifice for me because of the price. Do any of your bloods or tutorials give advice on what essentials are necessary for someone who will be use the machine mostly for card making? My budget doesn’t allow for other tools right now.
Thank You, I will be subscribing.
Hi Yvette! Check out my Materials and Accessories article. I give some examples of what people need regarding their hobbies or professions.
Have a great day!
I really like your step by step instructions. I can’t wait to try this.
It makes me really happy that you like my tutorials! Can’t wait for you to try this one!