Hello Daydreamers!
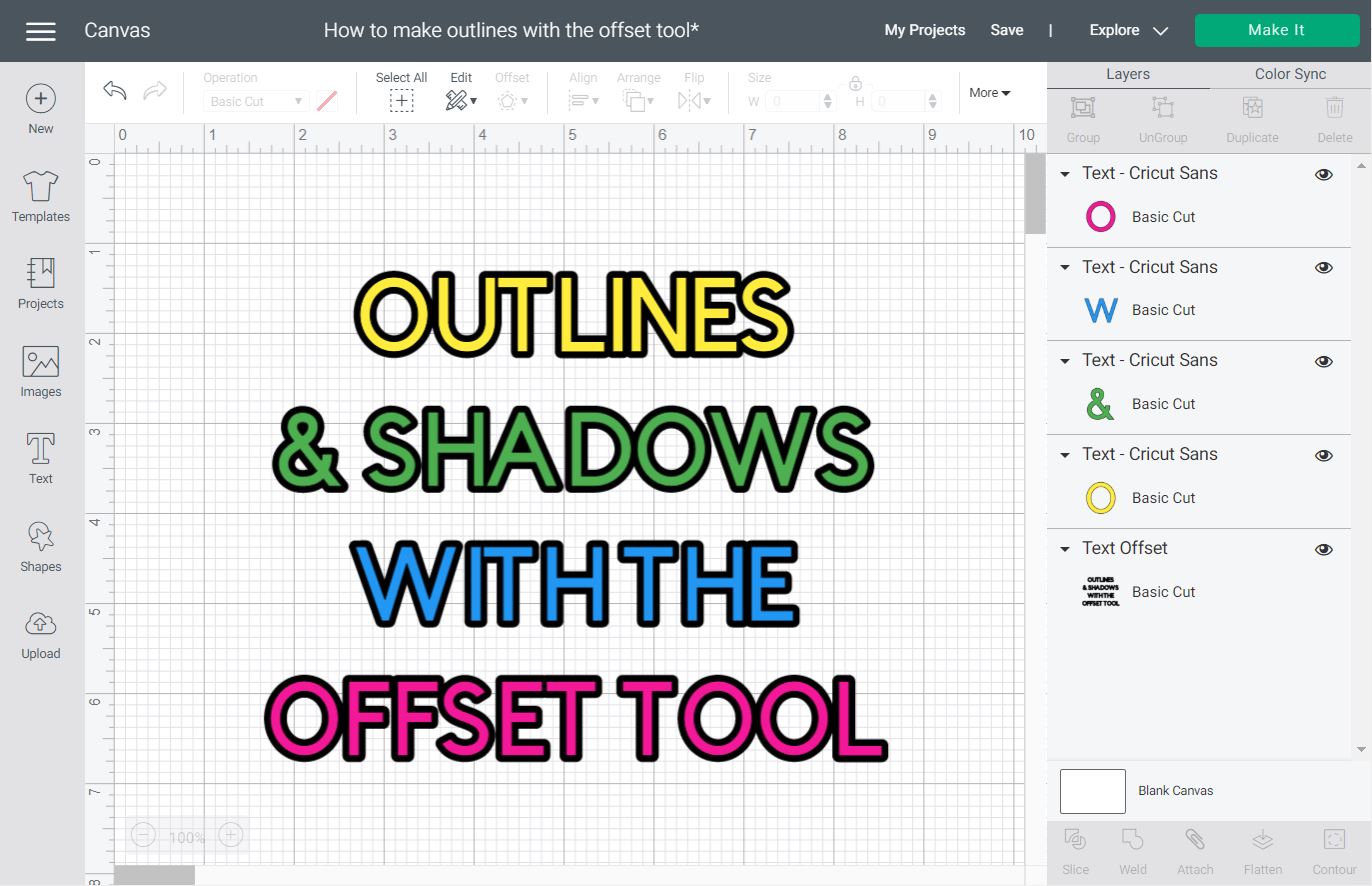
In today’s tutorial, you’re going to learn how to make outlines, shadows, and borders in Cricut Design Space with the “Offset” tool.
After many years of asking for this feature Cricut has finally released a way for us to make beautiful outlines in Cricut Design Space without having to go to other programs like Illustrator and Inkscape.
Important: this article has been completely updated to reflect the changes made by Cricut in March 2021. Therefore, all information and images will be different than what you may see on Pinterest, Youtube, or IG.
In a nutshell, these are topics I will be covering in this post.
- What is offset in Cricut Design Space
- System requirements to use the offset tool
- Overview of the offset tool
- How to make outlines for text when you want to cut and write
- Making outlines and using offset on images
- Using offset on shapes
- Fixing offset
- Project ideas using offset tool
- FAQ
Tip: This tutorial builds upon the skills I teach in every step. If you’re just starting with your machine, I suggest you read and follow each step.
What is Offset in Cricut Design Space
Offset, in Cricut Design Space, is a tool that allows you to create a proportional outline inside and outside of text, images, and shapes.
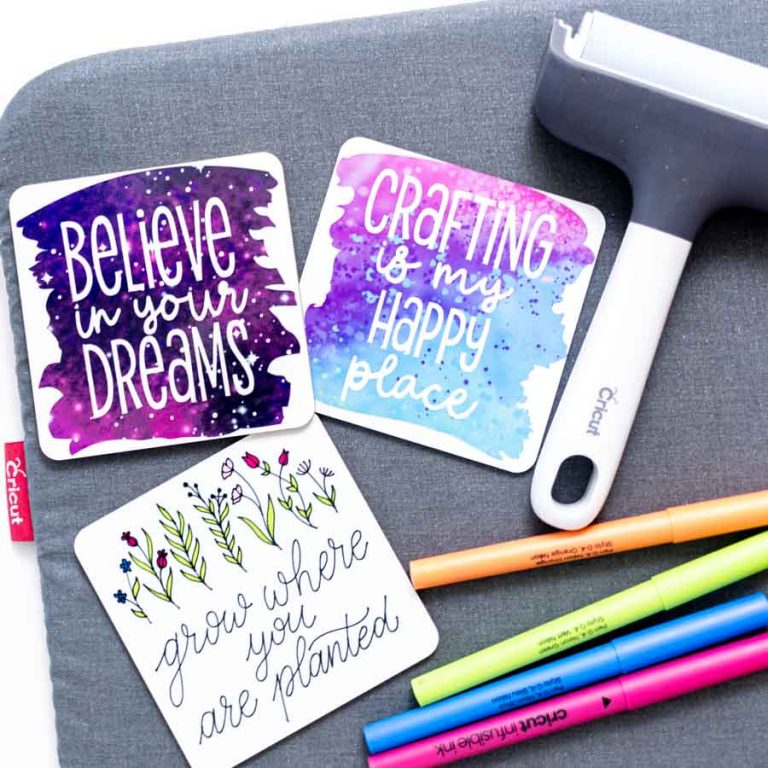
The offset tool is quite handy when you need to make projects like stickers, cake toppers, or any other design you may want to add a “stand-out” effect.
System Requirements to Use the Offset Tool in Cricut Design Space
The offset tool will only work on computers that run Windows 10 (64-bit only) and higher and macOS 10.15 and higher. If your computer is 6+ years, you may need to upgrade to Windows 10 or macOS 10.15.
If, for some reason, you can’t upgrade your operative system, here’s a PDF of the tutorial I used to have in this blog post when Cricut didn’t have the offset tool.
I like to keep all content updated because I don’t want people to try something the hard and old way.
Offset Overview
The “Offset” feature is located on the top menu next to “Edit” and “Align.” To active it, you need to place and select on the canvas area.
The offset tool will work with PNG, JPEG, and SVG files; however, there are limitations when you use images that don’t have a clear or continuous path. You’ll see more of this in this tutorial.
When you click on the offset tool, you will a couple of options, and although I’ll walk you through every single one, the best way to learn them is by playing with all of the options. Don’t worry; your laptop isn’t going to break!
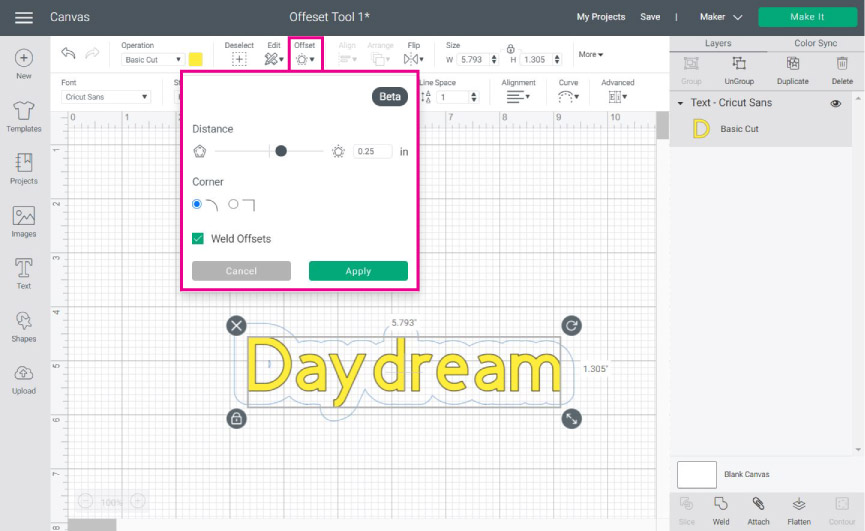
Whenever you click on the offset tool you will see a light blue outline on the shape or text you are selecting on the canvas. For the changes to take effect you always need to press “Apply.”
Once you press apply you can’t modify the features of the outline, if you want a bigger or smaller one, you can easily repeat the process.
Every time you set new settings, Design Space will remember the one you last used. This is very useful because you want your projects to look uniform. If you’re working with different offset distances, make sure to have a little note next to you where you take note of that because the program won’t remember it.
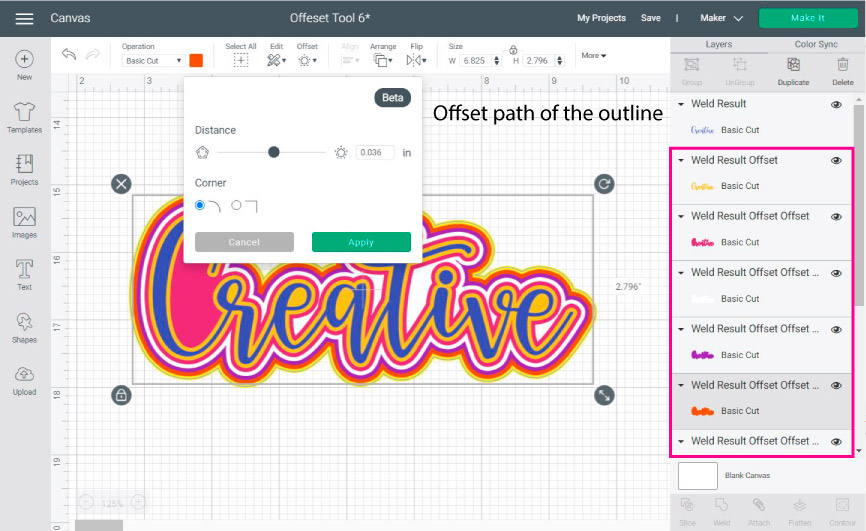
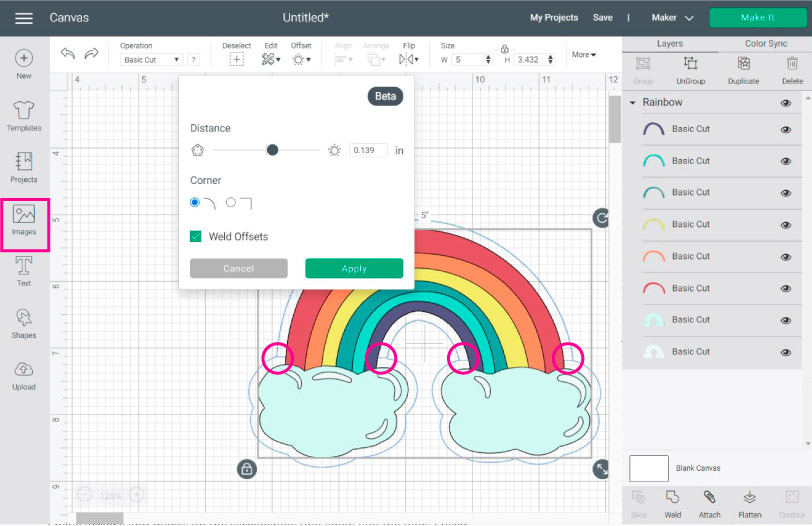
Distance
Distance will determine how big the offset will be.
The max distance you can apply is 1 inch in both directions. If you move it to the left, you’ll make an inline, and if you move it to the right, you’ll make an outline.
Moving the distance to the left may create undesirable results, but there are cases, especially when using shapes, where you may want to use it.
Check out the following graphic so you conceptualize distance.
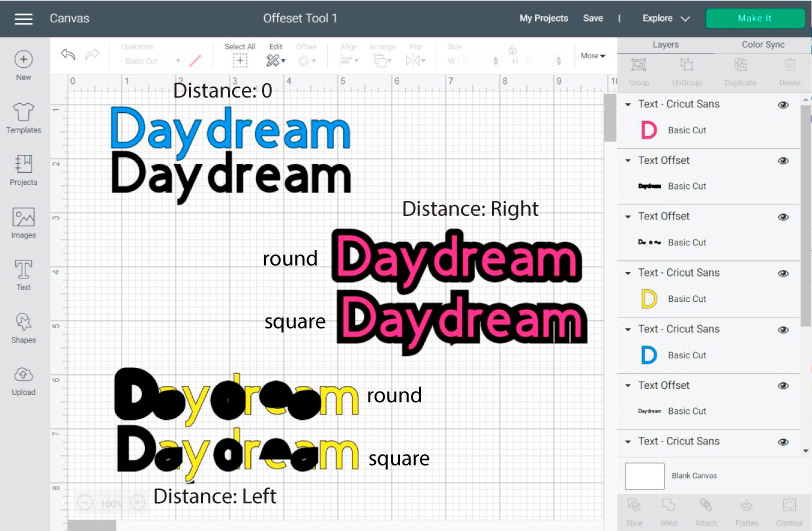
When you leave distance and 0 and click on “Apply.” you’ll have a copy of your design. Now check out the huge difference between the right and left distance when using text.
This features may be corrected as the offset tool leaves the “Beta” version.
Corner
You can choose between round and square corners when making a design. I usually use the round option because it generates a better result.
If your designs have sharp and acute angles when you use the square corner option on large distances, your design may get quite distorted. This also happens to me in Adobe Illustrator, but there’s an option called “Miter” to get those angles under control.
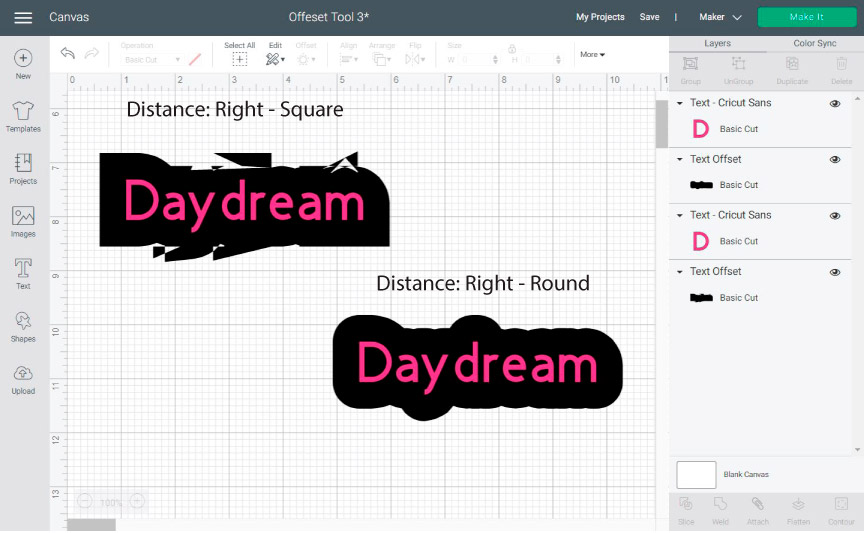
However, when you use the round corner, 99.9% of the time you’ll have a beautiful and smooth outlines.
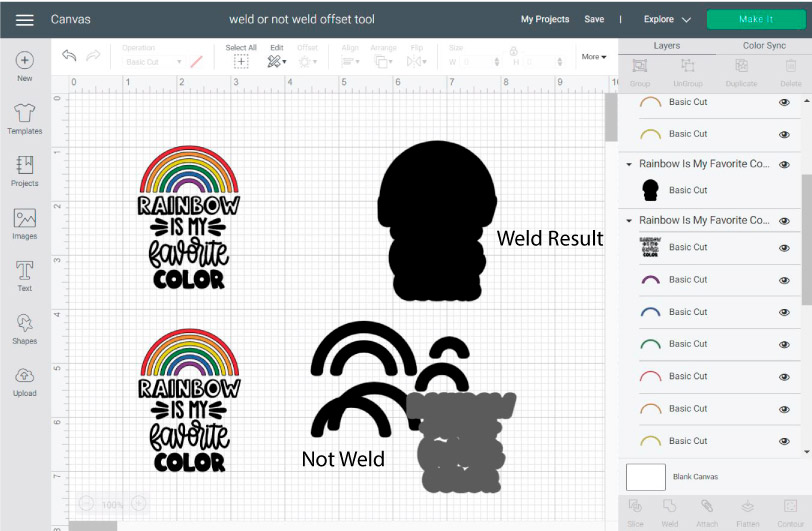
Weld Offsets
Something really cool about making outlines in design space is that you can use the offset tool on images that have multiple layers.
If you want your design to have a single outline check the option “Weld Offsets” and if you want the outline of every single detail of your multi-layer design, uncheck the option.
Now that you know an overview of how this tool works let’s have some fun using text, and other features of Cricut Design Space.
Using Offset with Text
Using offset with text will allow you to make multiple effects out of a single word.
For the next screenshot, I used the cursive font “Vanilla Cream” and typed the word “Creative” then, I fixed the spacing by ungrouping to letters, overlapping each letter, and welding.
If the last paragraph sounded like Chinese to you, check out my how-to edit text in Cricut Design Space for a step-by-step tutorial on how to fix cursive fonts and other cool things you can do with text with your Cricut.
Ready for the cool part?
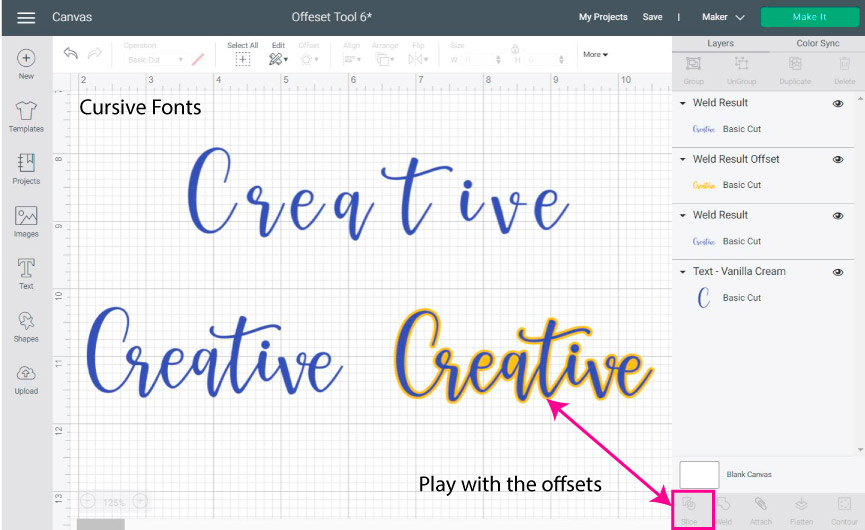
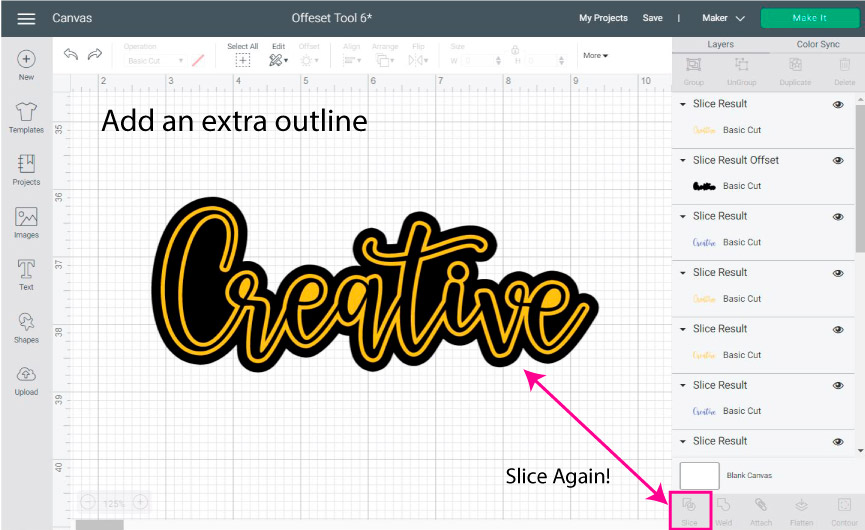
First I added a small border with the offset tool, then I selected the outlines and the fixed cursive font and clicked on “Slice” located at the bottom of the layers panel an voila!
Do you see the cool new design?
By only slicing you can create a new different effect.
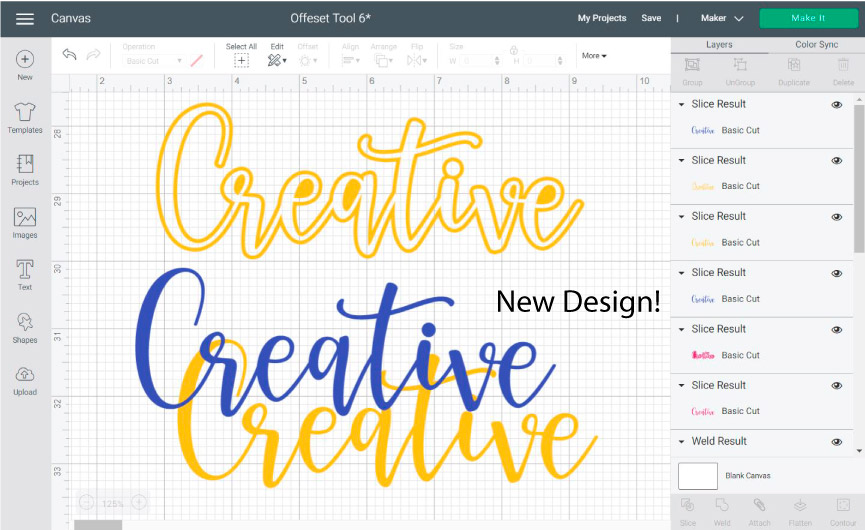
You can also make multiple outlines with the offset tool!
Why make just one, when you can me two, or three different borders. These borders bring a stand-out element that a regular font, just can’t provide.
You want your design to be different, and this is how you can achieve them.
To make multiple outlines, start with the initial design, in this case the “Creative” word, then click on offset to make your first outline, then select the outline, and click on offset to to make a second outline with the same settings.
I recommend you use the same settings so everything is uniform.
Note: Outlines will be black or grey depending on the color you’re using. If your color is black, your outline will be grey and if your colors is black (or any other color, as far as I tested) the border color will be grey.
But wait, there is more (read in informercial voice)
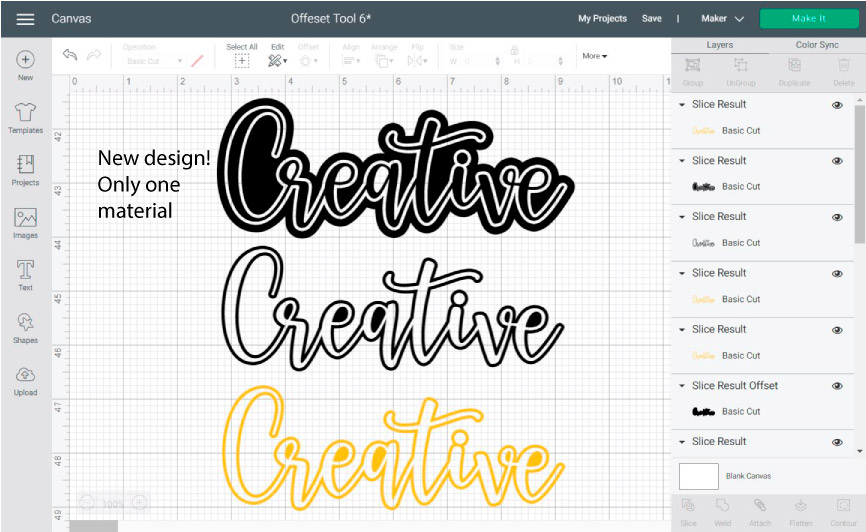
You can use “Slice” all over and over to make different designs. Remember the one we made before the multiple outlines? What if we make a new offset?
I just love the way it looks so much!
The yellow and the black represent two different materials or colors, so if you were going to make a t-shirt with iron-on you would need to cut two different colors and then layer them up.
But, what if your t-shirt has a beautiful color and you want your design to showcase that.
You can slice again and have your new design and let the background color of your material showcase that.
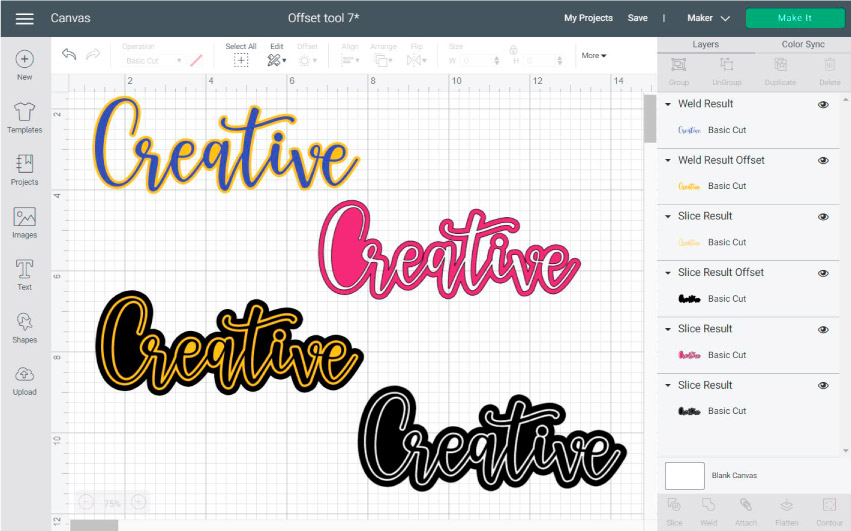
Just to recap!
With a single word we were able to create four different designs.
Isn’t that amazing?
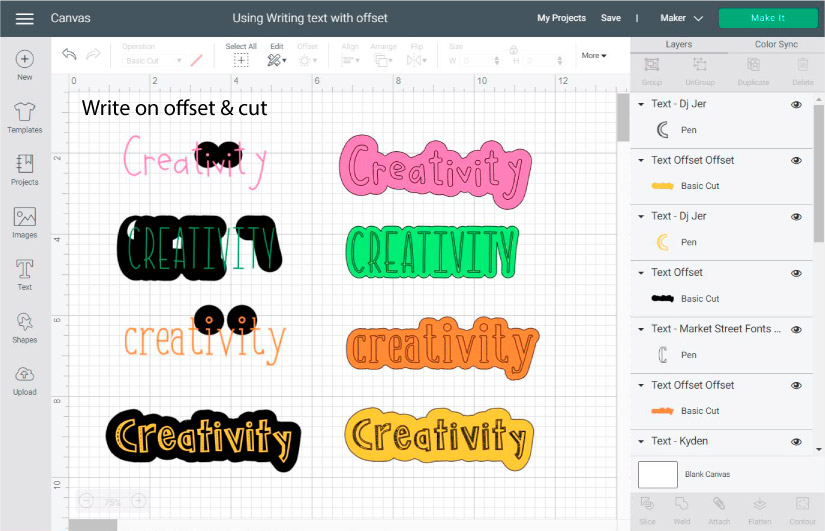
Using the Offset tool with Writing Text
If you are into scrapbooking or card making, I am sure you’ll want to use Cricut Pens with the offset tool.
There are some fonts in the Cricut world that when you finish your project look like you wrote on the paper. These are called “Writing fonts.”
To find writing fonts you need to place text on the canvas area, select it, and go to the top menu and find a font that has a writing style.
You can also filter them and choose writing.
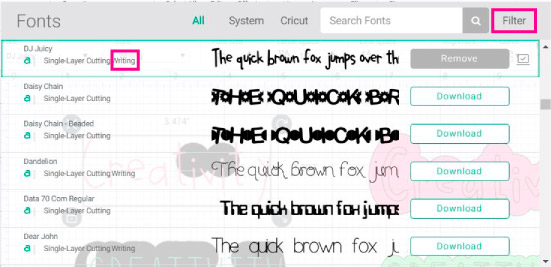
The offset tool doesn’t work very well when you use writing fonts.
Let’s take a look of the following screenshot.
With the exception of the last font (DJ Jer), every time I tried to offset path, it didn’t work at all!
You don’t have to give up, though!
On the right side of the canvas, you’ll see that instead of using the “Writing Style,” I used the “Regular Style, and I changed the operation from “Cut” to “Pen.” and had great results using the offset path tool.
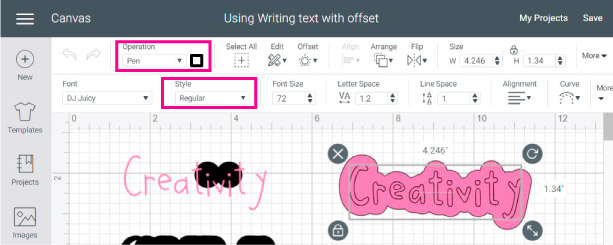
If you really want the “Writing” style, after you make the offset you can change the font type from regular to writing again and resize it to fit the outline.
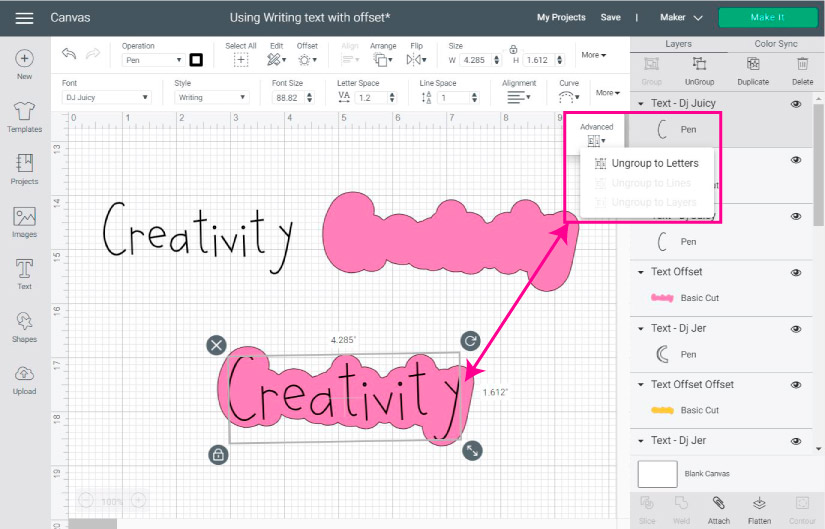
If resizing the font is not working very well you can ungroup each letter and do your best to fit inside the offset.
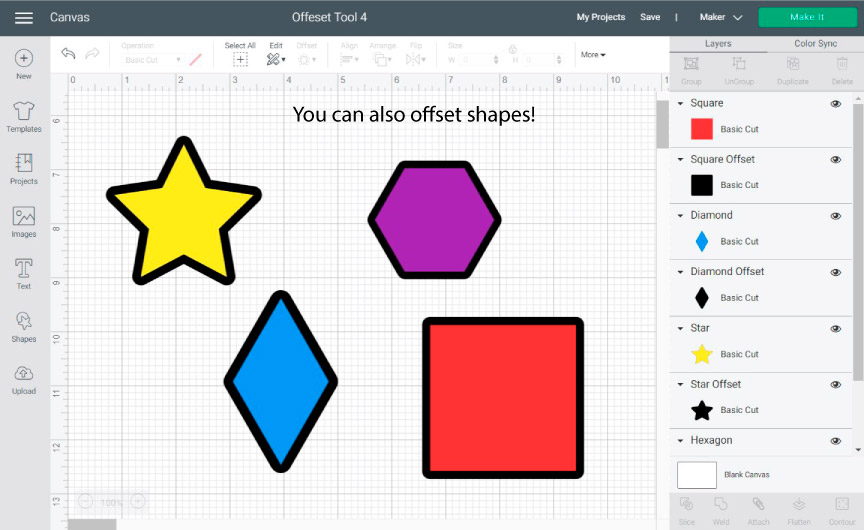
Making Outlines for Shapes
You can also make outlines for shapes!
If you use a rounded corner, you can make rounded shapes. There was no way to do this before!
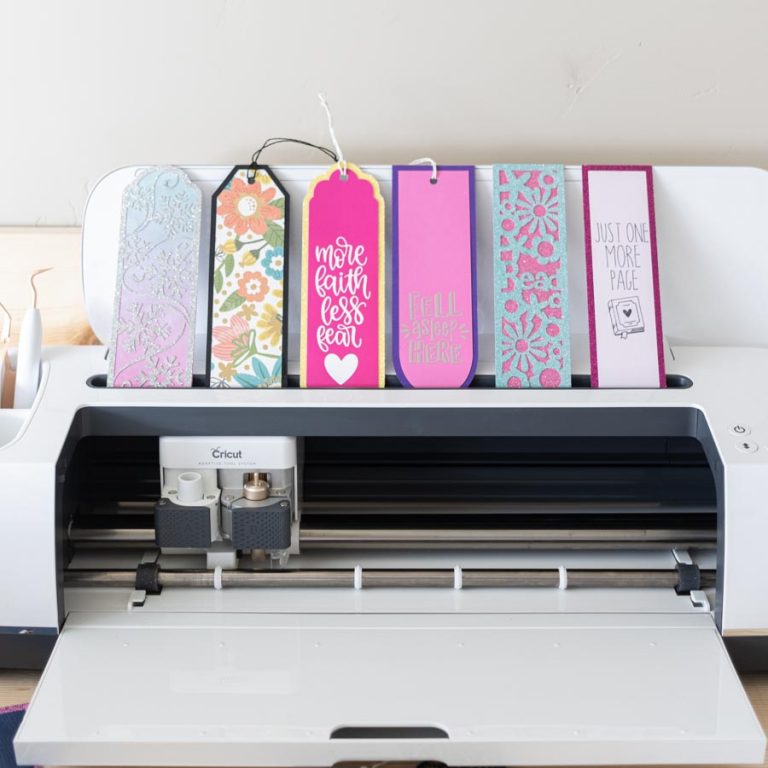
You can get very creative with shapes and the offset tool to make cards, bookmarks, even seam allowances if you’re into sewing!
Here’s an example of how “negative distances” can make an inline.
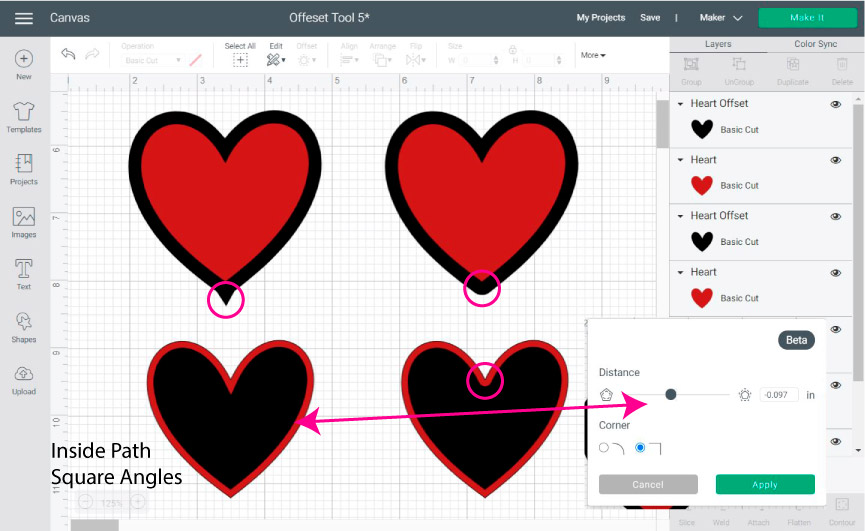
When I tried to make an outline of the heart, the angle at the bottom looked quite distorted, but and since I still wanted to keep the sharpness, I tried making an inline and it worked beautifully.
Again, you just have to play around to find what you like best.
Making Outlines with Images
Try to make outlines with images too!
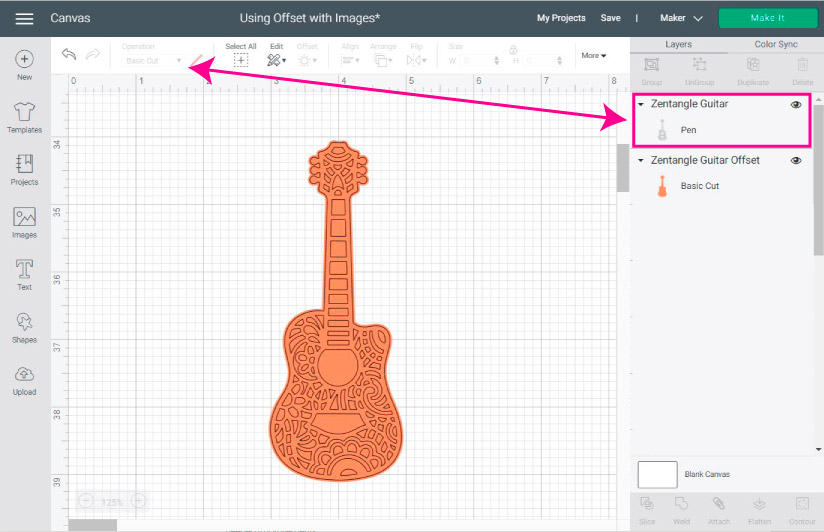
You can use your own images of SVG files you find online. But for this tutorial, I used a guitar from “Cricut Access.” I made a tiny outline and noticed all the little holes the outline has?
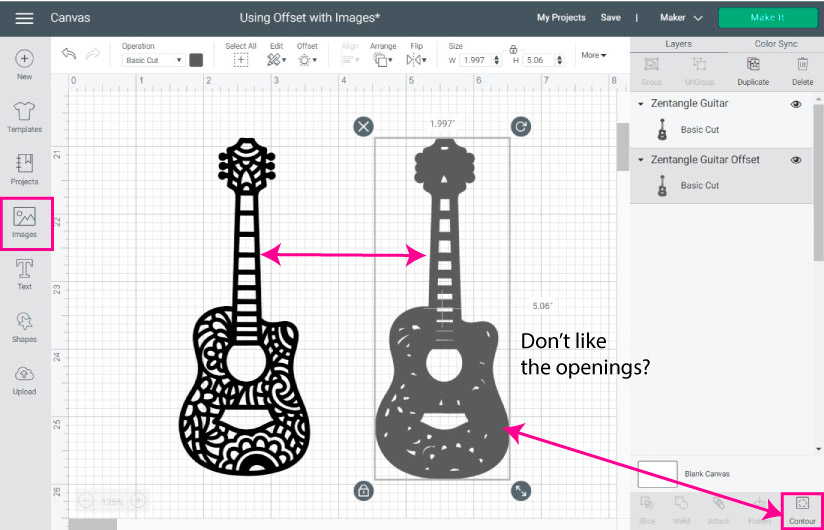
If you don’t like those openings, you can remove them very easily.
Select the offset path on the canvas and click on the “Contour” tool located at the Layers panel’s bottom.
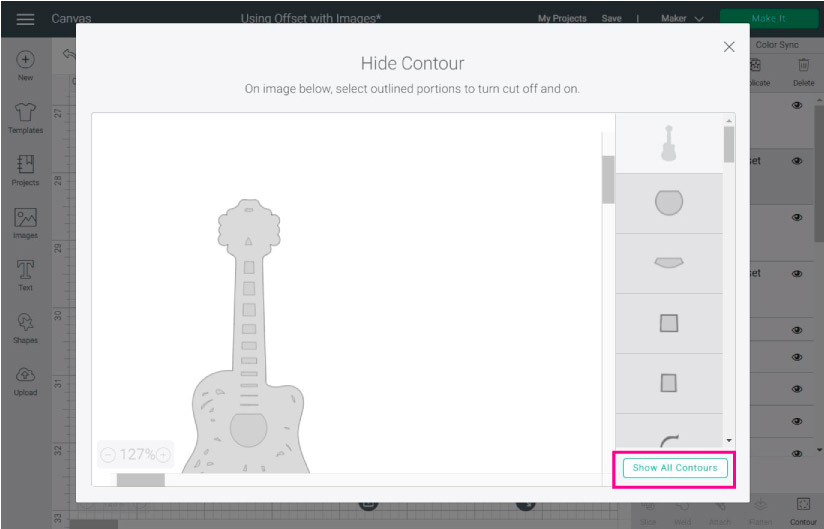
A small window will open where you can hide those spaces. If you want to hide them all you can click on “Hide All Contours” and close the window.
You see!
There’s no more openings!
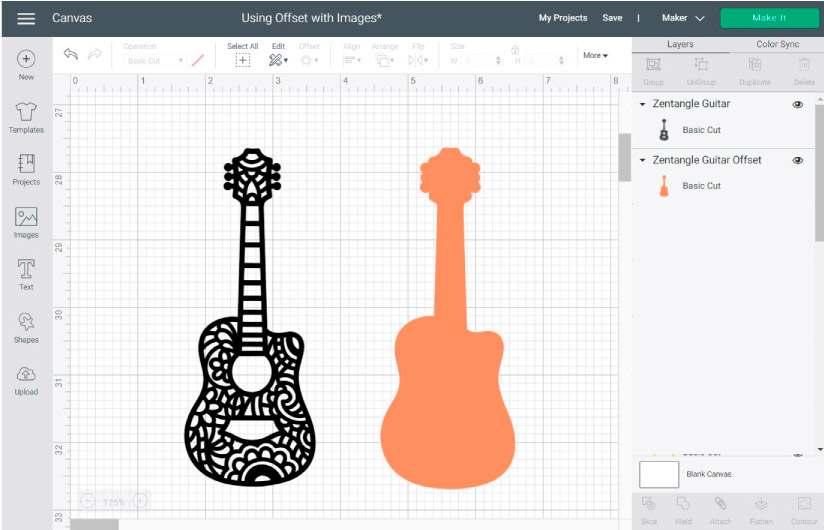
You can also change the “Operation” of the main image from “Basic Cut” to pen and place it on top of the offset. If you have a friend that loves guitars or is a musician, you can use this design as a gift tag, sticker, etc.
Fixing Offset Tool in Cricut Design Space
As I mentioned before, when you make an offset you see a preview on the canvas areas.
There are some images that will not work well, even if they seem they could. This may be corrected as the offset tool gets improved.
But in the meantime, I want you to be able to use any image your heart desires!
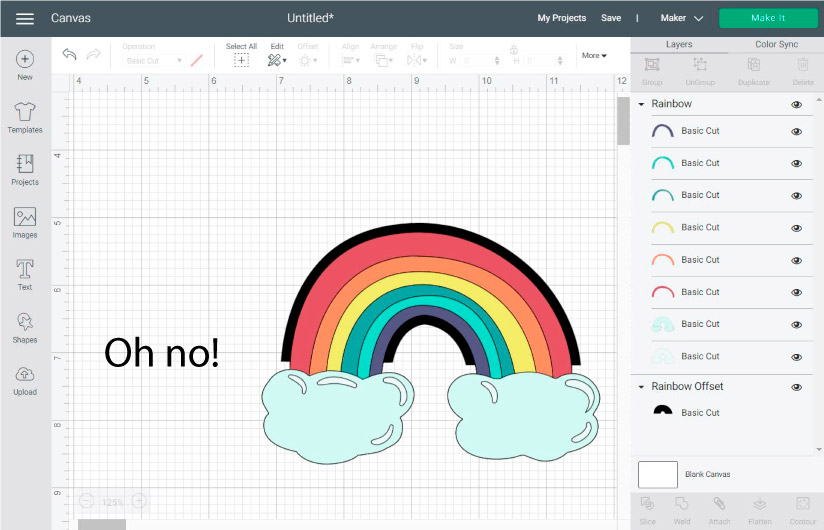
Look at the following screenshot.
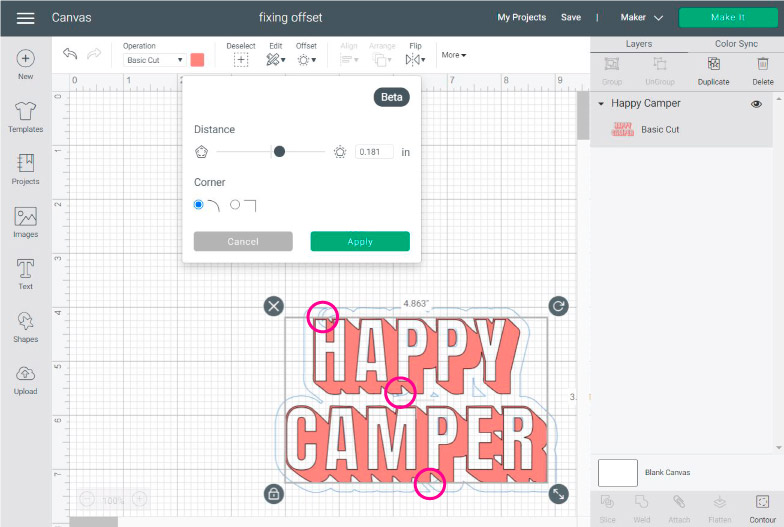
There are some areas where the offset will look so glitchy and weird.
When I clicked on “Apply.”
This is how it looked!
Terrible!
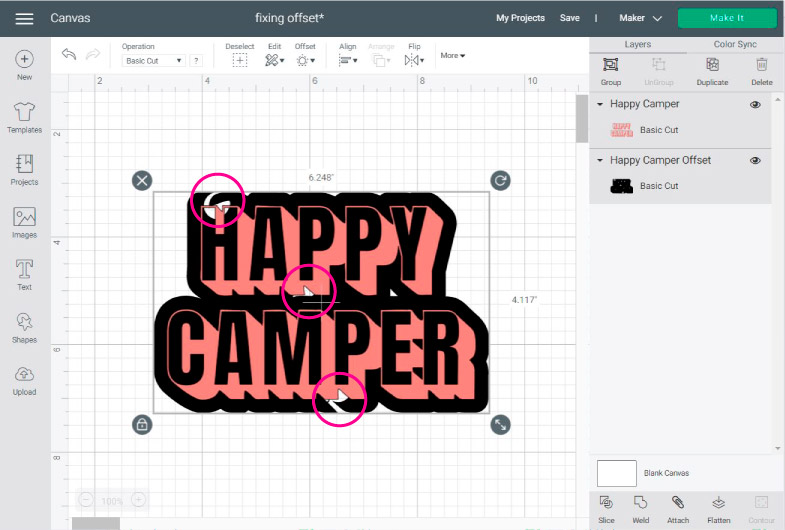
You can use another image, of course!
But you can also fix that outline.
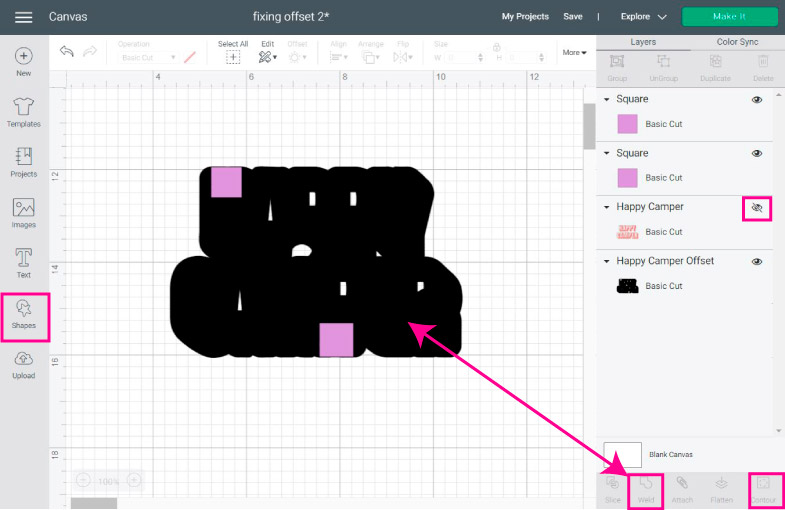
First, hide the main design layer, add two squares, and resize them to fit the odd spots. I used squares, but you may need circles, triangles, or hearts.
Then select the shapes and the outline and click on “Weld” located at the bottom of the Layers panel to merge them into the outline.
Use contour to hide all the other spots if you want your outline without openings. Finally, make the original design visible again, and your shadow is ready to go!

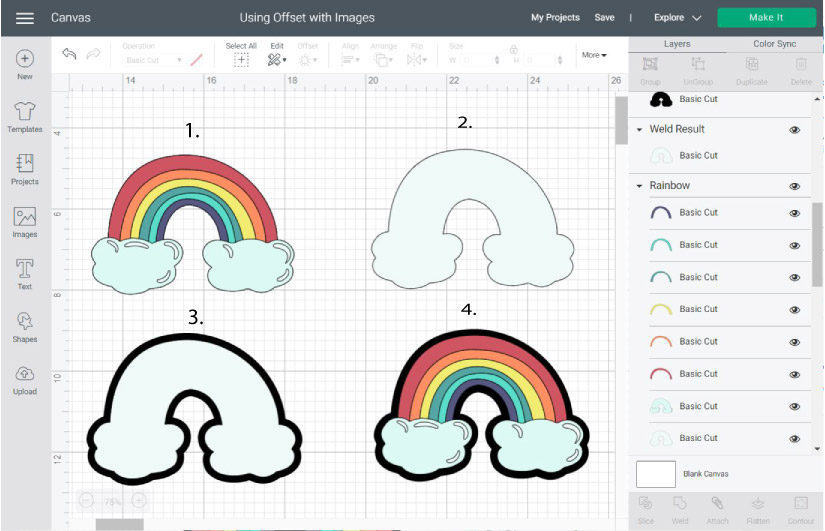
Here’s another case where the offset tool was a little glitchy when using a multi-layer image from Design Space, and this is how I went around it.
Tip: This error may happen when you have shapes and elements of different colors that overlap each other.
It always starts with the preview; whenever you see crossing lines inside the path and click on “Apply,” you will have a faulty outline.
You can fix this very easily!
- Step 1: Make a copy of the multi-layered image you want to use.
- Step 2: Select all the layers of the copy and click on “Weld.”
- Step 3: Use the offset tool on the image you just welded.
- Step 4: Delete welded image and bring and center the multi-layer image on top of the outline.
FAQ
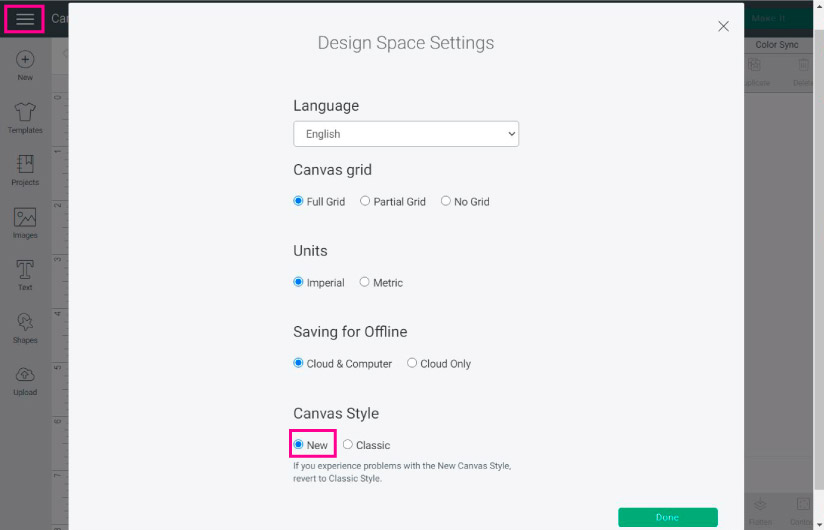
I can’t find the Offset Tool
Remember the requirements you need for the offset tool to work. If your PC meets those requirements, you need to click on the toggle menu on the upper-right corner of Design Space, select settings, and change the “Canvas Style” from “Classic” to “New.”
Can I use the Offset tool on the Cricut App?
At this moment the offset tool can only be used on Desktop computers.
How can I make a larger offset?
The maximum size (or distance) you can use for offset is only 1 inch. If you need a larger shadow, create the first offset and then select it from the canvas and use it as a reference to make a larger outline.


Catalina: this is a great tutorial. Is there a way to print a pdf of this?
When I make a print then cut sticker using the offset tool and a white offset the blue outlines are also printed . How do i fix that ?
It must be a glitch. I don’t know why this would happen.
This is amazing, thank you so much!
Hola, acabo de ver tu tutorial y es genial, te felicito y agradezco sinceraste te preocupes por nosotras las novatas en este hermoso arte del mundo de cricut, me pregunto si tendrás este mismo tutorial en español, quedo muy agradecida contigo.
No tengo my blog en español 🙁
Puedes utilizar el traductor de Google.
When you were describing how to do the offset, how did you make them colored?
Select the offset, then on the little color box next to “Operation” on the top panel of the canvas area, select the color you want.
This is great info! Is there a way to take letters in a word that are spaced apart and offset the letters individually? Can I then cut them all together as one word and not lots of pieces. I’m trying to use HTV for a tee and the letters are cutting out separately. Any help appreciated.
Yes. You need to choose “weld offsets” also for the original design make sure is welded as well.
Hi Catalina,
Thank you for the tutorial. I’m making family birthday t-shirts and I want to use htv. I’m just printing Dad for example and I wanted an outline around it. I’m having trouble figuring out in my mind how it will cut. I don’t want to waste my htv. Can you tell how how it will work with cutting htv? It looks nice on the computer screen. I just want the word dad in one color and the outline in a different color. Can you help me please?
Thank you
Carol
You need to cut different layers. I have a tutorial that covers how to work with iron-on to perfection and it has a section that teaches how to layer HTV.
I am using an image and want to do an outline with the material behind showing through. My “slice” option is grayed out and unvailable. Any suggestions?
You need to select the outline and the design you want to cut out at the same time to turn on slice.
Merci beaucoup pour ce tutorial très utile ! Je vais vite m’entrainer.
You’re welcome! 🙂
Thank you so much for this tutorial!!!
Note for troubleshooting, I wasn’t able to always select the top element. With the SVG I had to make sure to select the element with “xmlns” in it for the changes to take effect.
I’ve always wondered how to do this, thanks a million!
You’re very welcome 🙂
Seguiré editando en Sillouette y cortando con La Maker, el software necesita una actualizacion con urgencia
Estoy de acuerdo 🙂
Thank you for figuring this out. It’s too bad that you had to spend so much time on this because this is a basic function that should be built into design space. I have a Pazzles machine as well, and it is just a click of a button to make a “mat” around text or an image. It has been maddening to me that we can’t do this in DS, so thank you for sharing this– much appreciated!
I agree. As much as I love Cricut I gotta tell you that their software needs extra love
Thank you! I was able to add an outline to my svg, just like I needed.
I am happy to hear!
On my ipad, I just import a new image, delete what I want to go away and save the images in various levels or background then add them all to the canvas. If you want to do that with Cricut images, just screenshot the image and clean it up.
You can do this too. I just prefer not to teach it that way because Cricut doesn’t have an option for you to save their images as JPEG and I feel a little bit weird teaching a workaround where people may use their images in ways they are not supposed to.
This is by far the most intelligent Cricut hack I’ve EVER seen! Thank you, I can’t tell you how many issues you’ve solved for me!
Yay! I am so happy to hear I was able to help!
I’m on a Mac and using Chrome following your Mr & Mrs Tutorial on your video. I’ve managed to add Stroke: Black and can see the black line around my shape. I then added Stroke-Width: 40 but the line does not change size. Really hoping this will work for me as your way seems to be the simplest way I have seen out there! Thanks for the video help and any other help you can give…. thanks!
I don’t why isn’t working for you. It should be adding an outline, I just checked. :/
This is absolutely helpful.
Thank you for the tutorial!
You’re very welcome 🙂
Thank you so much! I’m just wondering about printing. Will I have to print the colors individually and then layer it? Or is there a way I can print the image as is on one vinyl sheet.
if you have printable vinyl, you need to flatten and then print then cut. Read my tutorial if you aren’t very sure about it 🙂
Amazing and so creative, thank you!!!
You’re welcome 🙂
Thank you for this tutorial!!! I am working on my laptop (not Mac) and followed your instructions. I was good until I came to step 3. There was no Elements tab at the top showing. I have increased the window and still, no elements. My window shows Inspector, Console, Debugger, Network, Style Editor, Performance, Memory, Storage, Accessibility, What’s New…… what am I doing wrong!?
I think I found the reason. I was not in Chrome.
Great!
If it’s the first time opening the inspect element, the tab it’s at the bottom. You can also google how to open the inspect element on Desktop. I always see the Elements tab.
Hi there. Thank you so much for this! I knew there must be a way to get a background on anything. However I did everything you said and still can’t get the background. I’m going nuts trying to do this. Is there anyway you can offer any more assistance? I see the element.style and I’m able to type what you say but there is absolutely no change. Please, please, please help.
Are you using an SVG file? It has to be an SVG it can’t be a JPEG or PNG. On the “element.style” make sure you click on the design itself. You need to be selecting the first item on the right panel.
I hope this helps 🙂
This has been SO helpful in outlining text, but i’m stuck at the very beginning for creating an outline of an image. How do you contour the image in step 1? THANK YOU!
Hi Judy! Check out my contour tutorial!
Thanks soooo much for this detailed tutorial. I had been using Inkscape to do the same thing and found it tedious & a complicated. This works so well with SVG files. You have given me back countless hours that I can use making more projects. Thanks!!!
Yay! It makes me really happy to hear!
Hi Catalina, I am having trouble creating an outline for an svg file that I created in inkscape. This trick does not seem to be working on any of the lines I choose within the “inspect” screen. I have been successful with other svg files, just not this one. Any ideas what could be going wrong?
Hi Laura. I really wouldn’t know unless I had the file. If you have Inkscape there are really good tutorials for making outlines within that program itself.
Thank you SO much. I’m making dinosaur valentines for about 250 kids on my cricut, and I could not for the life of me figure out how to cut a background color for their dinos that was slightly bigger to be a nice border color… and this post SAVED me. Thank you!!!!!
Yay! So happy to hear 🙂
Thank you so much for this tutorial. Just thought I would mention though that the number for the kitty download is MC6A1442 and not as stated at the beginning.
You’re very welcome Arlene! That code is for a very similar kitty, but it’s not the one I used for the tutorial. It will look perfect as well, though!
Does this work with all fonts? I’ve tried with Kratos font and I cannot get the stroke:red or stroke-width to change.
Did you screenshot and converted the file to SVG? It has to be an SVG. Also, if you did, select the second element (not the first one) as it doesn’t work on the first one for some reason.
Please let me know if this helps. If you have some doubts, please check out my video where I show you how to it with fonts. And troubleshooting.
Thank you so much for this detailed walk through, very helpful! I’m trying to learn how to use a cut file, that I already had (for example when I purchase something printable from Etsy) it comes with two different files, the one to print and the one to cut ‘Printable A’ and then “Printable A, cut files’ both PNG. I can’t quite figure out how to merge them together to use the outline to cut when I’m printing. I believe that what you’ve mentioned above is very close to what I’m trying to learn how to do, can you please help?
Hi Cathleen, please check out my Print then Cut tutorial where I explain to you how to upload images. I hope this helps.
I LOVE LOVE LOVEEEE this! I love how you’re not afraid to open Dev Tools in the browser to manipulate the DOM (screen). As a female developer who LOVES her Cricut, this is AMAZING!! THANK YOU
Hy Krystle! I am so happy to see this comment. I use “Inspect Element” all the time to change colors and little details on my blog. I am not blessed to have a degree in computers, but I am learning little by little.
Who knew cricutters could benefit from that, right?
Hi Catalina, your tutorials are awesome. Was just wondering if you have a printable version of them. Thanks, Tracey
Hi Tracey, I don’t have them in printables, but an ebook is in the making!