Hello Daydreamers!
Have you ever wondered if you can cut laminated sheets with your Cricut machine and keep that beautifully outlined seal intact?
I am also a homeschooling mom, and the amount of laminating and cutting that’s coming my way is a lot; if you love Cricut and need to cut laminated sheets, you’re in the right spot!
Today I’ll present you with two different methods.
- Cutting laminated sheets from desktop – Compatible with the Maker, Explore 3, and Maker 3.
- Cutting using the Cricut app and SnapMat – Compatible with all machines except Joy.
This tutorial assumes you know how to “Print then Cut,” if you don’t know how to, make sure to check my fabulous guide.

Tip: This tutorial builds upon the skills I teach in every step. If you’re just starting with your machine, I suggest you read and follow each step.
Are you ready?
Let’s go ahead and get started!
Youtube Video!
Don’t forget to subscribe 🙂
Method 1 – Cutting Laminated Sheets from Desktop
This method isn’t compatible with older machines because we’ll be using “Print then Cut” with the laminated sheet, and as you know, these sheets are pretty reflective, and the sensor on older machines can’t read the project.
Important: this project won’t work if you send your project to cut from the phone app.
The idea behind this project is to make a “Print then Cut” layer for all the illustrations you want to laminate and a ‘Print then Cut” layer for cutting the laminated page using the sensor mark sheet of the first layer.
Both layers must be the exact size for this fantastic tip to work.
Let’s start with the following project in Design Space.
Tip: “PTC” stands for “Print then Cut.”
You can also use a PTC project of your own.
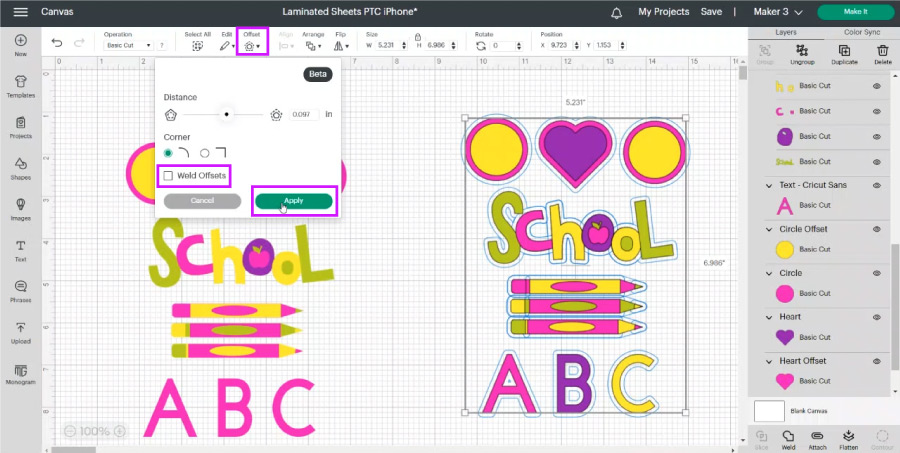
Select your flattened project on the canvas and click “Offset” on the top menu. Check “Weld Offsets” and slide the distance circle to form a small outline allowing some space between illustrations. Click “Apply.”

Move the outline to the side and check for undesirable openings.
For instance, the offset on the circles was glitchy with those cut-outs. Also, you may not want any extra cut-outs after you laminate.
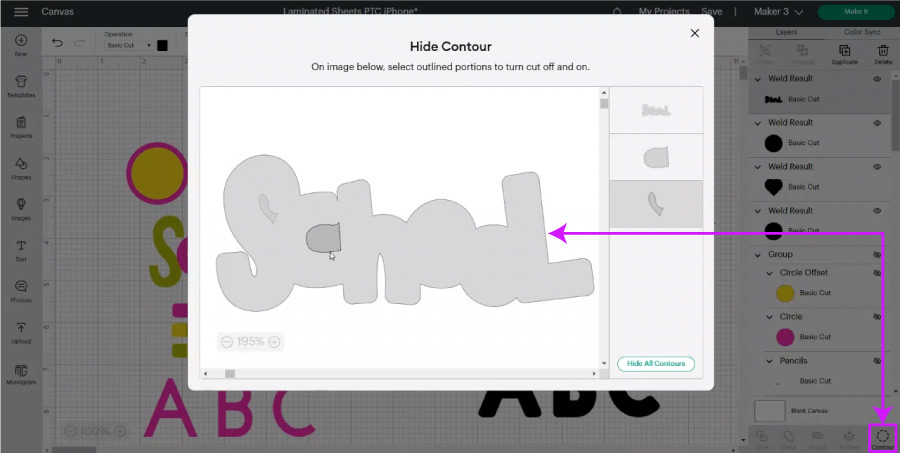
If you need to hide some openings, you must change the operation of the offset layer from “Print then Cut” to “Basic Cut” and use the “Contour” tool at the bottom of the layers panel to get rid of the empty spots.
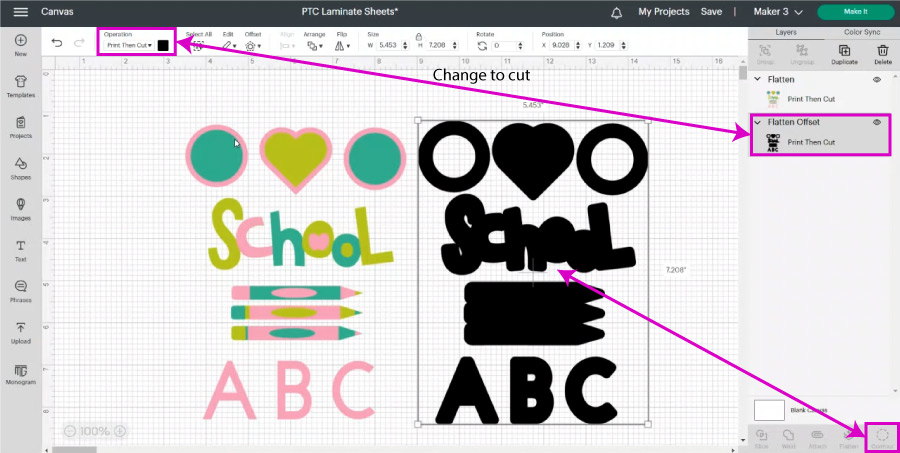
After hiding undesirable spots, change the layer’s color to white and the operation back to “Print then Cut.”
Now, make a duplicate copy of the offset layer, select the illustrations layer and one of the offset copies, click on “Align,” and select the option “Center.”
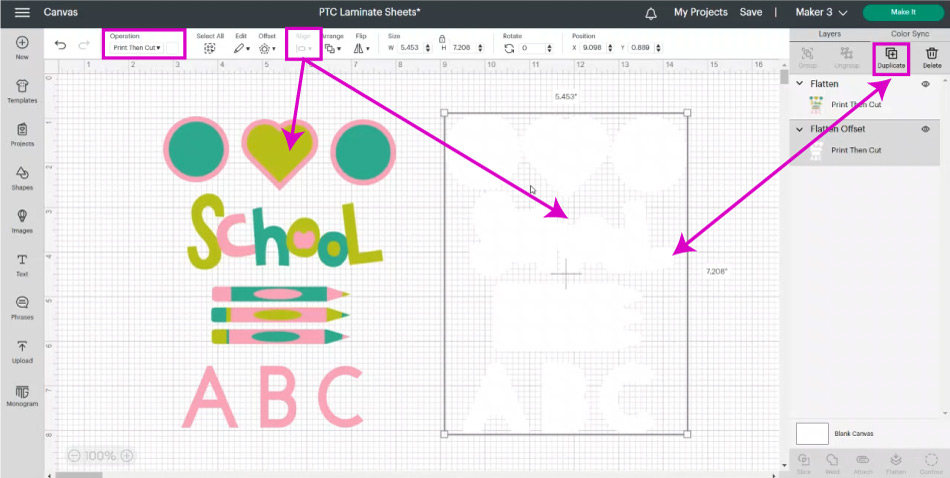
At this point, you should have the “Print then Cut” project with a centered offset right behind it and a duplicate of the offset on the side.
Go ahead, select the PTC project with the offset on the back, and click “Attach” at the bottom of the layers panel.
Congratulations, you just finished the PTC layer for your illustrations.
Now we need to work on the PTC layer for the laminated sheet.
The following step is optional; f you’ve already calibrated your machine for “Print then Cut,” you can easily skip it. However, if you haven’t, I recommend adding an “inset” to create a small bleeding effect, so your Cricut cuts only on the laminated sheet; (this makes sense when you cut your project).
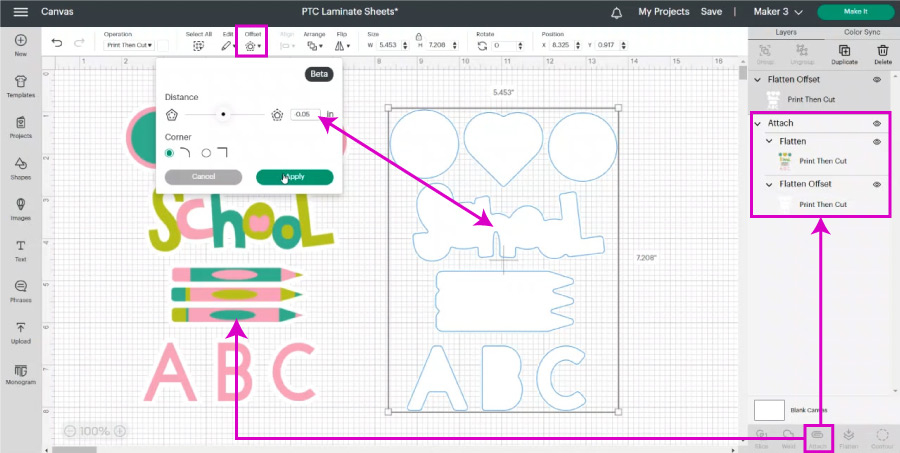
To add the inset, select the offset and type in a small number. I did -0.06 in. The inset must be able to contain the original design as well.
After creating the inset, select it along with the offset and click on “Attach.”
We’re done with both PTC layers!
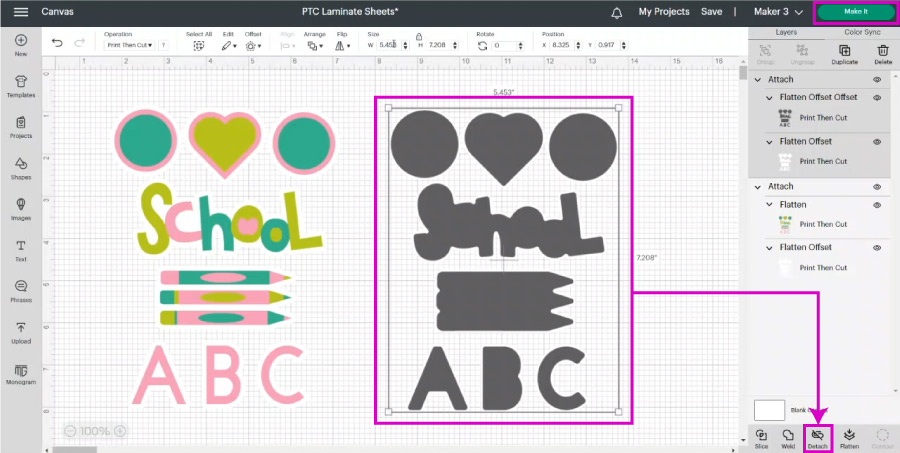
For the print layer, the blade will cut around all the colored elements and the white offset.
The cut around the white offset will serve as a reference to place and cut the elements on the laminating pouch.
And the attached offset and inset are references for cutting out the laminated sheet.
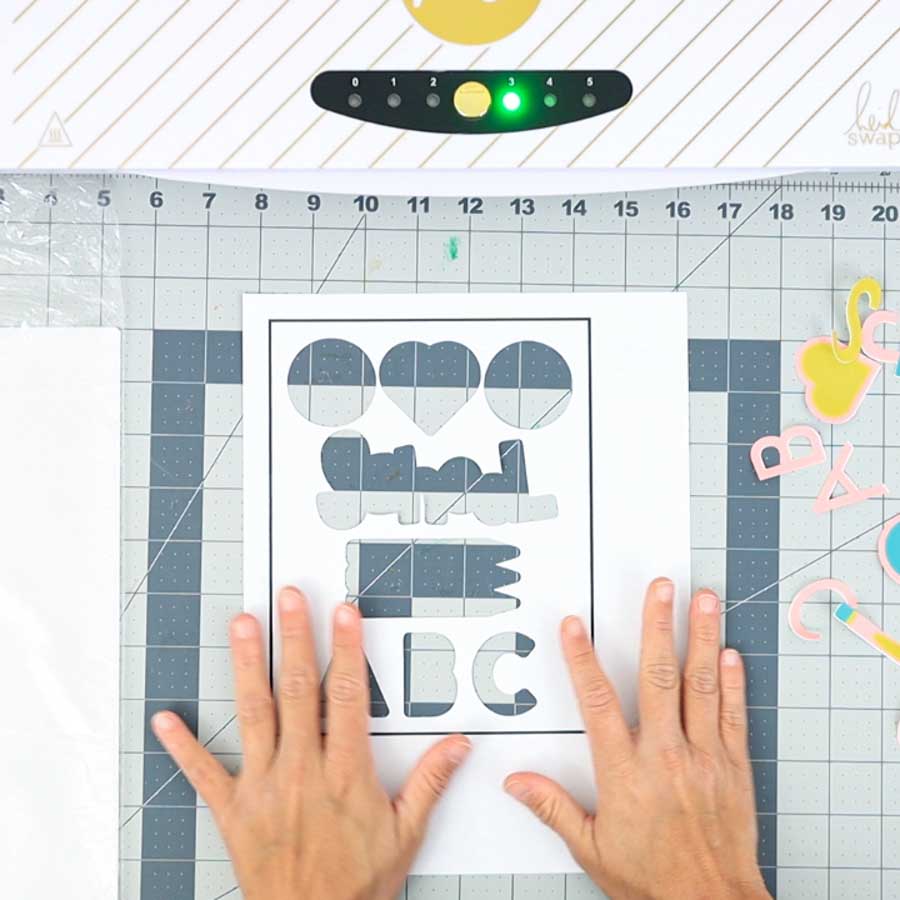
Click on “Make it” to send the project to your machine.
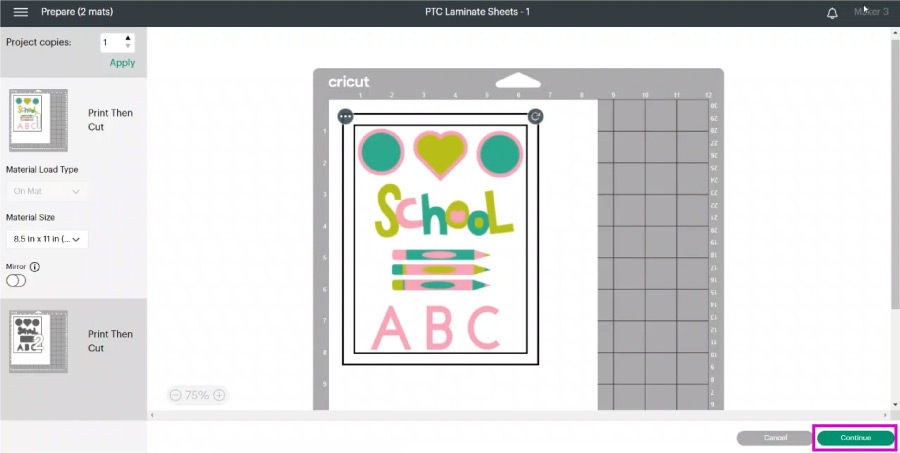
You should have two PTC mats, don’t move anything as the placement must remain identical on both mats.
Click on “Continue.”
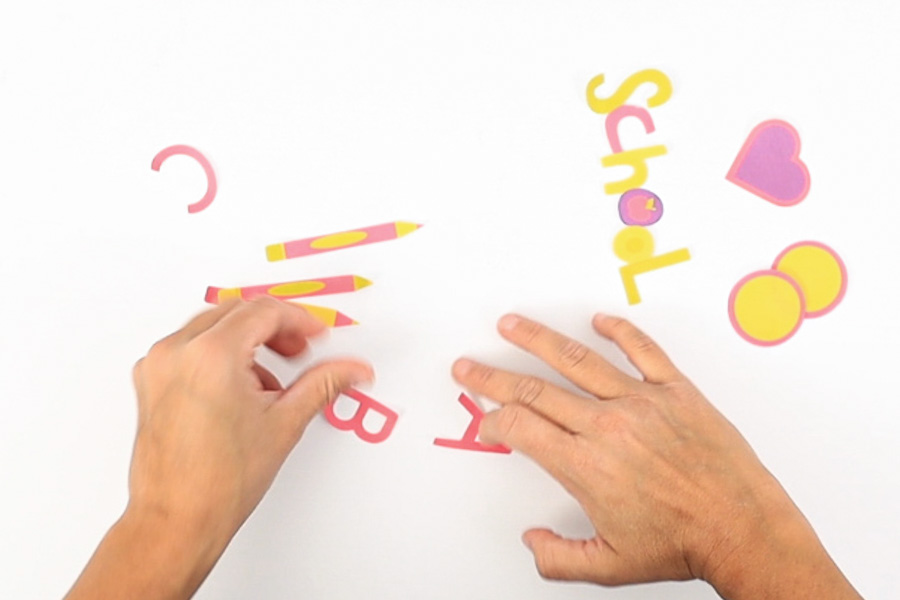
Start with the illustrations layer.
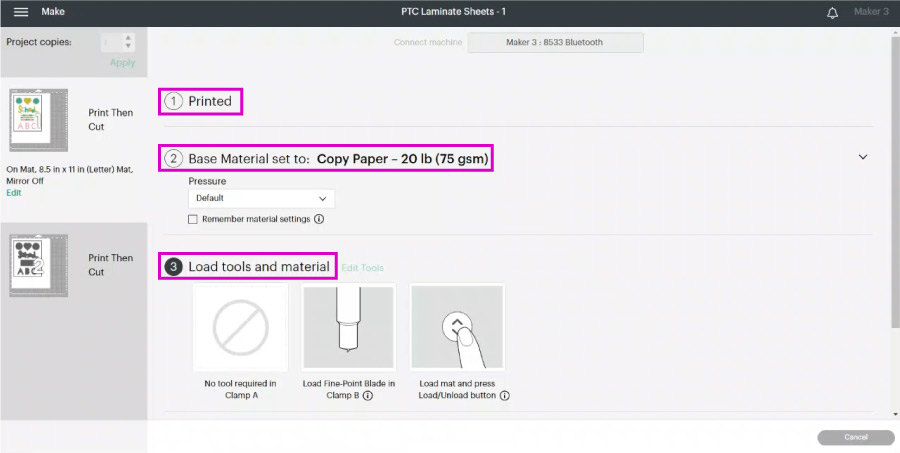
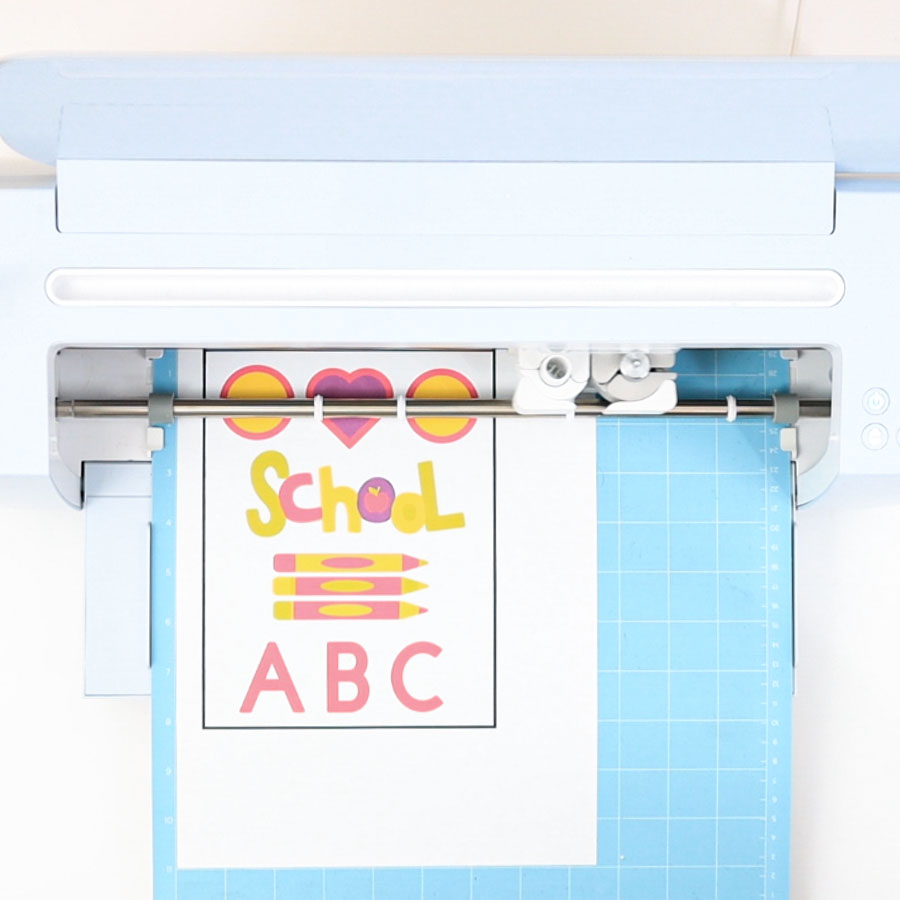
Send it to your home printer and place it on your Cricut mat. Load it to your machine and press the flashing go button to start the cut.
I used regular copy paper for this project.
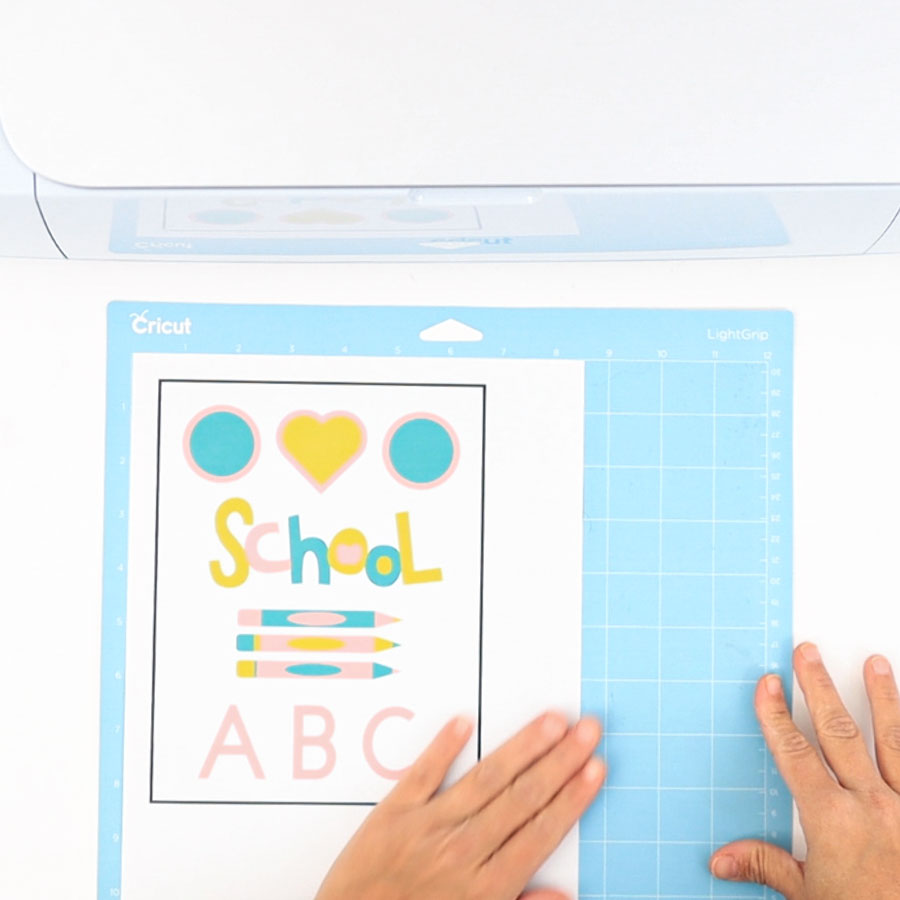
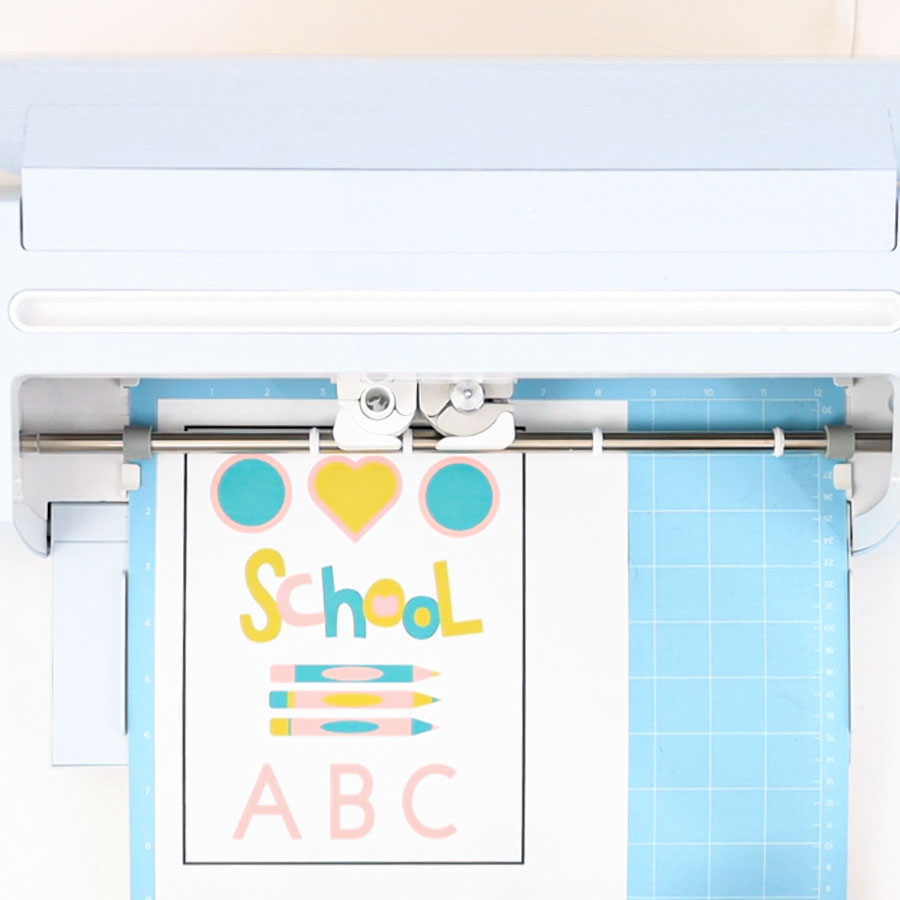
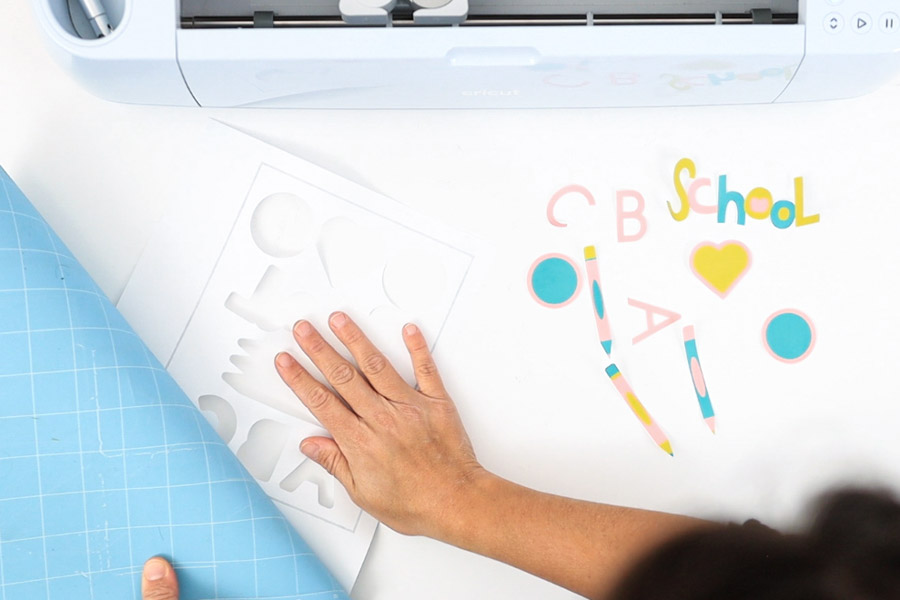
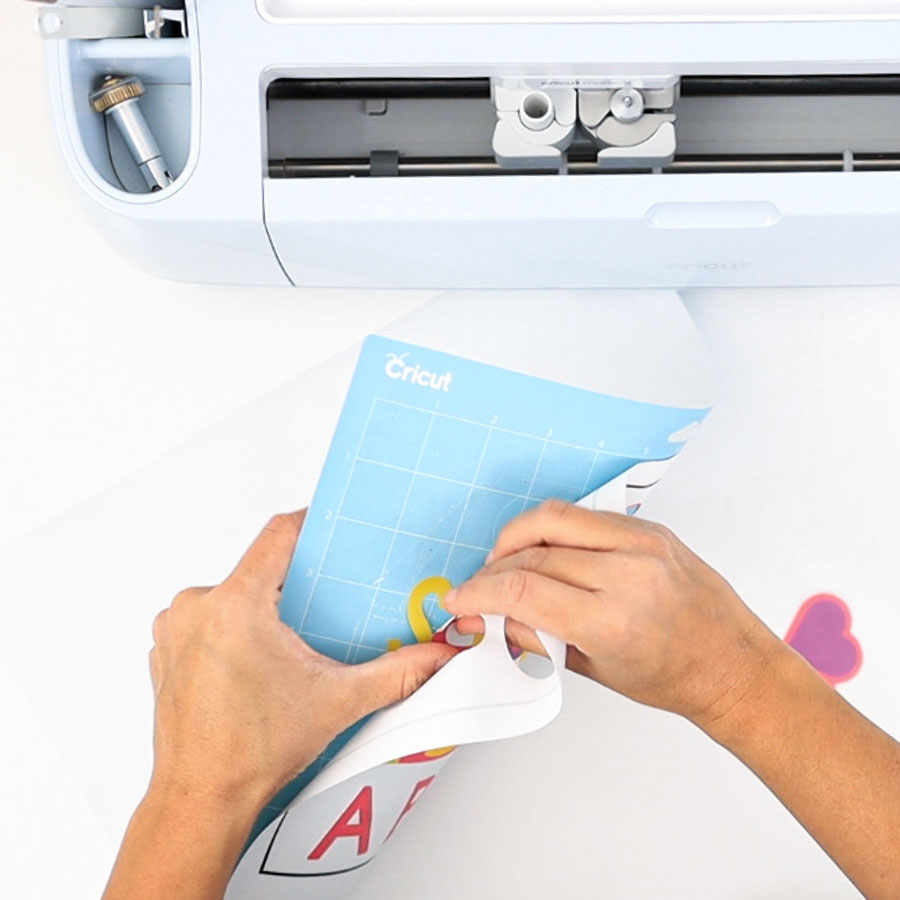
When your machine is done cutting, unload your mat and bend it to release all cuts from it.
Important: be careful not to damage the leftover PTC sheet as we need it for the next cut.
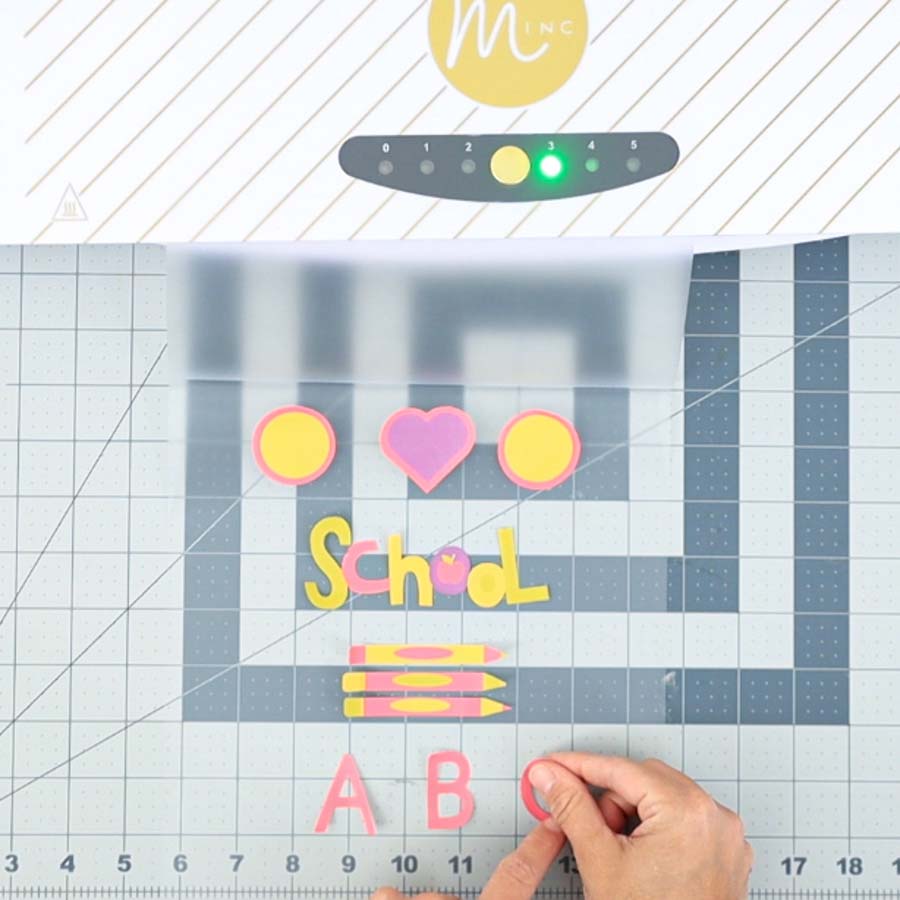
It’s time to laminate.
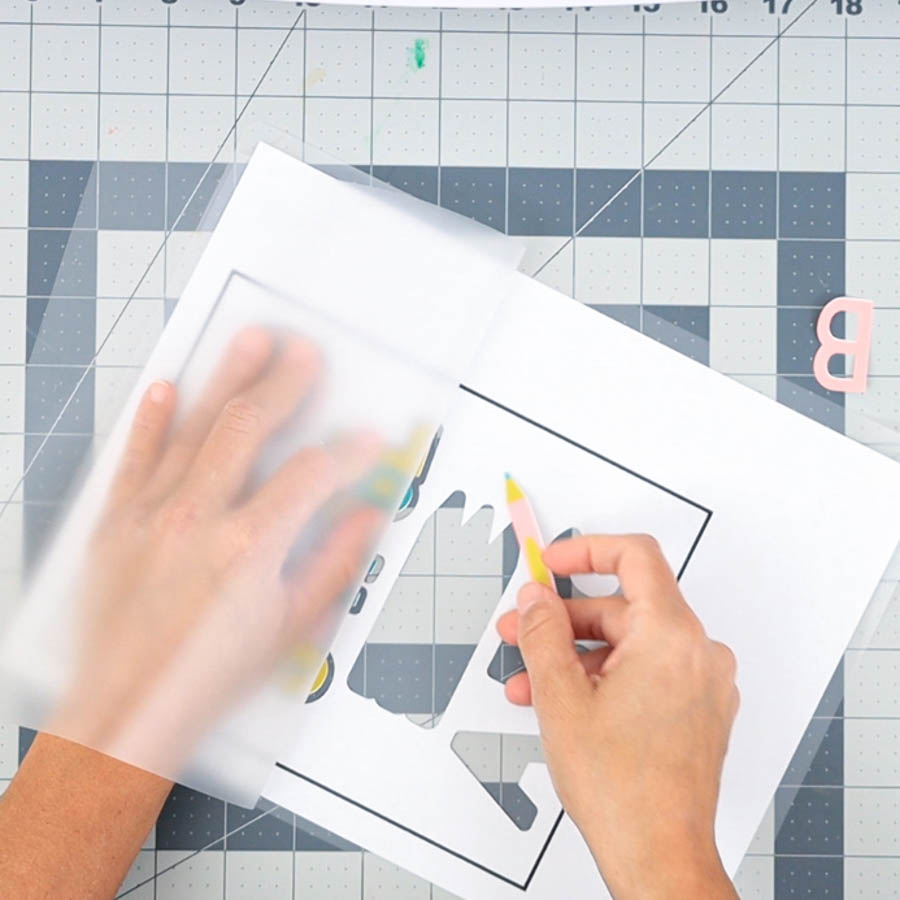
While you preheat your laminator open the laminating pouch and place the PTC leftover sheet inside.
It’s vital to work little by little. If you try to place all shapes at once and close the pouch, everything will move on you.
For instance, I placed the circles and the heart at the top first and closed the pouch gently by keeping the elements secured at all times.
Keep moving down gently until you complete adding all the elements.
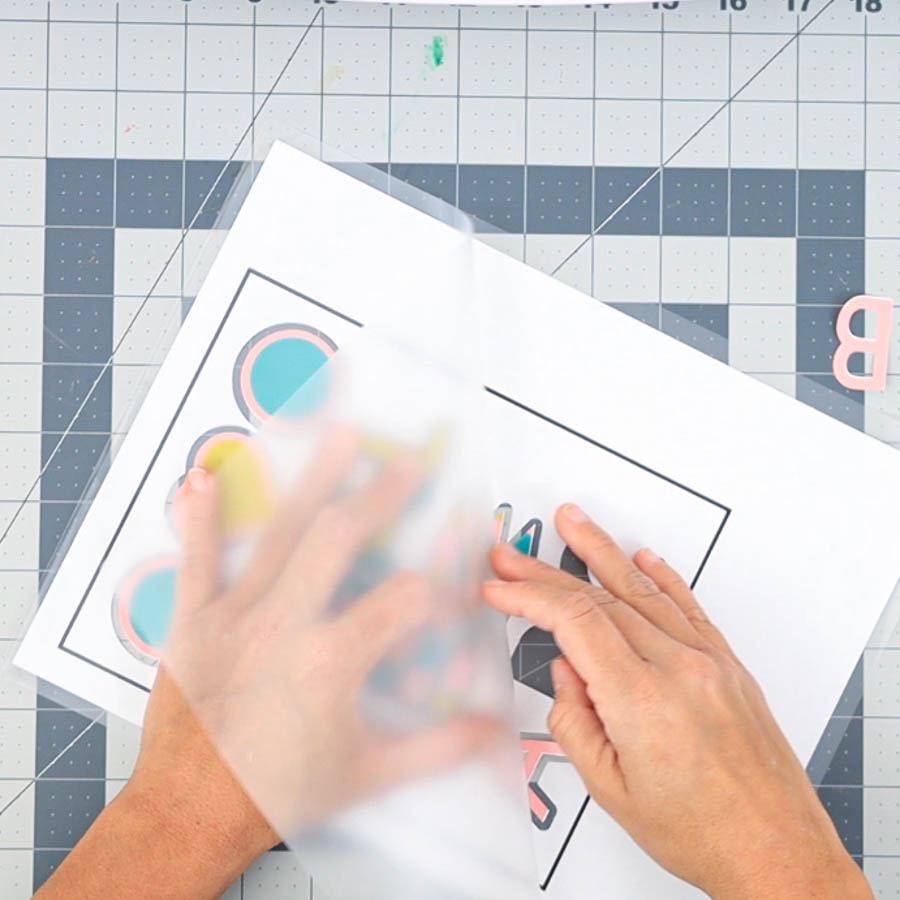
When you close the laminated sheet, feed it to your laminator, and we’re ready to cut it!
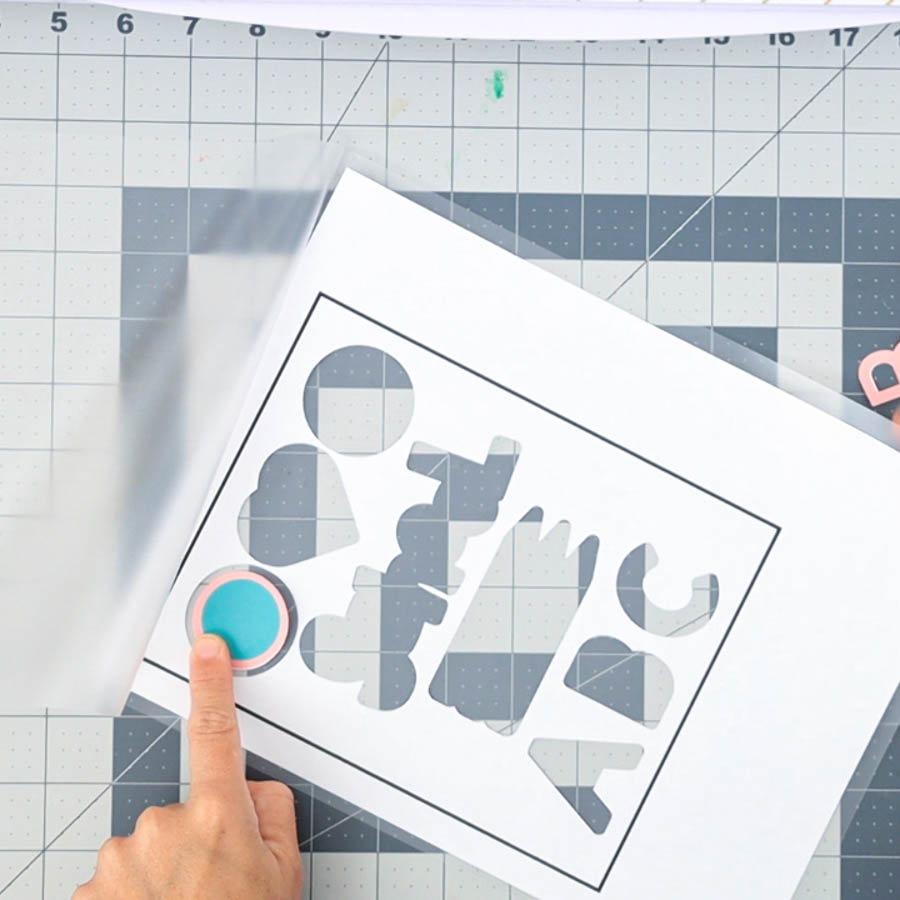
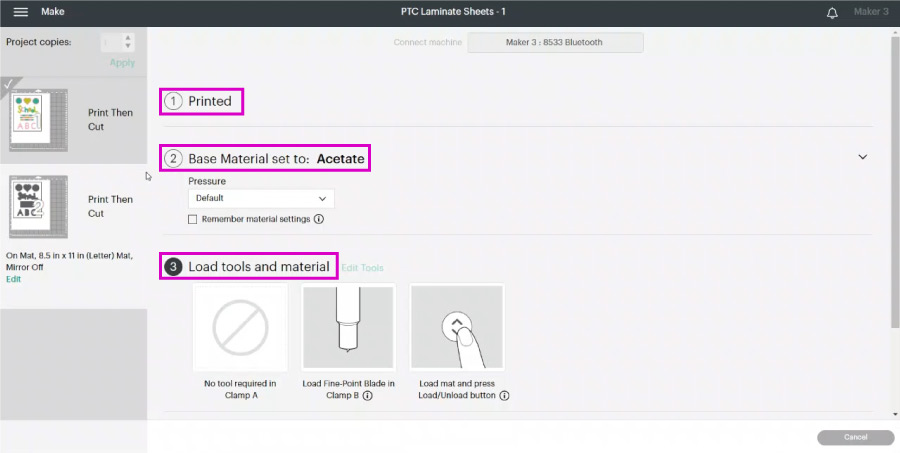
Go to Design Space and select the “Inset, Offset” mat. Where it says “Print,” go ahead and click “I’ve already printed.”
For the material base, browse “Acetate.” You can choose either regular or foil acetate.
Let’s move to real-life pics again!
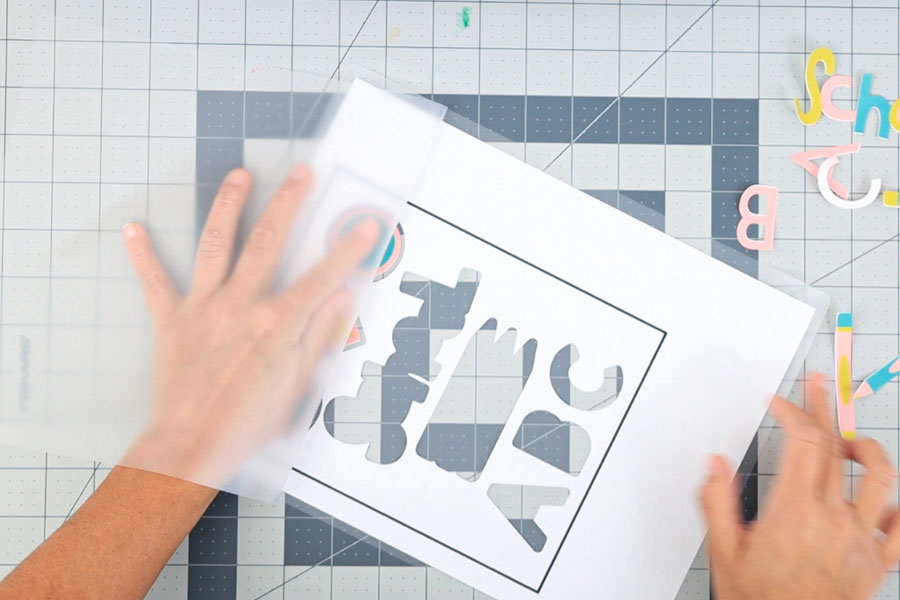
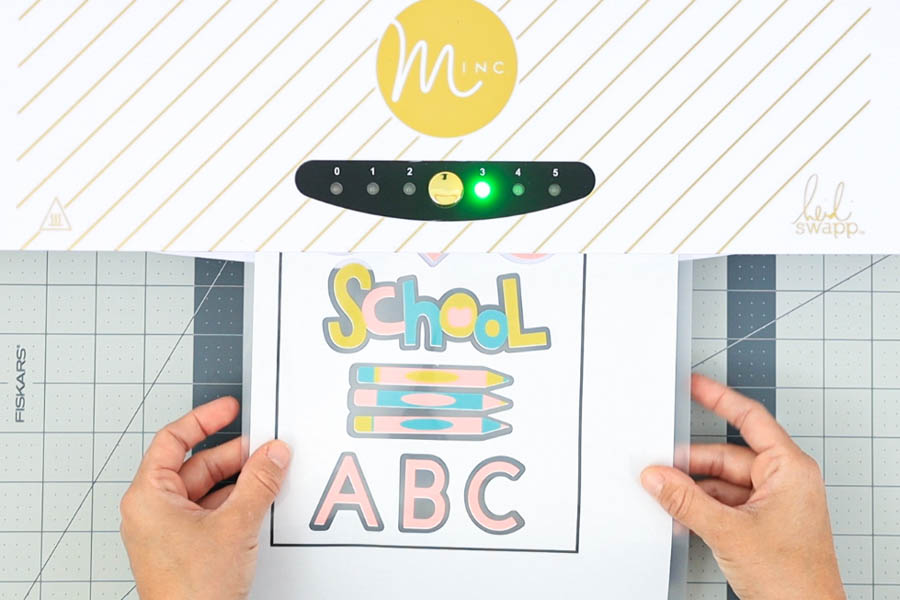
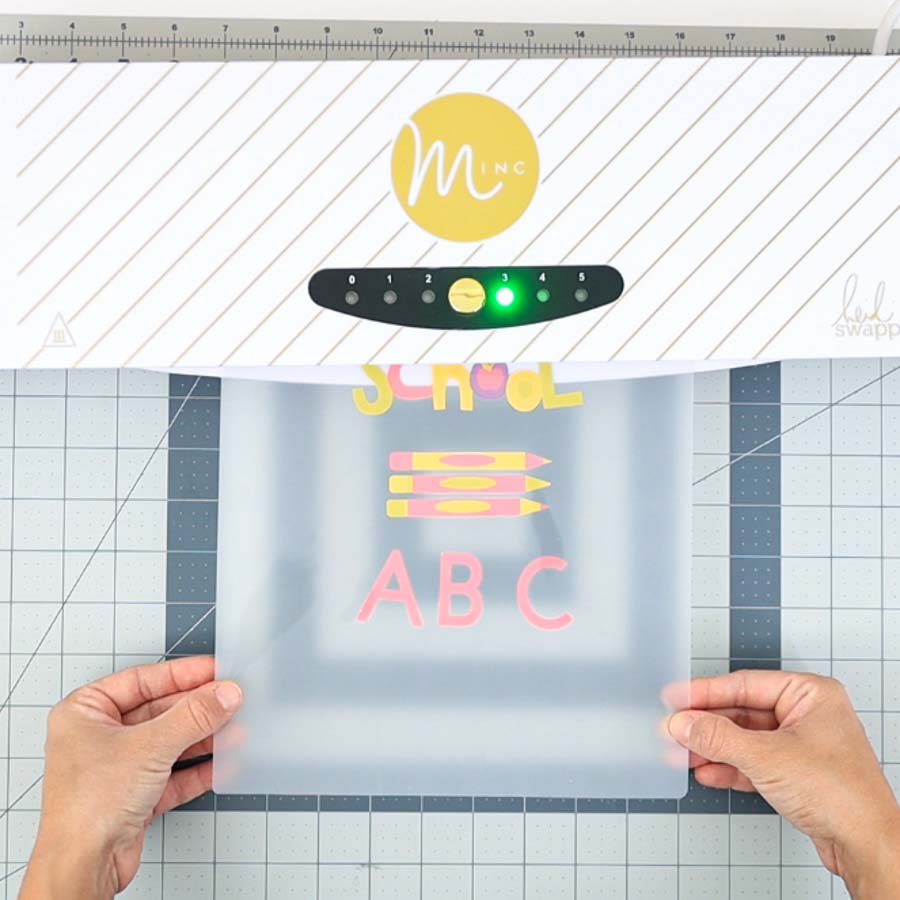
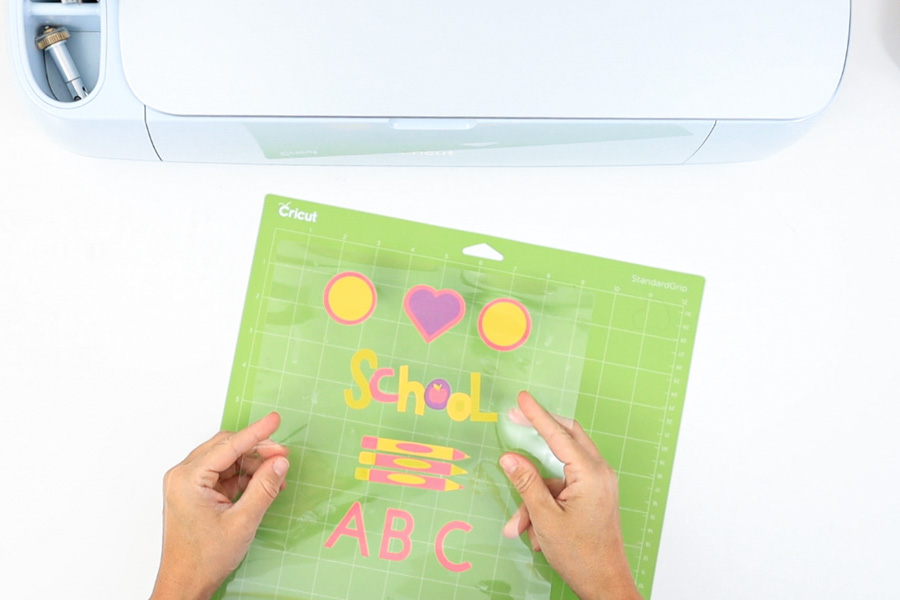
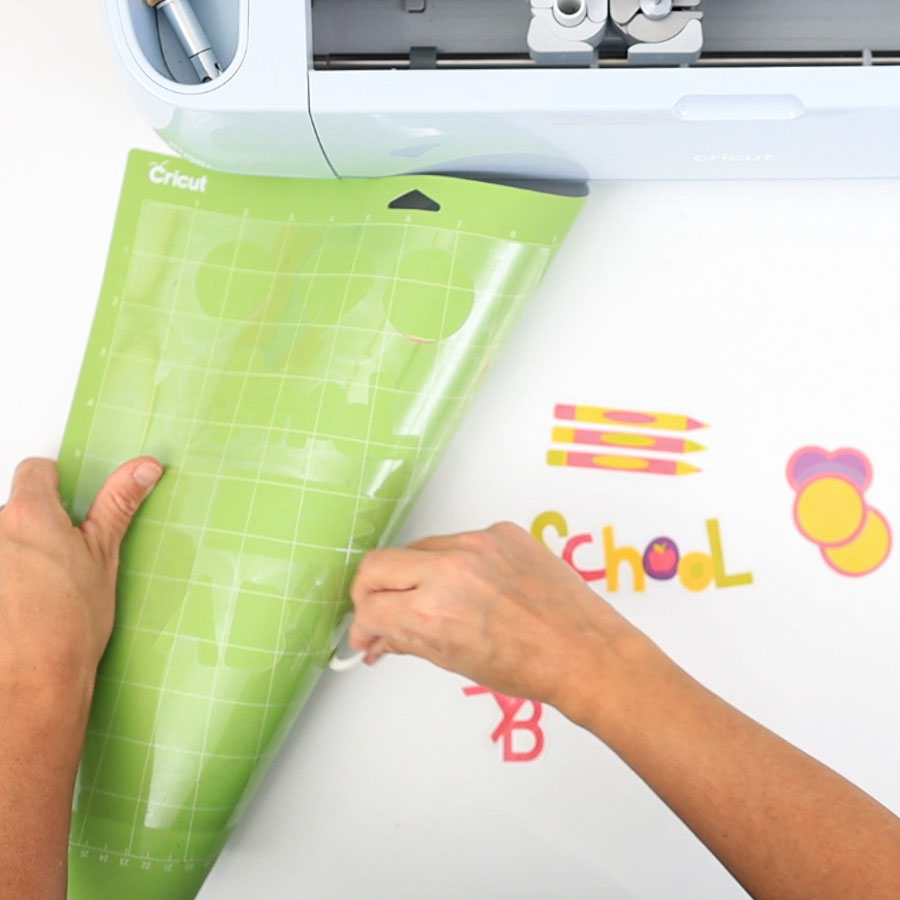
Get your laminated sheet and place it on your Cricut mat. I used a green mat; you can also use a new blue mat.
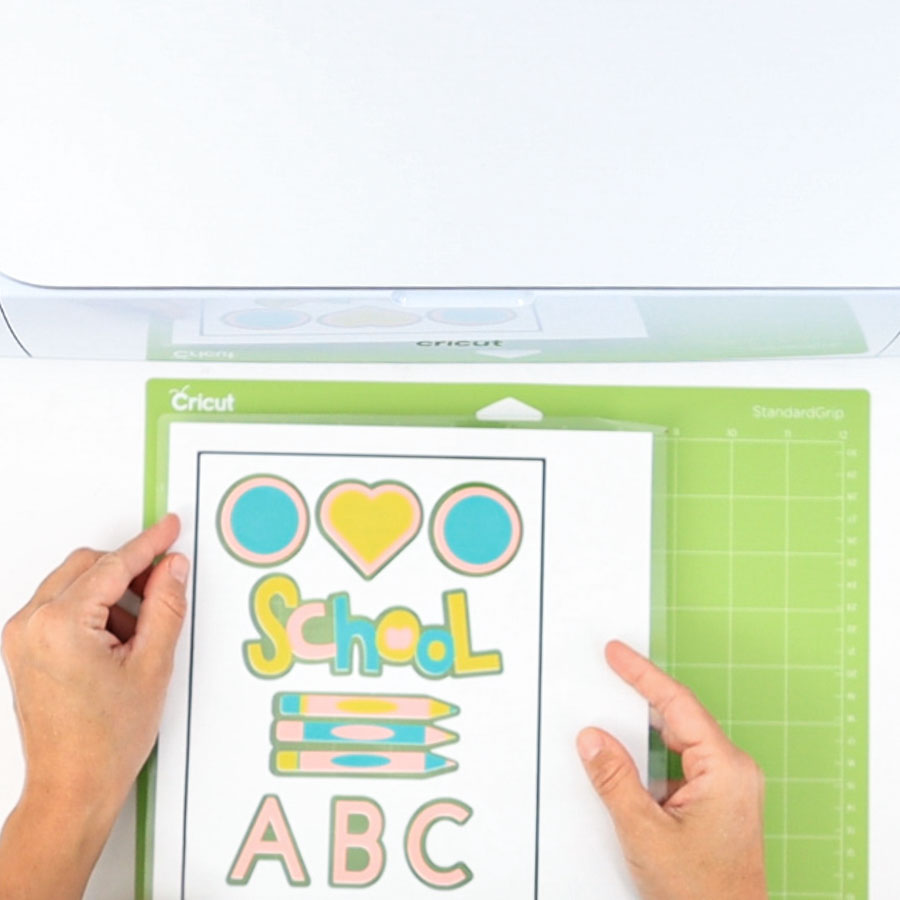
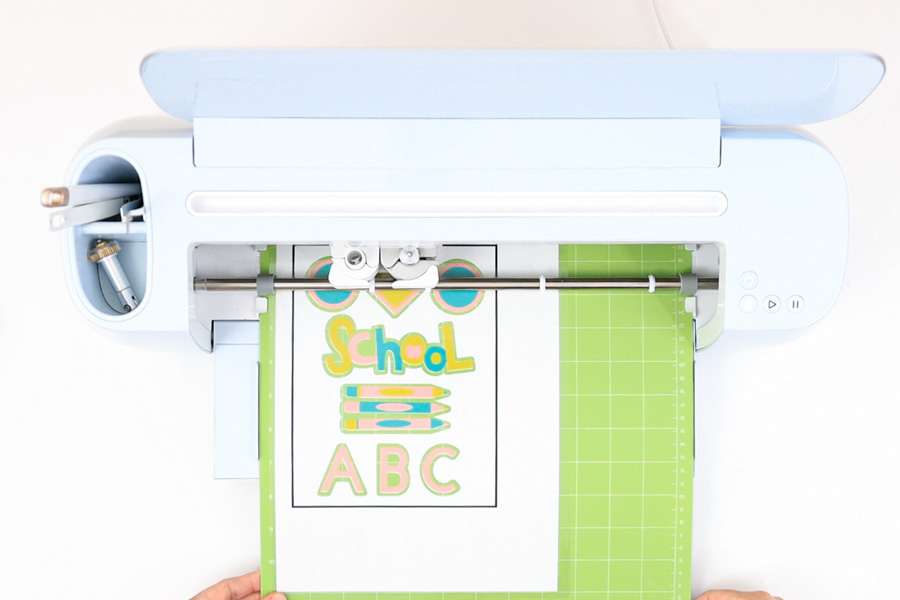
Load it to your Cricut and press the flashing go button to start the cut. When the cut is done, unload the mat and bend it to release the laminated elements.
Note: I placed the sheet on the mat as if I didn’t laminate it. Meaning there was a bit of laminated sheet on the non-sticky part.
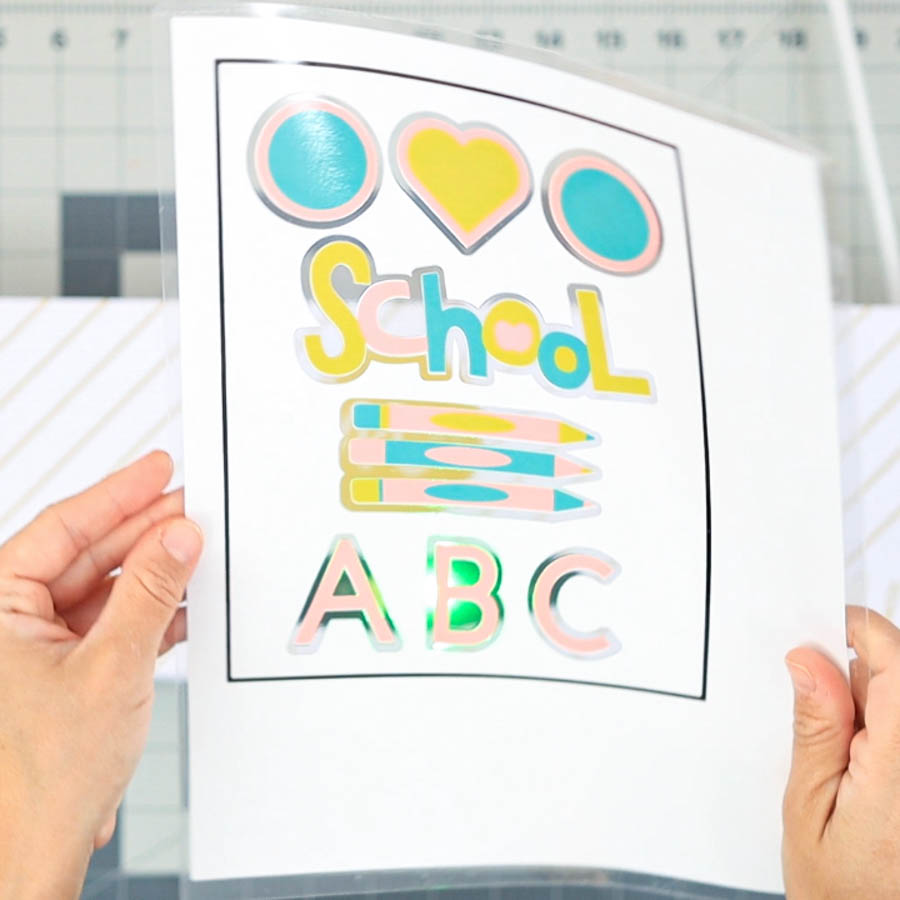
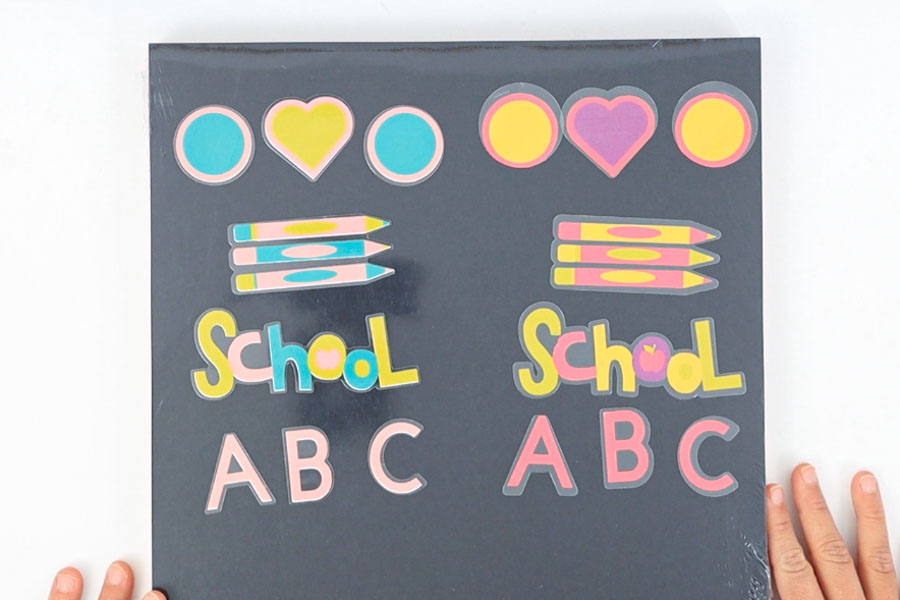
Take a look at the perfection!

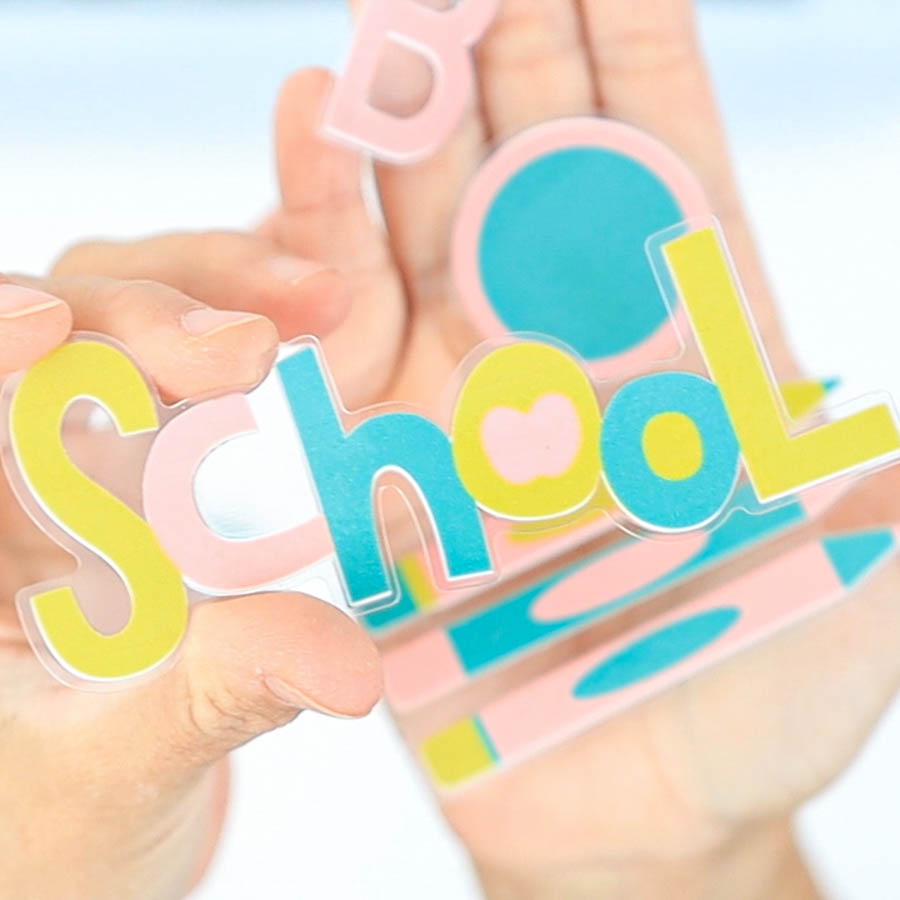

They are fantastic!
Laminating and Cutting without a Border
Suppose you don’t care about the border seal. Sometimes I don’t. You can simply PTC, laminate it, and cut it with the same settings; only this time, add extra pressure.
If the base material you print on is thicker than regular copy paper, you may want to do a test cut and possibly add a custom material to your Cricut machine.
Note: You can’t PTC laminated on old Explore machines.
Method 2 – Cutting Laminated Sheets from Cricut App & SnapMat
This project is compatible with any Cricut machine, except with Cricut Joy. If you have an Explore Air or One device, you must follow this process.
For this method, you need iOS, meaning it’s only for iPhone and iPad users.
So if you have an Air machine and an Android phone, you can’t make this project (I’m so sorry).
Before we continue, I must tell you that SnapMat is one of the glitchiest tools one can ever work with. I hope one day Cricut improves it because this would be my favorite method to cut laminated paper.
Therefore, if this setting is giving you a headache, do method #1 if your machine allows it, or PTC, laminate, and cut by hand.
I will show you how to set up the project on my desktop, and then we’ll move to the app.
I have the same project before flattening, only with different colors.
Go ahead, select all the elements and click on “Group.” Then create a duplicate of the group and click on “Flatten.”
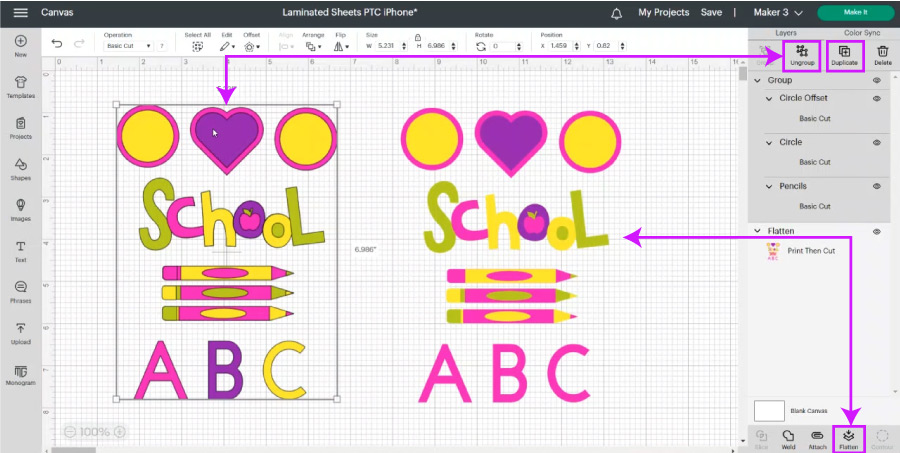
Just like that, you now have the PTC project. Now we need to work on the cuts for the laminating sheet.
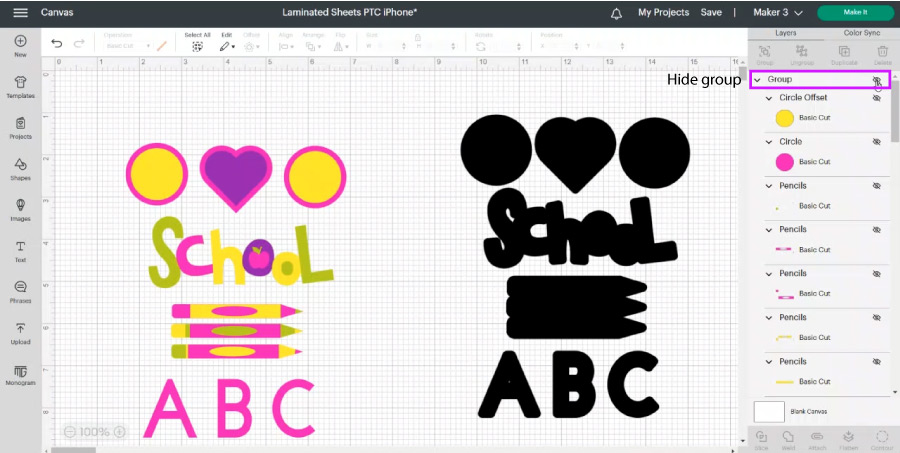
Select the group (with operation basic cut) and click on “Offset,” Uncheck “Weld Offsets,” and slide the distance circle to form a small outline allowing some space in between illustrations. Click “Apply.”
From the layers panel, hide the group (you can also delete it), leaving only the offsets.
For this method, we need to manipulate each offset because we don’t know where exactly the cut will be on the mat; hence we are using SnapMat.
If you pay attention, you’ll see that although some of the offsets look like one on the canvas, when you move them, you’ll see there are multiple layers.
For instance, the circles and the hearts each have two offsets, and “School” has four. Any shape or element with more than two colors will have multiple offsets.
Before we continue, we need to organize the offsets.
I like to do it by welding the offsets of each shape. For instance, I selected all the offsets for “school” and clicked on “Weld” at the bottom of the layers panel.
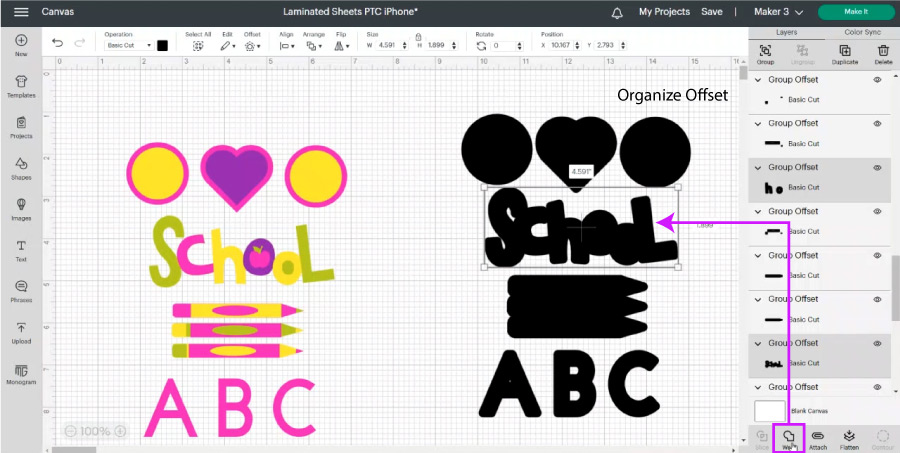
You need to repeat this with the pencils, hearts, and circles.
After welding, you may hide any undesirable empty spots. I did it for “school” and the letters.
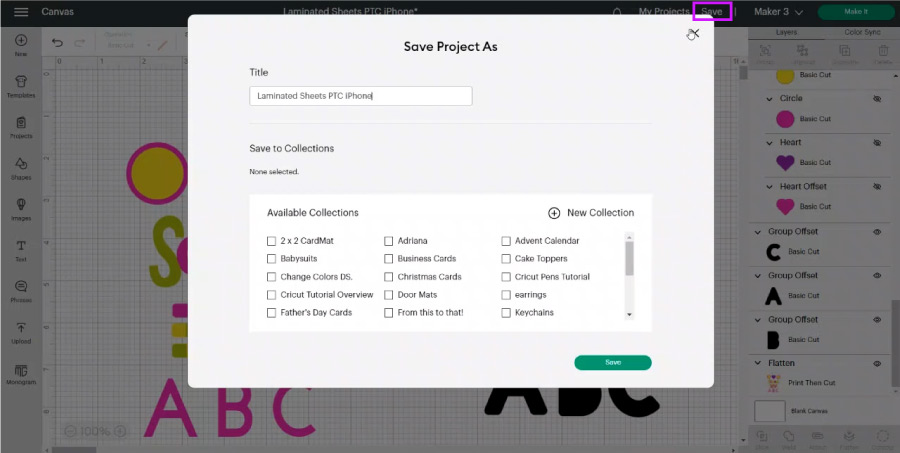
We’re ready to move to the app, but first, you must save your project!
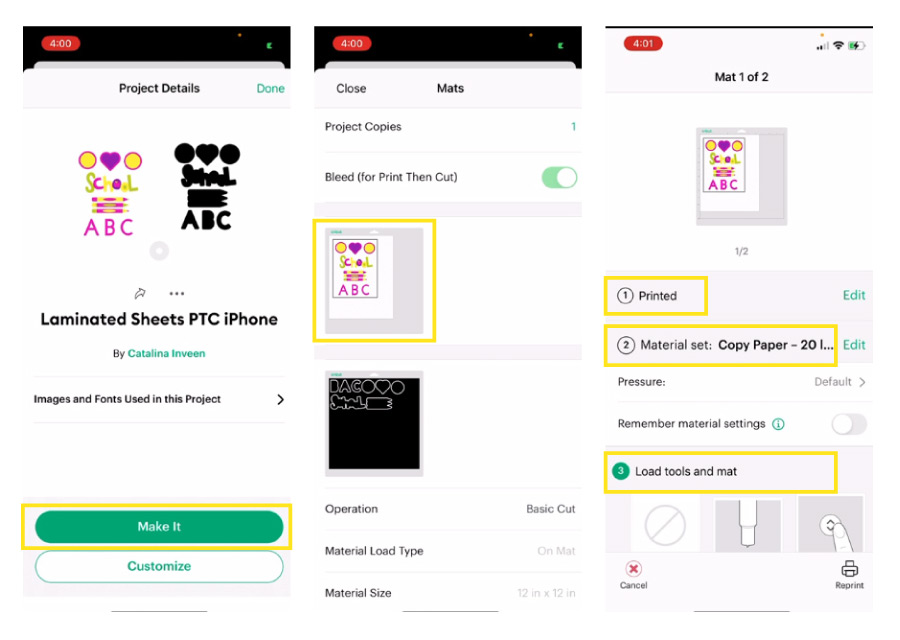
Open the project on your phone and click on “Make it.”
First, we’ll PTC the illustrations; then, after laminating, we’ll cut the other mat. Send your project to your home printer and set your base material. I used regular copy paper.
Place the PTC sheet on the mat, load it to your machine, and start the cut. When the machine is done cutting, unload and bend the mat to release the cuts from it.
It’s time to laminate!
Open the laminating pouch and place elements on it. Although the shifting here doesn’t matter much, I try to keep the graphics as straight as possible.
After laminating, place the laminated sheet on the Cricut mat, and let’s head over to the app again!
To activate SnapMat, tap on “Cancel” at the lower left corner of the app, then tap on “SnapMat.”
You need to place your phone parallel with the mat and still enough to capture a picture. I’ll work on a SnapMat tutorial soon, but in the meantime, you can read some tips on Cricut’s website.
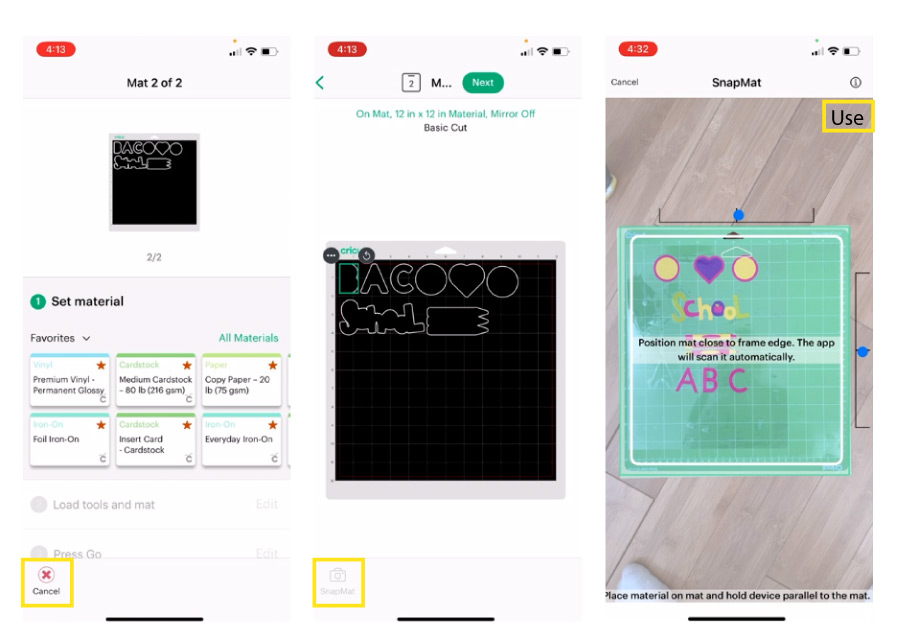
When Cricut captures the picture, tap “Use” on the upper right corner of the app.
It’s time to place each offset on each illustration. Take your time because SnapMat has quite the margin of error, and if you rush it, well, you’ll cut a great mistake.
I wish the layers’ opacity had transparency so you could place things better on the mat. Hey, maybe one day!
I recommend you zoom in as much as you can. On many illustrations that weren’t as straight as I wanted them to be, I moved them slightly to the side and rotated them to have a better fit!
After you place all offsets, tap on “Next” and set the material to “Acetate” or “Foil Acetate.”
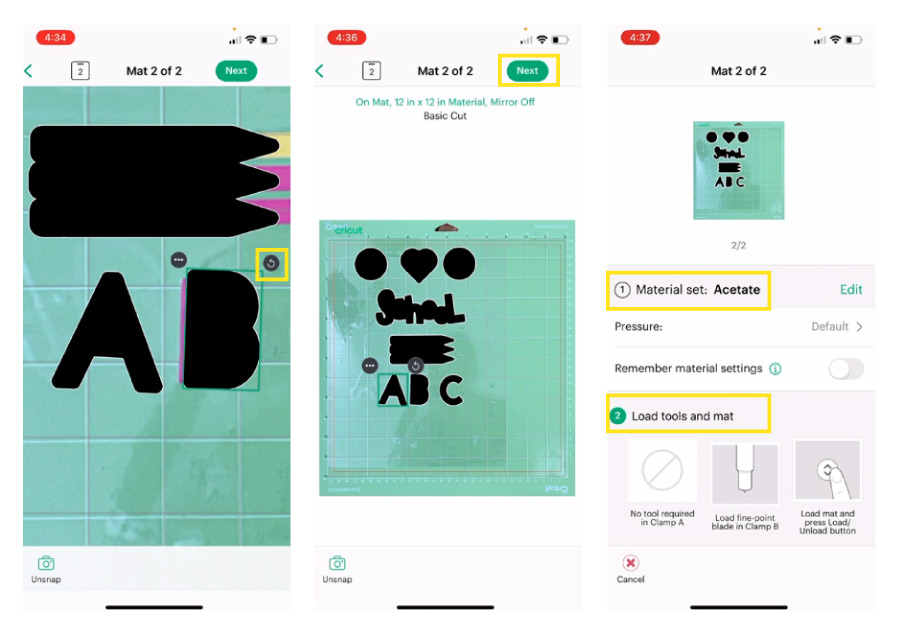
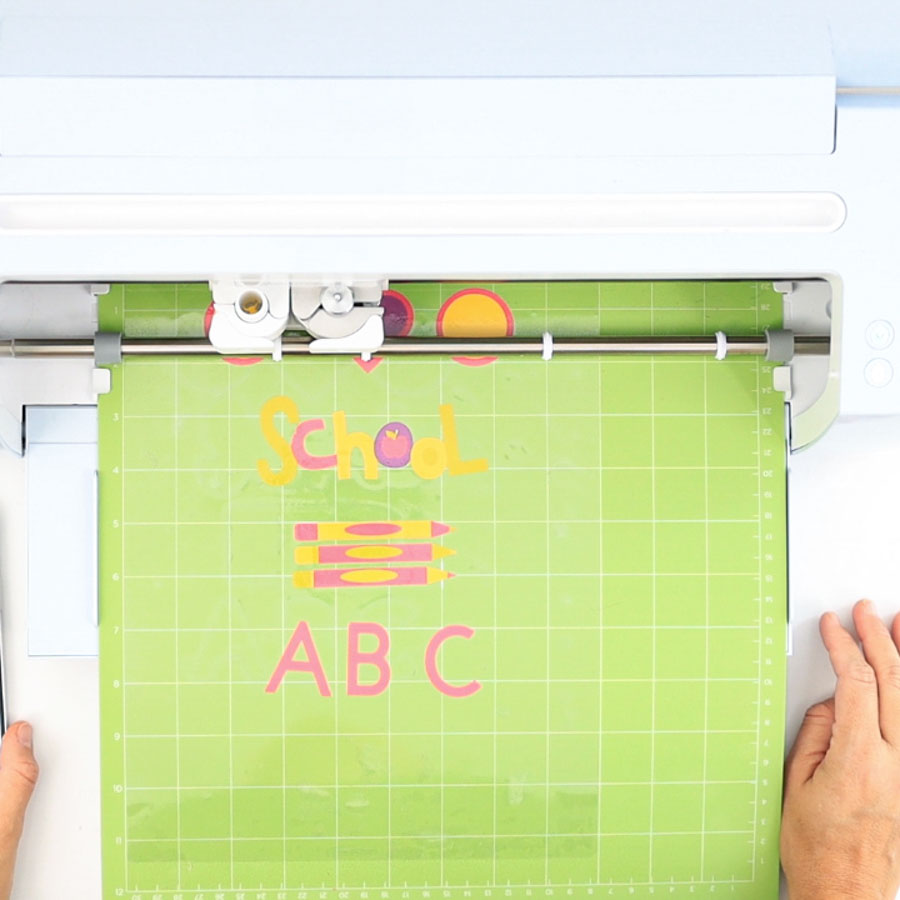
Load the mat to your Cricut and press the flashing go button to start the cut. When the cut is done, unload the mat and bend it to release the laminated elements.

I have to say that I took my time with some of the elements, but I did an abysmal job with the circles, the heart, and some of the letters.
This method won’t be as perfect as the first one, but if you take your time, you can get it done.
Here’s a comparison of both methods.
I pick method one all the way!
Share it!
Do you know it takes me over 25 hours to complete a single Cricut article? I know it’s wild, but I want to make sure you understand everything!
I would appreciate your support on Instagram , Pinterest , and YouTube as I try to grow my audience and continue producing great content!
Oh!
Just so you know, I also have a library full of free SVG files and Printables for all my subscribers, a.k.a. Daydreamers. You can see a preview right here or get access by filling out this form.


Oh goodness! What a job. Thank you for sharing it.