Hello Daydreamers!
In today’s tutorial, you are going to learn how to “Mirror” and “Flip” in both Cricut Design Space Desktop and App.
Learning Mirror and Flip in Design Space will save you time and some headaches. Let me tell you that I ruined multiple projects at the beginning of my Cricut journey because I didn’t grasp the full meaning of these features.
Since I don’t want you to get lost, these are the topics I will be covering in this article.
First, I will be covering “Mirror.”
- What is “Mirror”
- How to “Mirror” in Cricut Design Space Desktop Version
- How to “Mirror” in the Cricut Design Space App for Phone/iPad
Second, I will be covering “Flip.”
- What is “Flip”
- How to “Flip” in Cricut Design Space Desktop Version
- Examples of “Flip” applications.
- How to “Flip” in the Cricut Design Space App for Phone/iPad
Before we continue, and if you are just getting started with your Cricut, I invite you to check my tutorial for the Cricut desktop and Cricut App.
In those two tutorials, I go over every single icon and give a brief explanation of what every feature is for.
Are you ready?
Let’s get started!
What is Mirror in the Cricut World?
“Mirror” is a feature in Cricut Design Space that allows you to flip an image once you finish your design.
Mirroring is something you do after you click on “Make it,” and it’s commonly used when using materials such as Heat Transfer Vinyl and Infusible Ink.
You see, when you cut Iron-On, you are cutting the dull side, which means that the cut is backward, and if you don’t mirror your image, once you transfer it, your design will look inverted.

Pretty Side Dull Side
Since “Mirror” is a feature that you do during the cutting process, it’s more likely to forget and make mistakes, that’s why you always need to take your time and not rush.
I’ve ruined multiple cuts and wasted materials because I wanted to speed up my process!
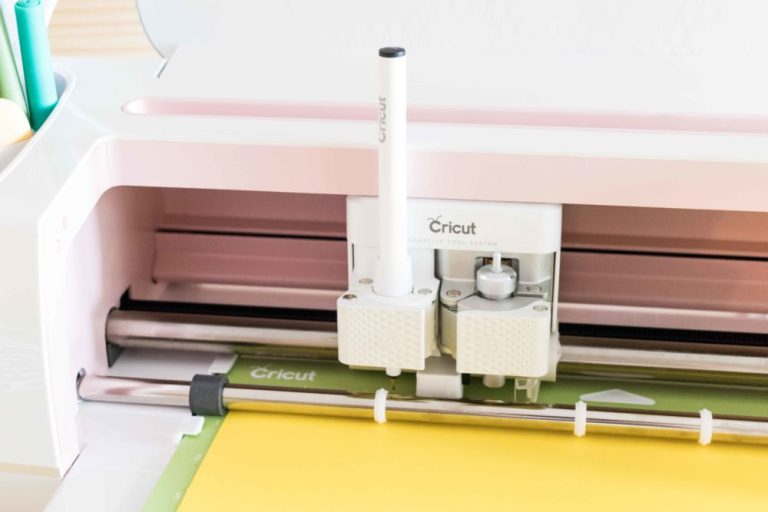
How to Mirror in Cricut Design Space Desktop
The following screenshot shows two different images (you can download at the end of this article).
These two images are meant to be used in baby t-shirts, and since I am going to use HTV (Heat transfer vinyl), I have to mirror.
Go ahead and upload the images, or once you have what you want to cut, click on “Make it” on the upper right corner.
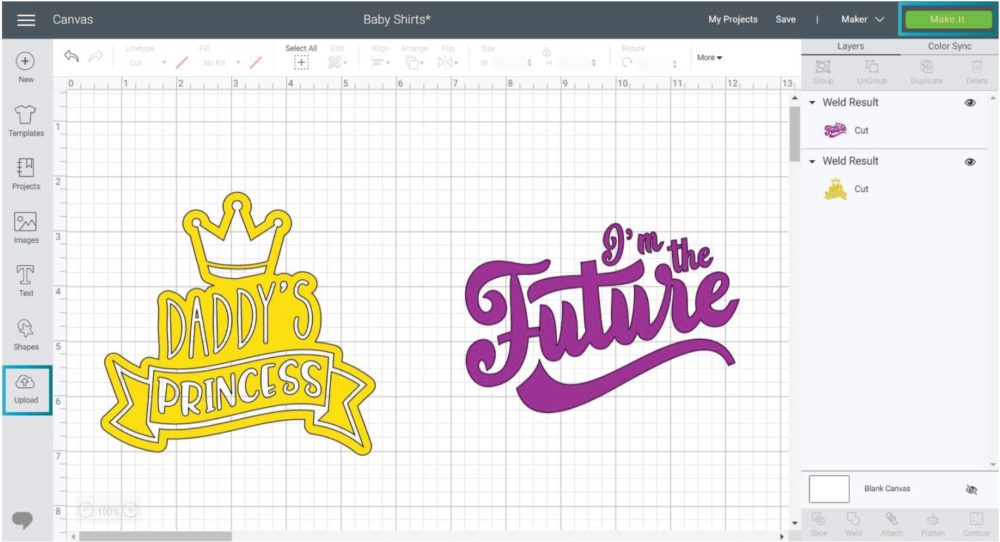
After clicking on “Make it,” you will see the preview of the project you want to cut.
By default, all images will look like the way you had them on the canvas area, and each color will be on a different mat.
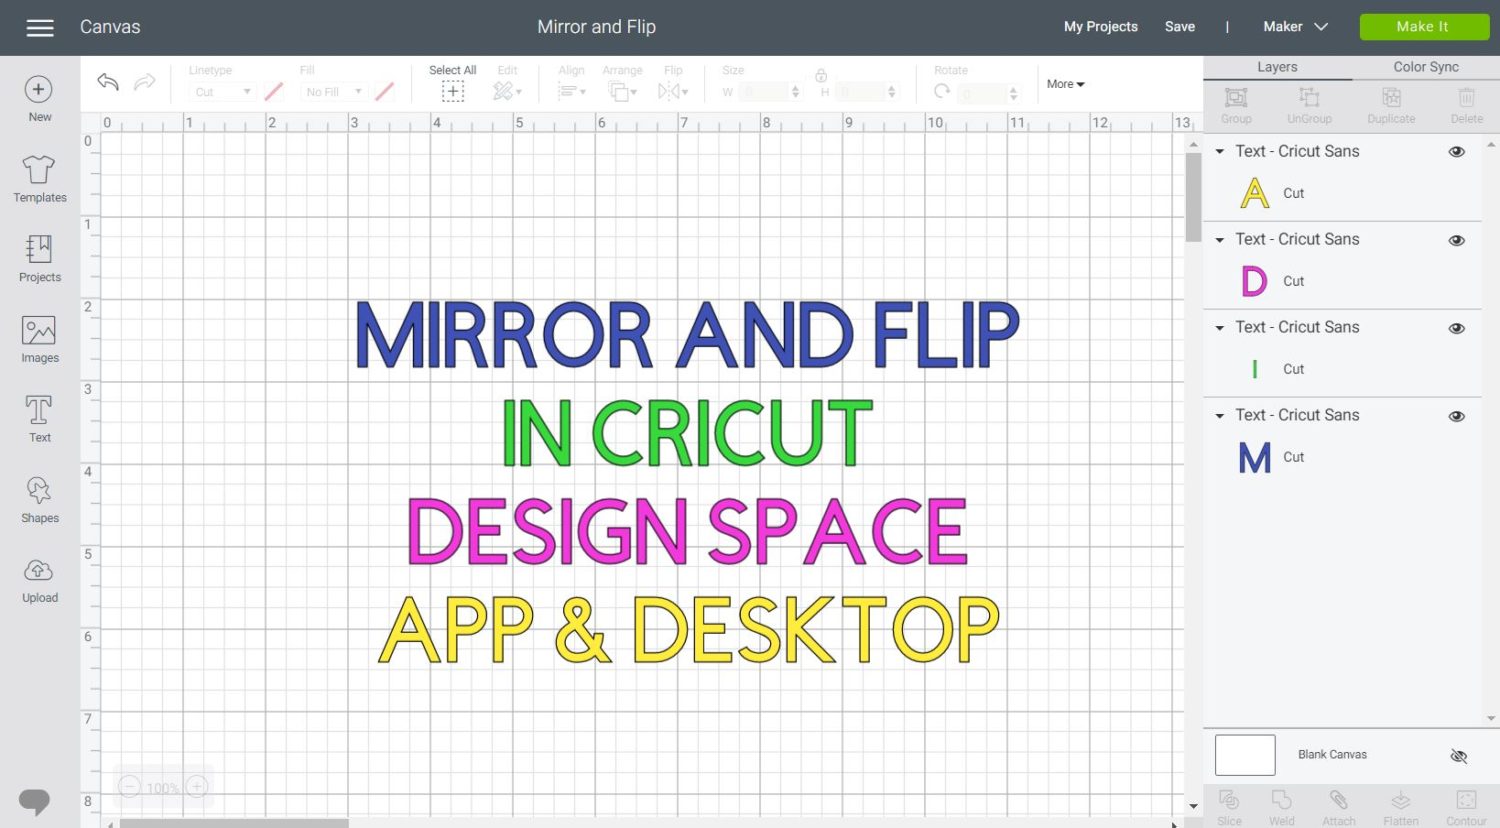
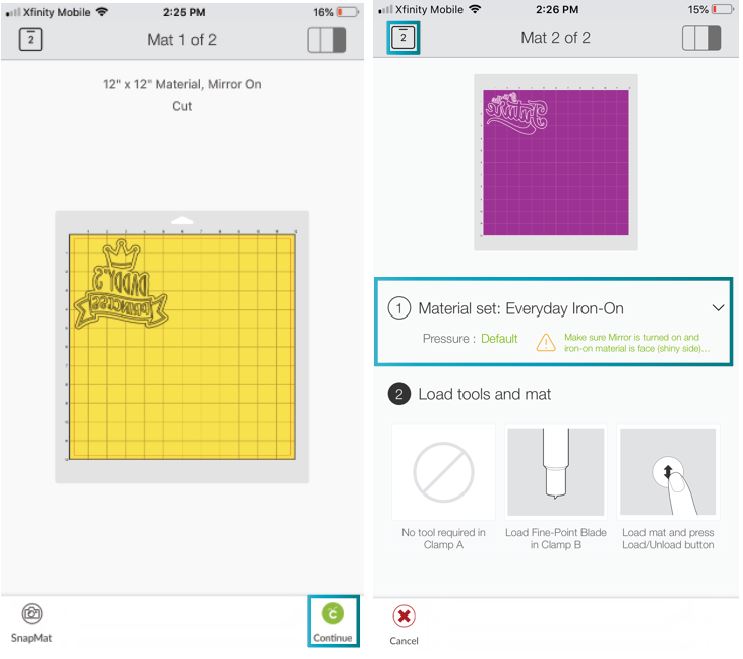
Since both designs are for t-shirts, and I am using Iron-On, I need to turn-on “Mirror.”
On a PC/Desktop, “Mirror” is located right underneath the mat thumbnail; to activated click on the little on/off switch. When the switch is green, that means you have successfully turned on “Mirror.”
The big preview of the mat will also reflect the change.
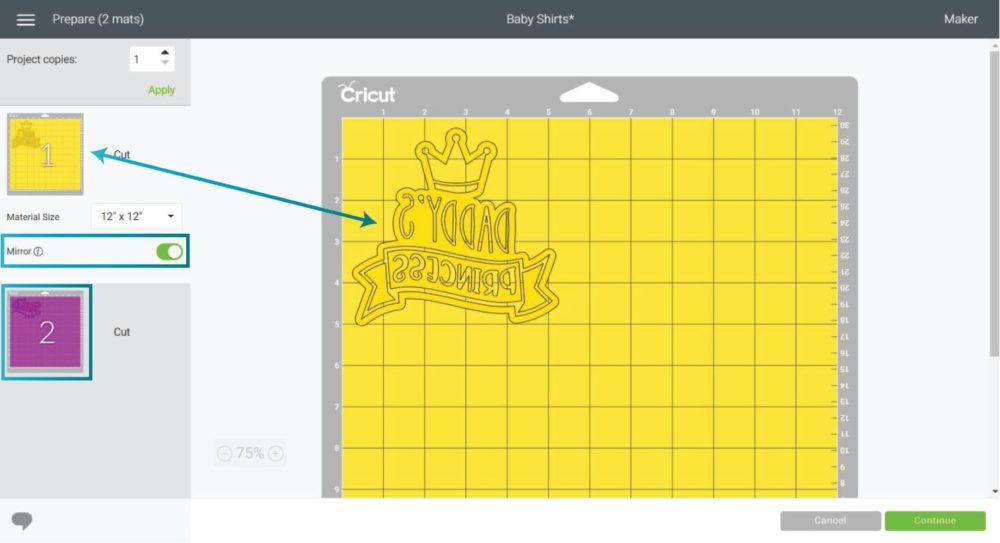
When you turn on “Mirror,” you have to do it per mat!
Therefore, it’s essential that you manually select all the mats that need to be mirrored according to your project.
Once you are done, proceed to cut select the material you’re going to use. Either from the Smart Set Dial if you have an Explore Machine or from Cricut Design Space if you have a Maker.
If you select any type of Iron-On/HTV or Cricut Infusible Ink, Design Space will remind you about mirroring and the way you should place your materials on the mat.
If you haven’t done so, this is your last chance!
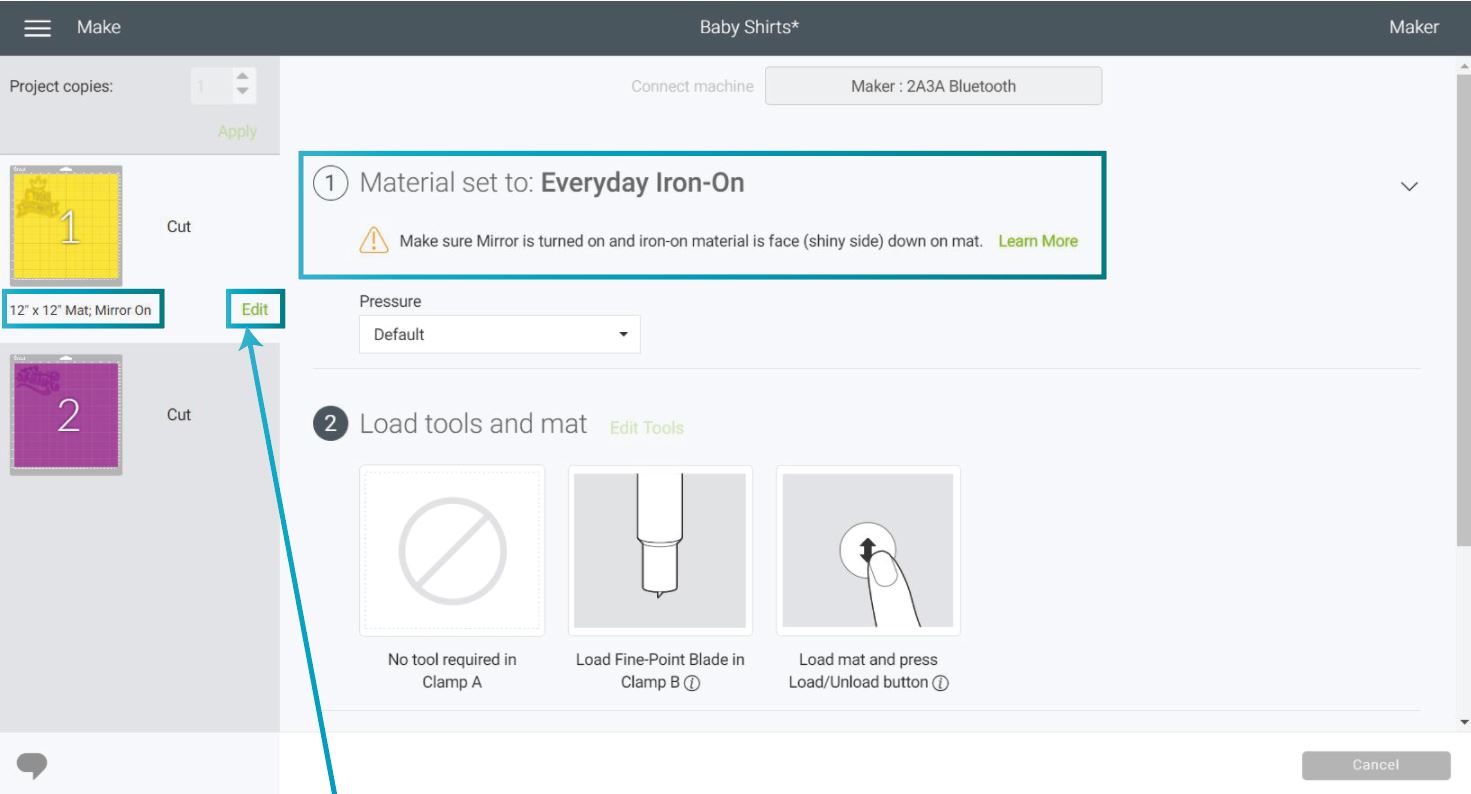
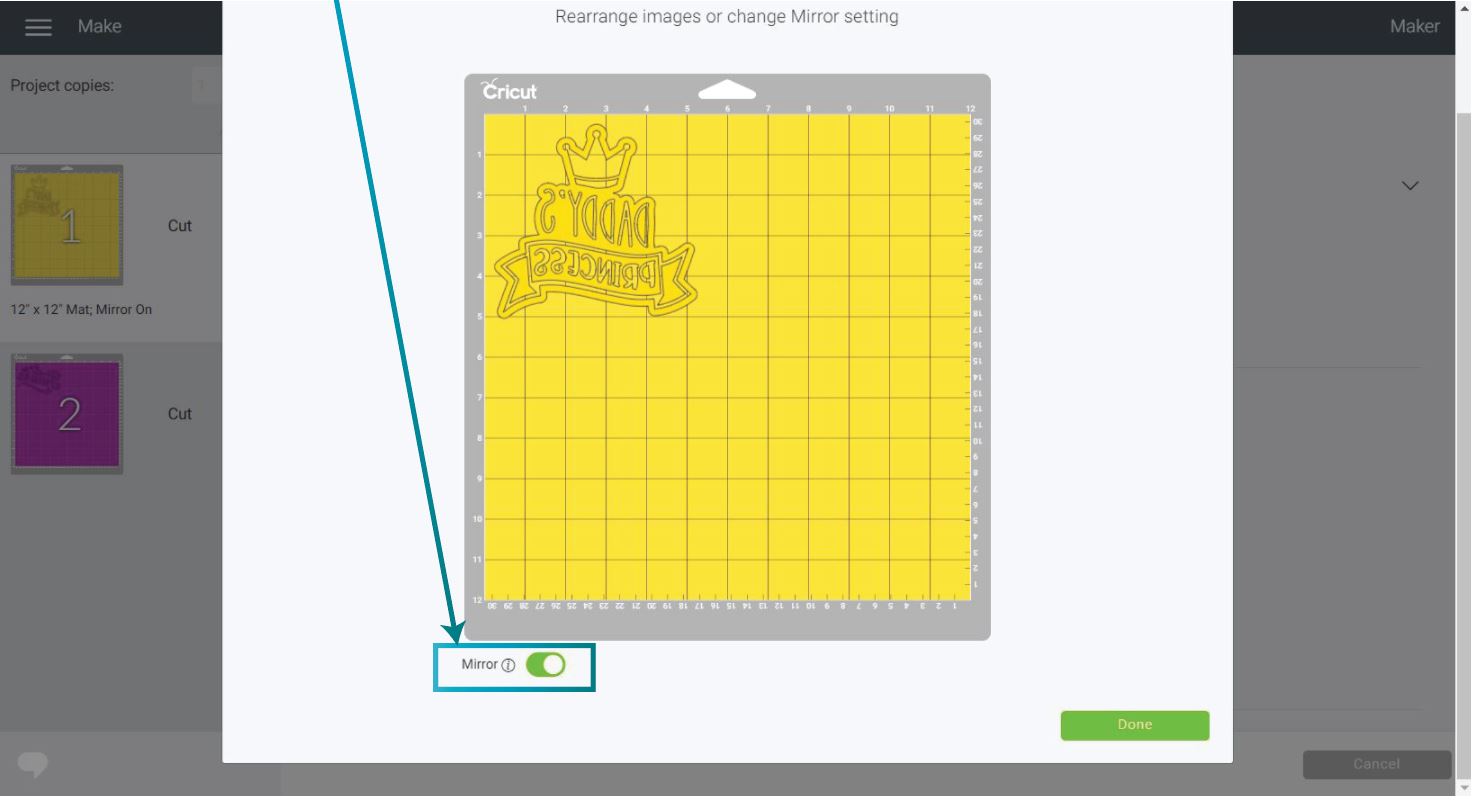
There is no need to cancel your cut; just select the mat thumbnail on the left panel and proceed to turn on “Mirror.”
How to Mirror in Cricut Design Space App
Finding the “Mirror” feature is a little bit more complicated from the Cricut App. But once you know where it is, you won’t forget.
First, have your project ready to cut, then tap on the “Make it” button located on the bottom-right corner of the app.
For the ease of this project, I am using the same scenario, I explained before. The images in the following screenshots are for baby shirts.
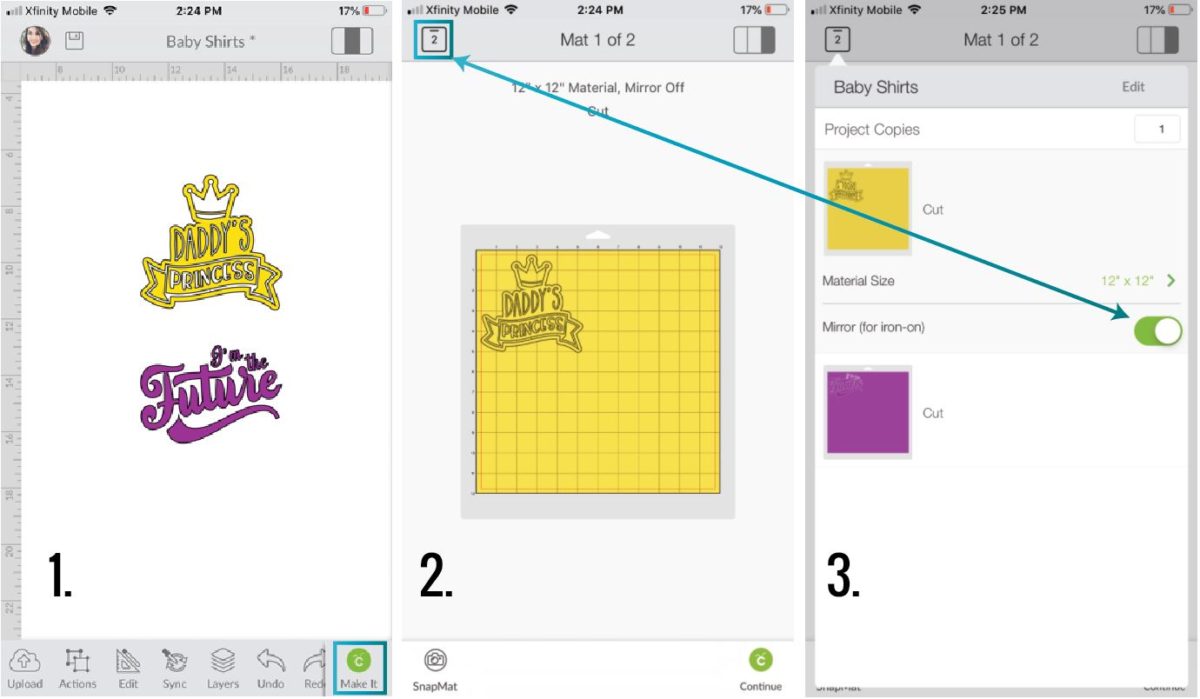
After tapping on “Make it,” you’ll see at the top of the app, you’ll see how many mats you have to cut. Also, as you swipe to the right, you can see a preview of the mat.
However, where in the world is the “Mirror” option?
To turn-on “Mirror” on the Cricut app, tap on the little mat icon located on the upper-left corner of the app; then tap on each individual mat you want to use this feature.
Just like in the desktop version, when you turn on “Mirror,” you have to do it per mat!
When you finish, go ahead and tap on “Continue” to select your material. If you set the material to Iron-On/Infusible Ink, Design Space will bring a notification informing you that you need to turn-on “Mirror” and also the way you should place your material on the mat.
If you forgot to mirror your image, tap again on the upper-left icon, and make the respective changes.
What is Flip in the Cricut Word
“Flip” is a feature in Cricut Design Space that allows you to reflect your images, text, or anything you select in the canvas area.
“Flip” has two options:
- Flip Horizontally: Reflects the image horizontally, the same effect as “Mirror.”
- Flip Vertically: Turns the image upside down.
Unlike “Mirror” that has similar capabilities, “Flip” is a feature you execute before the cutting process.
I use “Flip” very often; however, I see that this little featured is entirely undermined in the Cricut world, but once you see the capabilities, you will find yourself using it all the time!
How to Flip in Cricut Design Space Desktop
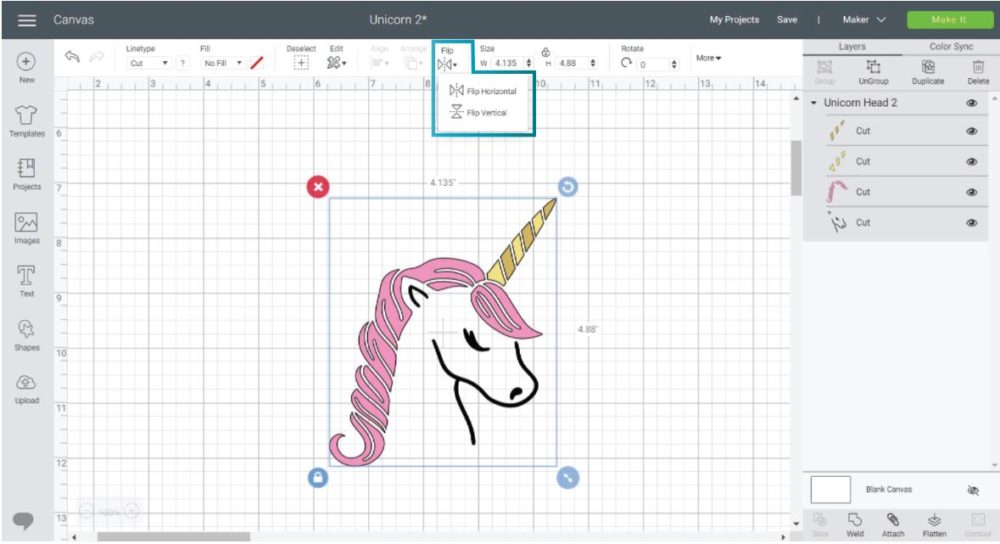
To “Flip” something in Design Space, you need to place and select an element (text, image, shape, etc.) on the canvas area.
On a PC/Desktop, “Flip” is located on the top editing menu on the canvas, and when you click on it, you’ll find two different options.
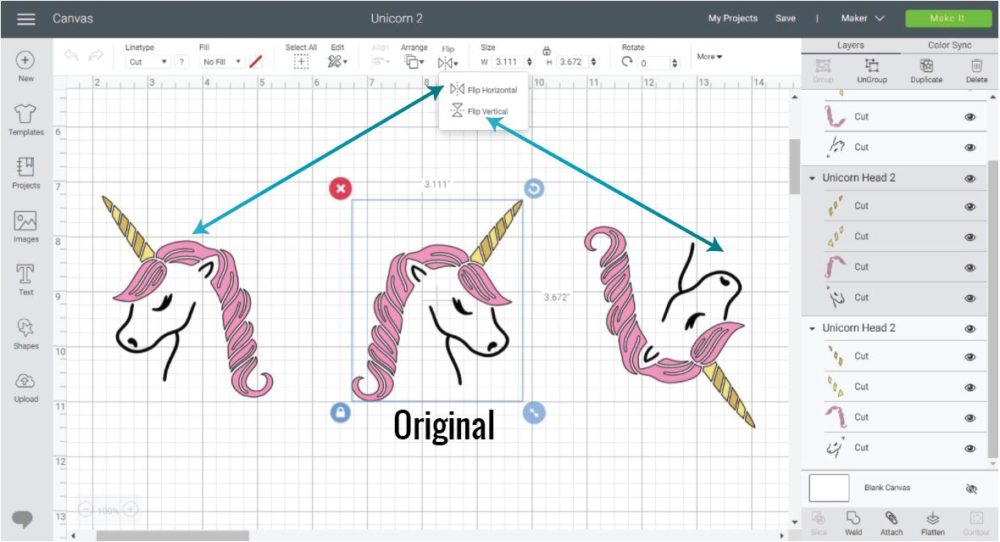
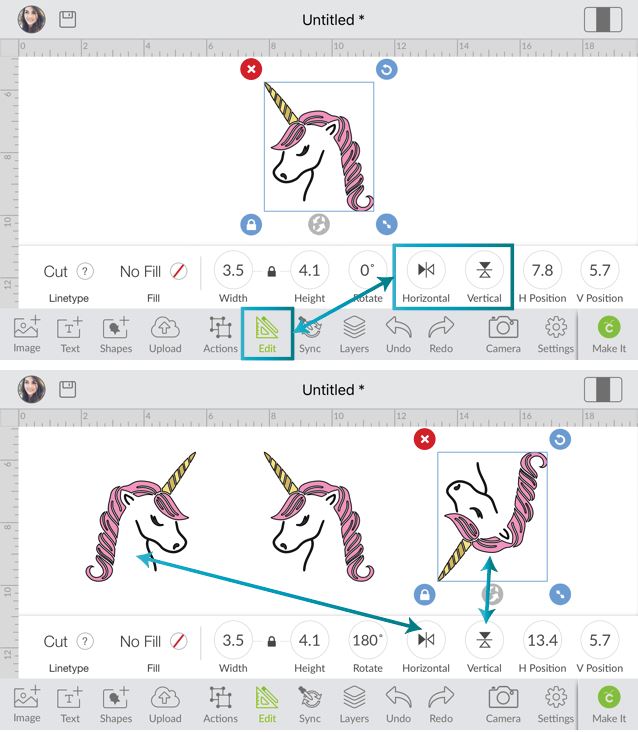
The following screenshot shows three different images. In the center, we have the original image (code #M6D6499F), and on the left, we have the same image once flipped.
On the left of the original, the image was flipped horizontally, and on the right, the image was flipped vertically.
Why would you want to use “Flip”?
I am glad you ask!
Some projects benefit a lot from the “Flip” option.
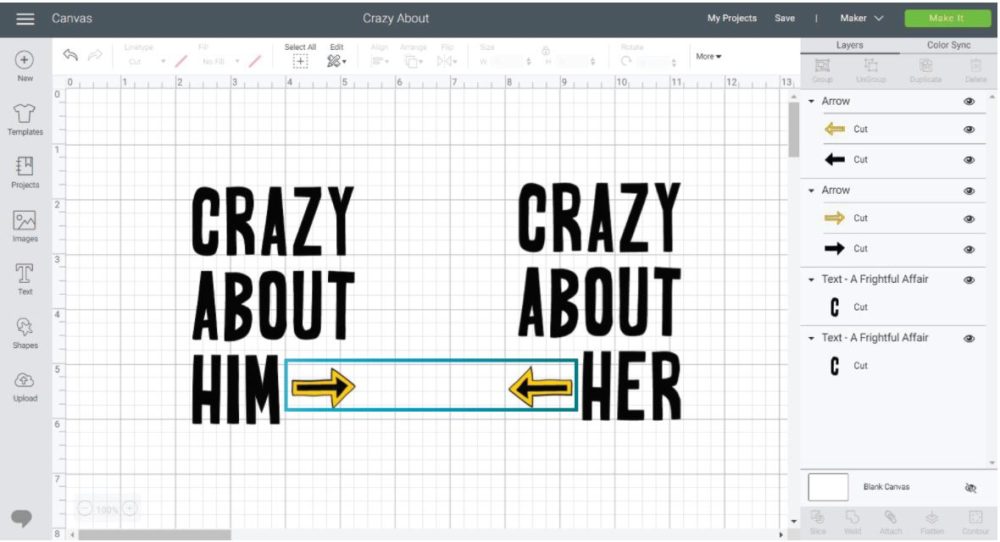
Have you ever seen those matching t-shirts with arrows? They are cute and fun, but most likely, the designer used something like “Flip.”
Look at the following example.
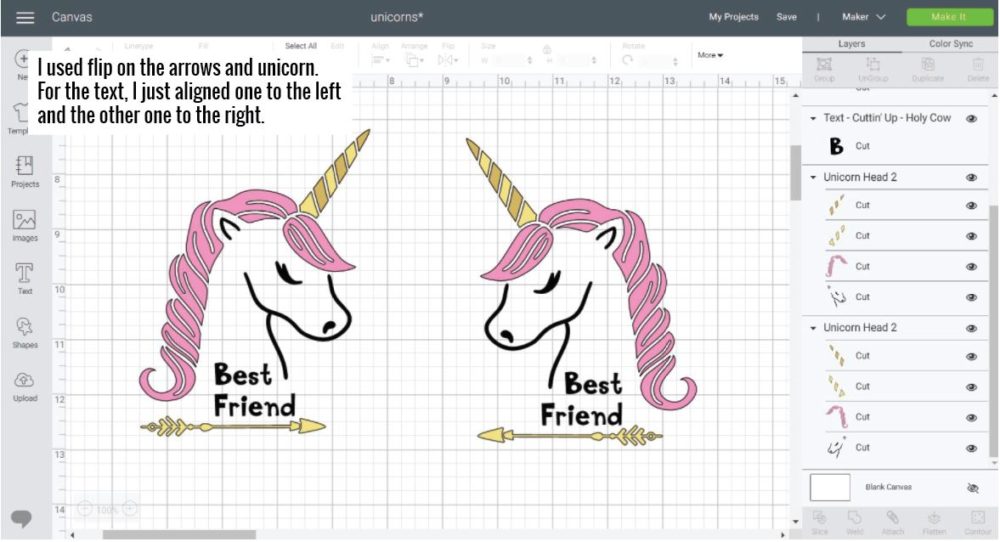
They are designs for matching t-shirts for two best friends. Each unicorn is facing the other one, and each arrow is pointing the other one.
In real life, if taking a picture of the two friends, one should be on the left, and the other one on the right.
Isn’t that cute?
Note: For symmetry purposes, I aligned text to the right when the unicorn was facing to the right, and I aligned the text to the left when the unicorn was facing to the left.
Learn how to edit text in Cricut Design Space.
Check this similar example.
In this case, I only used “Flip” on the arrows (code #M44708), and for symmetry purposes, I also aligned one of the designs to the left and the other one to the right.
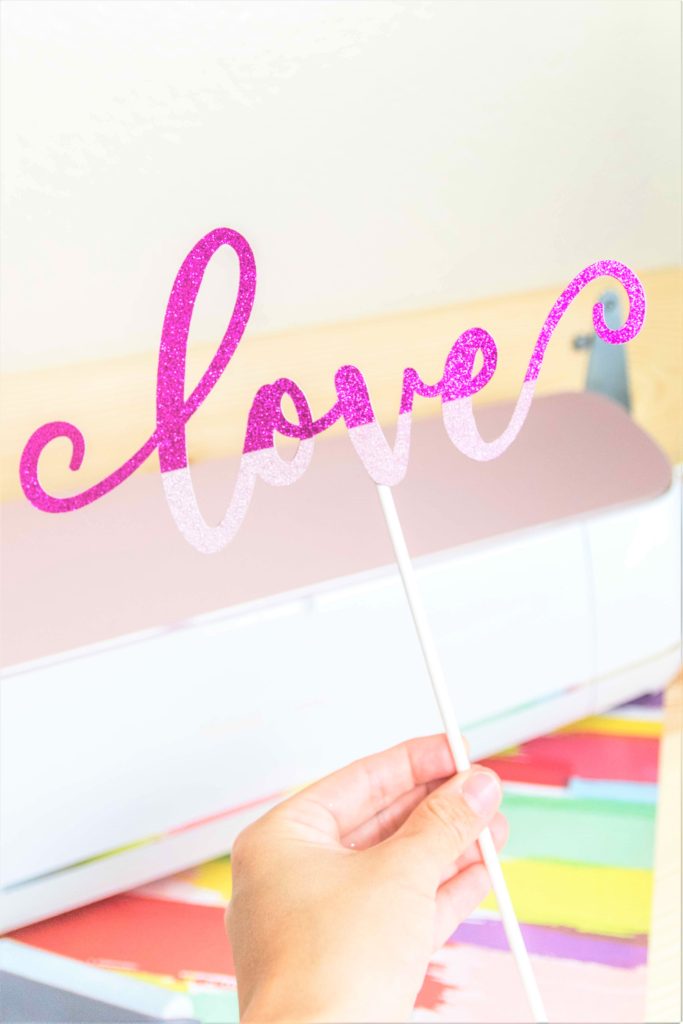
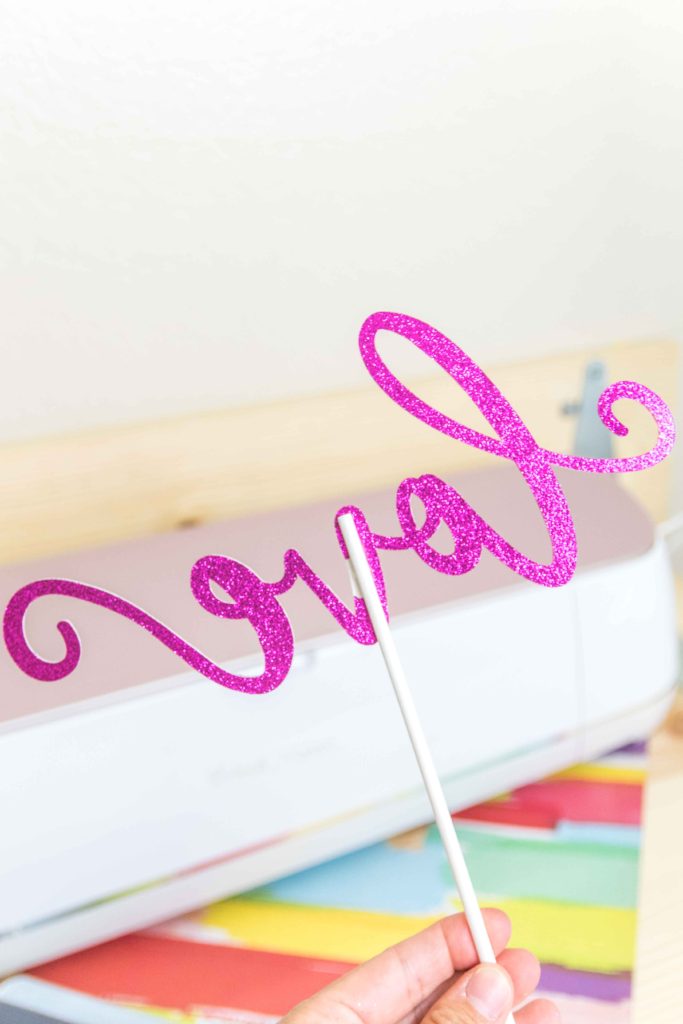
The “Flip” feature is also very helpful when you want to make projects that look pretty on the front and the back of your project.
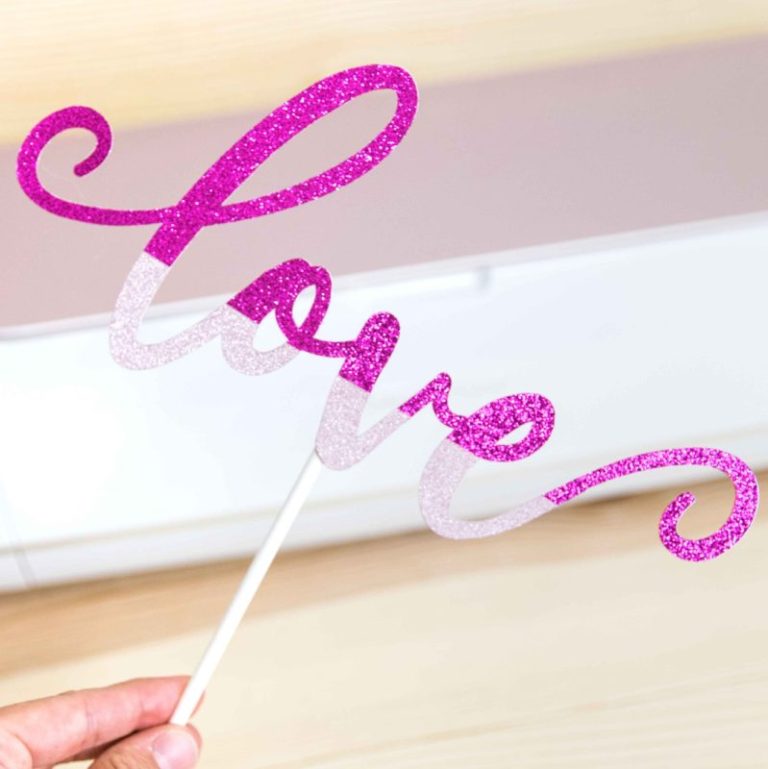
The following screenshots are from my “how to make Cake Toppers with your Cricut” tutorial.
Look how I flipped the “Love” design.

And this is how it looks once you cut the project. Back and front have a beautiful finish.
There was no need to “Mirror” after clicking on “Make it.” Everything was done before I sent my project to be cut.
Still, have doubts about incorporation “Flip” in your Cricut life?
Take a look at this lovely mitten; it’s an image from Cricut’s Library (code #M41EB5). There’s a big problem, though.
There’s only a left mitten!
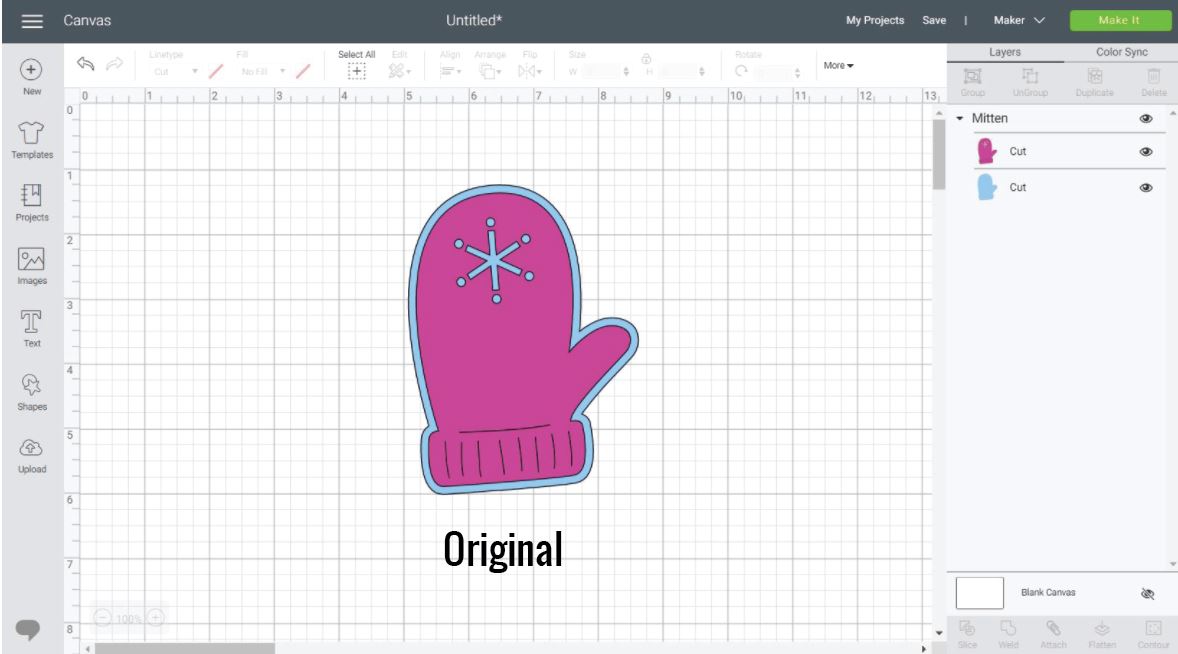
What if you want both mittens?
Very simple, make a copy of the mitten and “Flip Horizontally” one of them.
Voila! All of a sudden, you have the left and right mittens.
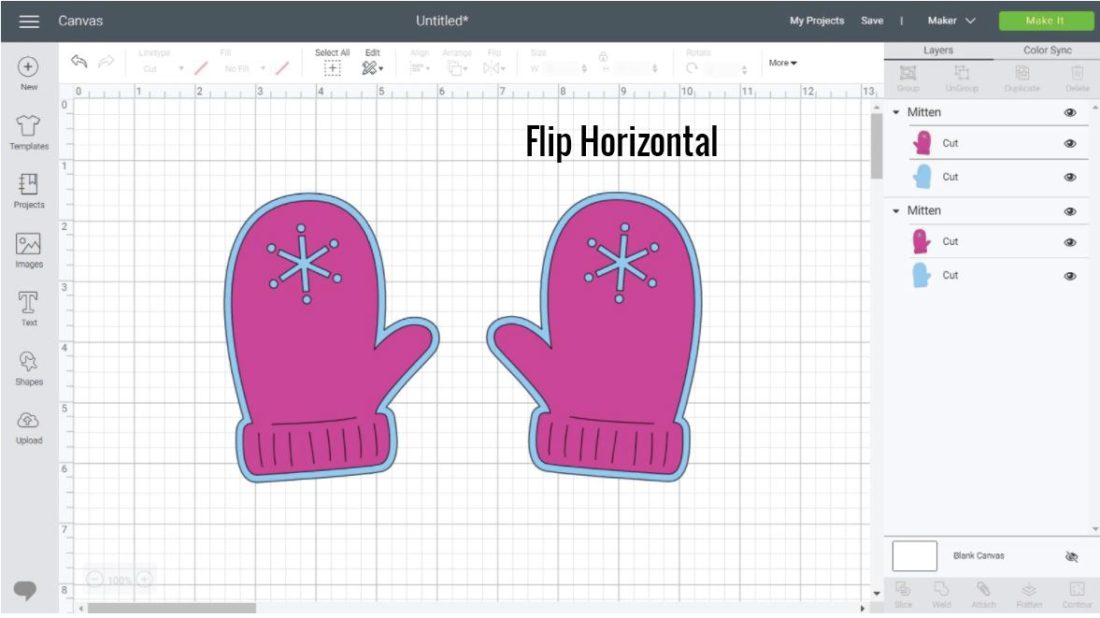
Isn’t that awesome? You can use flip with anything you need two opposites like hands, wings, eyes, etc.
Don’t be intimidated, and start having fun with this feature!
Find Flip in Cricut Design Space App
All of the things I just mentioned and illustrated about using “Flip” on a desktop can be replicated on the Design Space app.
There’s a little caveat, though.
Contrary to the PC version, where the “Flip” options are inside a drop-down menu, on the app, both options (Horizontal, Vertical) are next to each other. It doesn’t even say, “Flip.”
To activate “Flip Horizontal or Vertical” on the app, place an element on the canvas and tap on it to select it. Then go to the “Edit” icon located on the bottom panel and choose the option you want “Horizontal” or “Vertical.”
Easy, right?
Free Resources – SVG Files
To follow along (or if you just like them), you can download these two SVG files by clicking on the download buttons.
You need to be from a desktop computer, and they are for personal use only.
Follow and tag me on Instagram so I can see and feature your beautiful creations!
Oh!
Just so you know, I also have a library full of free SVG files and Printables for all my subscribers, a.k.a. Daydreamers. You can see a preview right here or get access by filling out this form.
Share it
All of your tutorials that land in my Inbox are very informative and helpful, especially with the pictures to follow along too. Thank you for your time and patience in putting these together, I’m sure I’m not alone in being very grateful and thankful.
I can relate to having to mirror each mat individually. I was working on an iron on project and forgot to mirror the second mat. I wanted to cry.
How does this work if you are trying to put words on the back of an item but can be read from the front.
I wouldn’t mirror it!
I am trying to make two flags for my sons boat with Outcast written in htv Nylon vinyl. How do I get the second Outcast needed to cutout going right to left.
The Outcast will be on the outside of each flag so one has to cutout left to right and the other right to left. Thanks for any help.
I would cut them the same way unless you want one to look backwards. Simply add in total 4 copies of the “Outcast” design and follow the “mirror” part of this tutorial.
This is great information, thank you so much! I have a question though, will mirroring or flipping help my machine cut through like its supposed to? I’ve tried everything with my machine to get it to cut through all the picture or lettering, but it always misses spots. I’ve only had it a month and done 3 projects with it. Ive tried replacing the blade, I have it on the correct material setting, I’m just at my wits ends.
I can’t seem to get you free SVG’s to download.
The only thing I see is the download button, but when I check they are not in my downloads.
Help
Hi Wanda. The file is there. I checked, maybe it’s saving on a different location of your PC?
Hello
Thank you for sharing your knowledge. This is very helpful and well written.
You’re very welcome, Ellen!