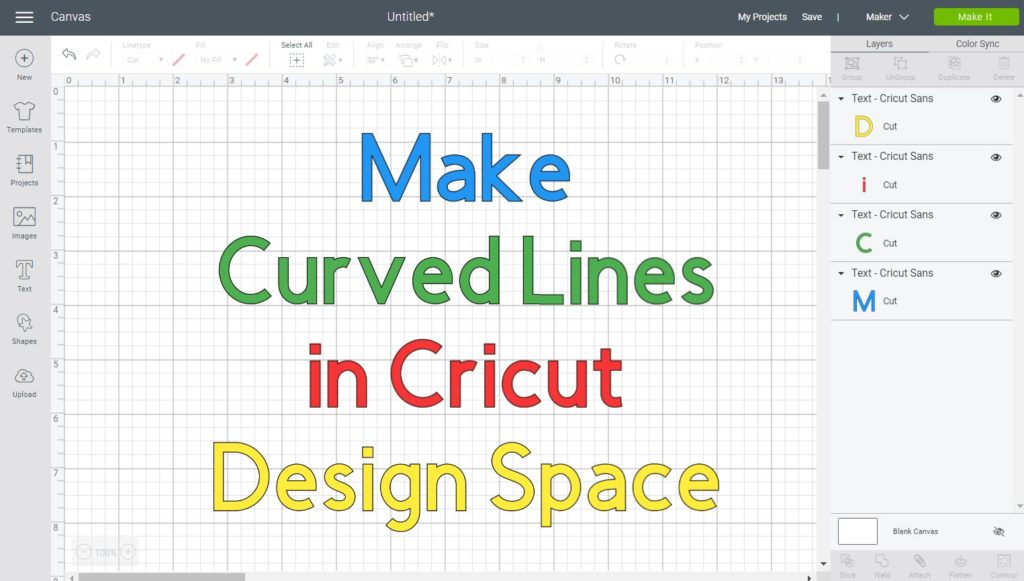
Hello Daydreamers!
In today’s tutorial, I am going to teach you all of my tricks to get curved lines in Cricut Design Space.
Plus, at the end of this post, there’s an SVG file for you to download multiple curved lines for you to use in your projects.
Let’s get started!
There’s not an option for you to add Curved lines to Cricut Design Space. However, you can extract curved lines from Cricut Access images, and or, create curves by welding and slicing circles against other shapes.
Lately, I have been putting all of my efforts to answer questions about shapes and lines for Cricut Design Space.
Look how to make rounded corners and add single lines.
I genuinely want to empower you to create whatever you wish on Cricut Design Space, and curved lines and shapes are an essential part of pretty much any design.
If you are a beginner still figuring out Cricut’s software, I recommend this comprehensive and easy Design Space tutorial.
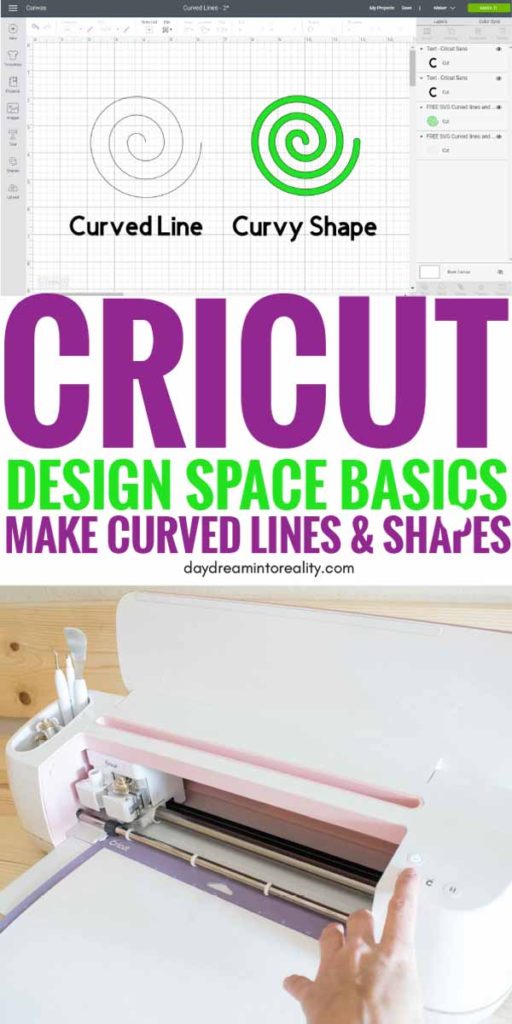
Understanding the Difference
Before we get started, and for you to follow this tutorial, you need to know the difference between a Curved Line, and a Curvy Shape.
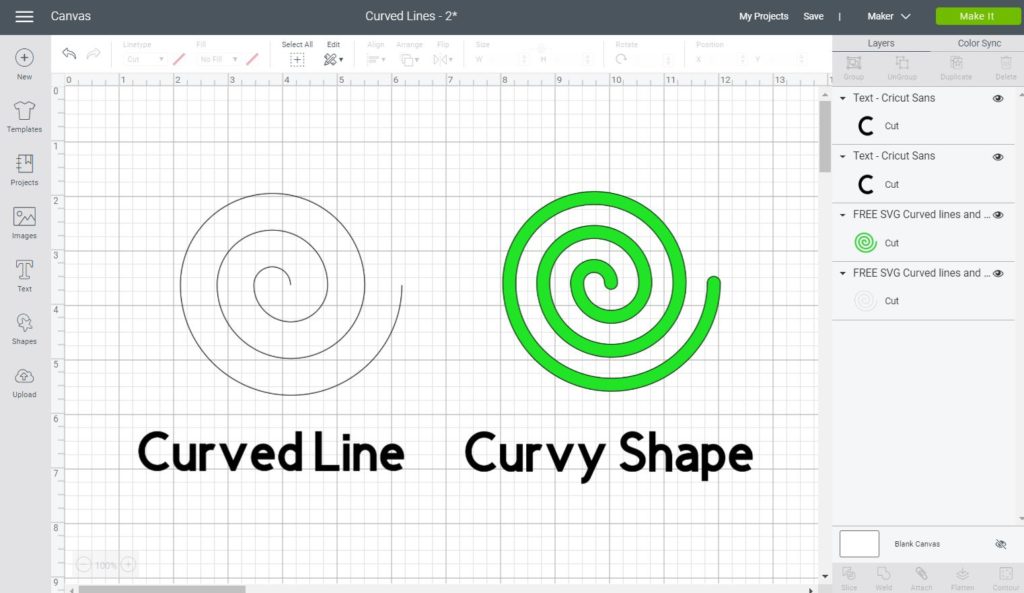
A curved line is ideal if you want to cut, score, or draw a single line on a design. That line shows precisely where the blade will cut through.
A Curvy Shape has the same properties as a square, triangle, heart, or any other shape. These are perfect if you want to incorporate in different designs and you can weld and slice them against other shapes.
Trying to Create Curved Effects on Shapes
If you are trying to create some wavy effect on your shapes, you can accomplish this by welding circles and then slicing them against your desired shape.
Let’s see a step by step tutorial.
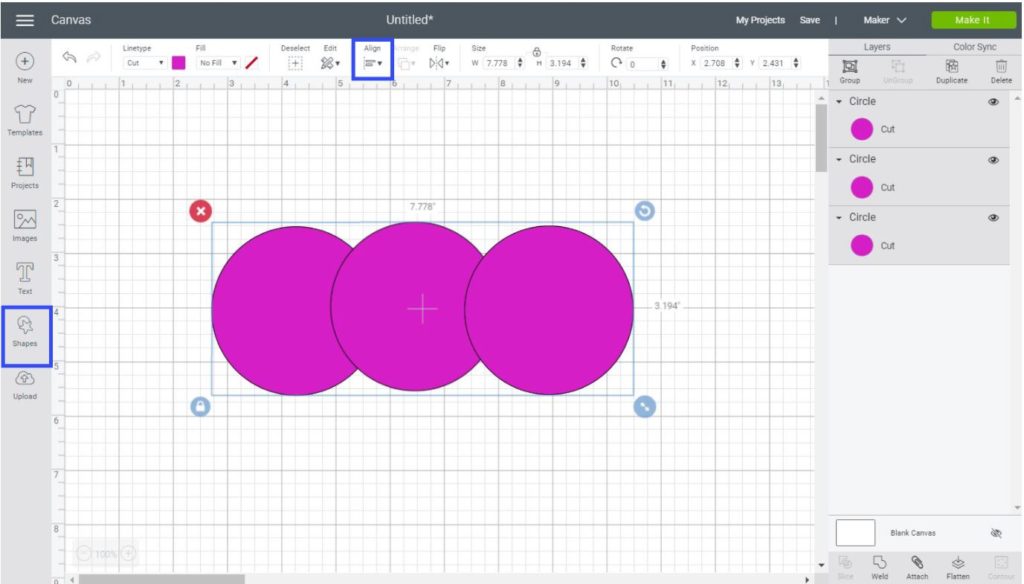
Step 1 – Add Circles
Add circles to create a new shape. The circle shape can be located on the left panel area under the shapes icon.
For this tutorial, I used three circles, and then, I align them at the top.
Be creative; they don’t have to be in this order, think of the curve you want and try to get the edge of the circle to look like that.
Step 2 – Weld and Duplicate
Once you have all of the circles, you need to select them and them and then click on “Weld.”
As you can see in the picture down below, a new shape (like a cloud one) has been created.
At this point, you can use the edge of the new shape and slice it against another one; however, I am going to duplicate it and then slice both of them.

Step 3 – Slice and Play Around
Try to see how many curved new shapes you can get by slicing the two “clouds” and think about how you can incorporate them into a new design.
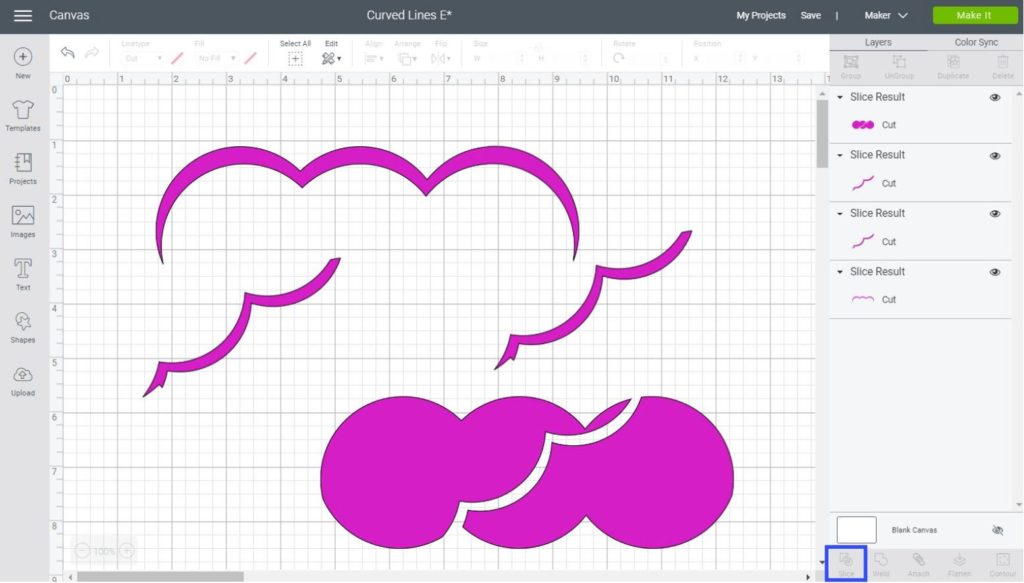
I used one of the “slice results” in a square.
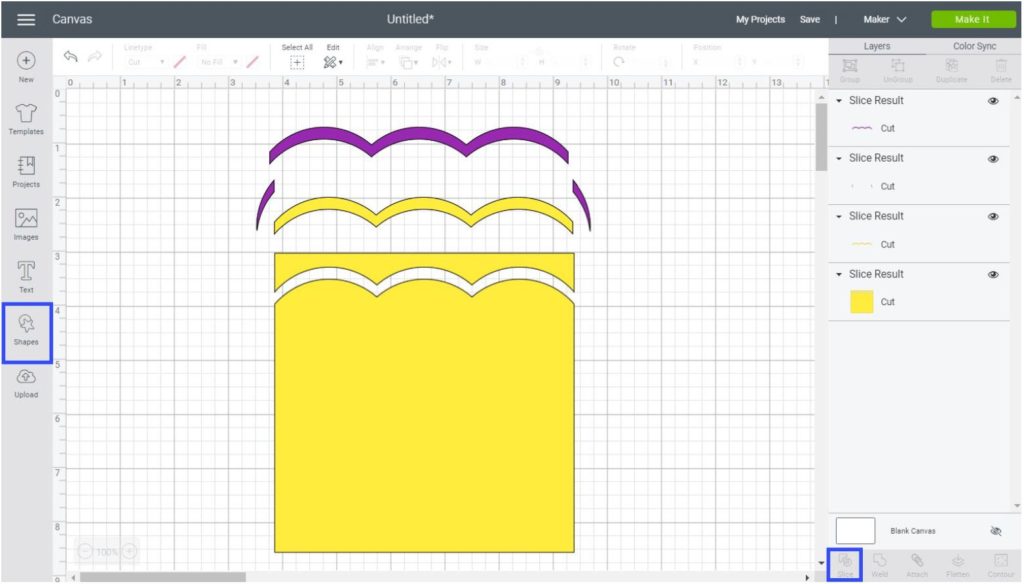
The problem with this method is that you can’t get single cutting lines; they will always be some curvy shape. Not an arbitrary line that you can just cut through.
Adding Curved Lines With Cricut Access
If you have Cricut Access (Cricut extensive library of Cutting Files) you can search for curved lines within their files and then add them one by one to your project.
If you don’t know what Cricut Access is, read this fantastic guide I put together and find out whether this a great option for you or not.
Click on images and type lines, line, curve, curves, to see what comes up.
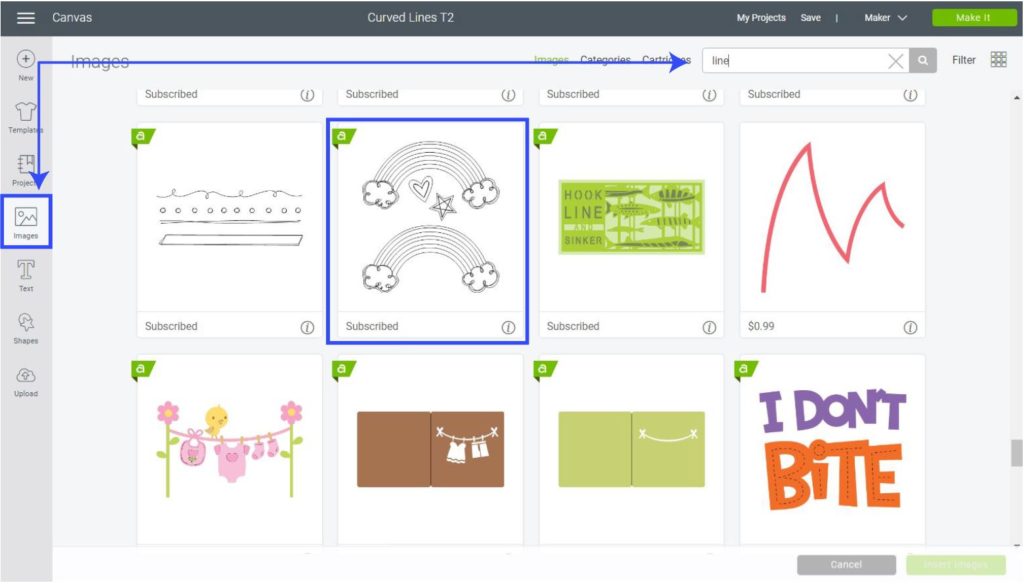
For this tutorial, I searched by the keyword line and added the Rainbow option.
Since I only needed the curved lines I hid – you can delete them too – the rest of the layers.
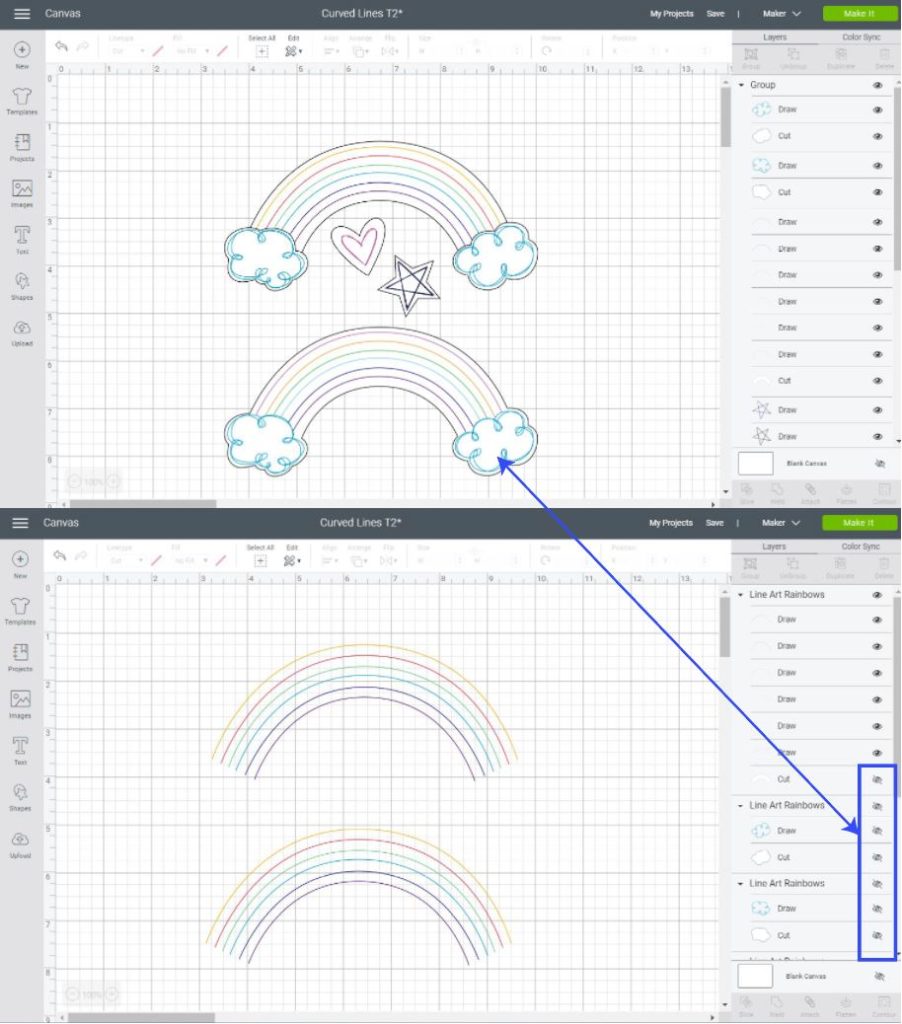
The problem with this method is that it isn’t free plus there aren’t many options available, and you can’t use a single line to weld or slice, so forget about creating new shapes with them.
Note: There are other curvy shapes similar to the ones we recreated above that you can incorporate as part of your design as well.
Get Curved Lines and Curvy Shapes for FREE

I have Adobe Illustrator (it’s my favorite software to create amazing beautiful cutting files.) Nonetheless, not everyone has that opportunity and access to this program, and I am a firm believer that everyone should have access to curved lines.
Wouldn’t you agree with me?
I have some curved lines and shapes for you to download and use in your projects, even for commercial use as long as you use them within a project.
DO NOT upload them on their own to your website or any other website; if you think someone would benefit from them, redirect them to this post!
This license is only for these Curved Lines, none of my other designs can’t be used for commercial purposes.

Oh!
Just so you know, I also have a library full of free SVG files and Printables for all my subscribers, a.k.a. Daydreamers. You can see a preview right here or get access by filling out this form.

Thank you so much for explaining this so well!
So helpful thanks!
Thank you so much, Catalina! I used the curved lines today!
Thank you so much! SOOOO useful! Thanks for your generosity
I created a compound vector curve in my CAD program and exported it as a jpg. I then imported it into Design Space. In cutting, Cricut went over the line twice which surprised me since I drew a single line. When I zoomed in to the line in Design Space I noticed that Design Space had turned the line into two lines, basically making it into a very thin curved shape. Looks like a line but Cricut handles it as a shape. So the end result is a very thin curved slot instead of a line cut. I also noticed that the shape had a color fill in it so I wondered what would happen if I chose black to fill the shape. Well, it still cut it twice, but this time Cricut handled it as a single line so I ended up with what I wanted, a curved line cut!
There are many free simple CAD programs available for download if you don’t have one.
Hope this helps.
I have tried several times to join your mailing list but it will not send me a subscription via email. It is not in my junk or spam folders, I have checked. Could you please fix this situation as I would really like to follow you and your work is very nice, with lots of helpful tips.
Hi, Elena I just added you, let me know if you get the password.
Hey ! I want to make single-line cuts, and I do have illustrator. How did you save your single lines from illustrator in a way that did not produce two-line cuts in cricut? When I save my lines in illustrator, my cricut cuts the outlines of the lines. thanks!
You need to use a vector line. Don’t outline or expand your design on AI.
This is what I needed to make my projects more interesting.
You’re welcome 🙂
I love this post. I’m really interested how you make these lines though. Could you explain it to me?
I make them in Adobe Illustrator. They are vector lines and they are super easy to make.
THANK YOU!!!! I’ve been trying to make and looking for a half circle with an open top for EVER!!! I could never get one that didn’t do wonky things when cutting (jagged edges, etc.). The one in your curved lines is perfect! Great article all around. You’re my new best friend. 🙂
You’re very welcome Kim! I am so happy I get to help. 🙂
Hi, thanks so much for these. I wonder if you could help me. When I create a path in Photoshop is there a way to convert it into a single line or would I need Illustrator to do that? I have tried in Photoshop but can’t find how to do it.
I am sure there’s a way to do it n PS but I have no clue. I use AI for vector lines. It’s easier.
I can upload this but not as svg. Any ideas?
Are you from a PC? Uploading SVG from a phone it’s a little bit tricky (working on a tutorial for this).
I am trying to sign up for your site, but do not see where to do it. I put in my first name and email, but do not see where to put in a password although it asks as if I have already chosen one.
Hi Annie. You need to fill out this form, then an Email with the password and link will be sent to your email! If you already got the email, the password right bellow the link.
Hi do you know if you can offset shapes in Cricut design space. It’s really frustrating as I want to be able to cut round small drawings. Thank you for your help.
You can’t. However, I have a handy article that will teach you how to achieve outlines.
Thank you!!
You’re welcome!
Hi, I have a question. I recently created some curved lines in Illustrator, but when I import it into the Design Space, the curvature changed a bit. How to get around it?
Thanks!
Hi Tina, that’s a little odd, quite frankly that’s never happened to me. I hope you can find a way around it.
I apologize but it will not let me right click and upload? Is it not available anymore?
They are still available. Right-click on the image and select the option “Save Image As.”
Hi! Thank you so much for these lines! I’ve been searching for hours trying to figure out how to add tails to the balloons I made in Design Space.
I’m not seeing how to download these lines though. Right click on what? The picture or should there be a link? I have a Mac so maybe that’s why I can’t figure it out.
Hi Jen! I am glad they can help you! Yes. to upload them just right click (on the image that sais so) and save on your computer and then upload to Desing Space.