Hello Daydreamers!
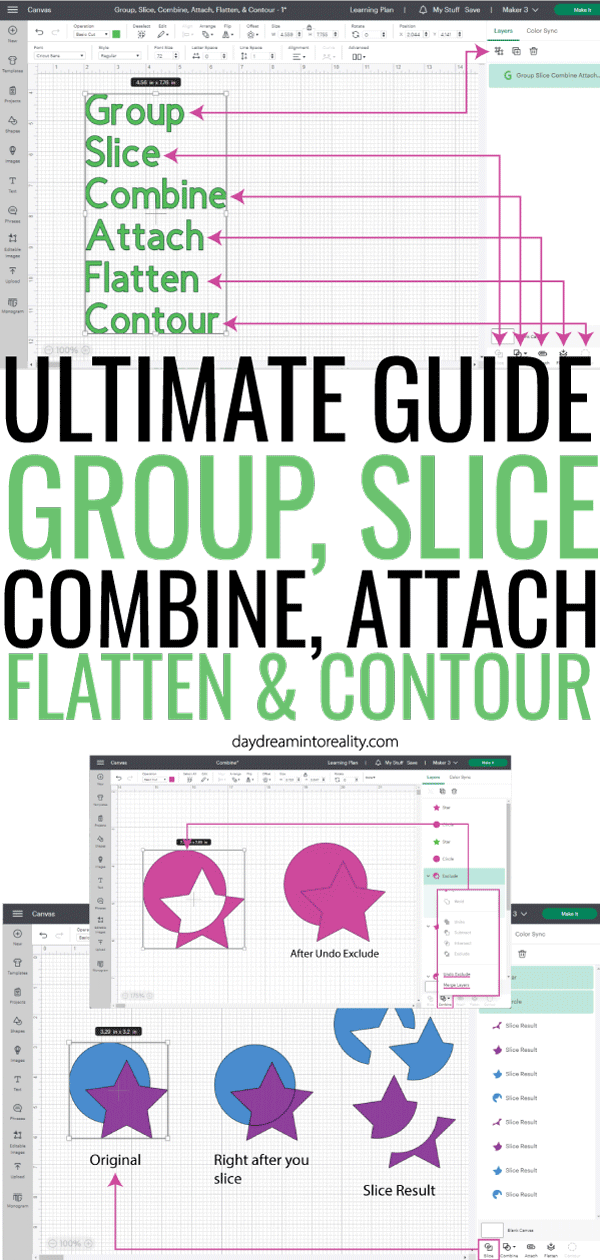
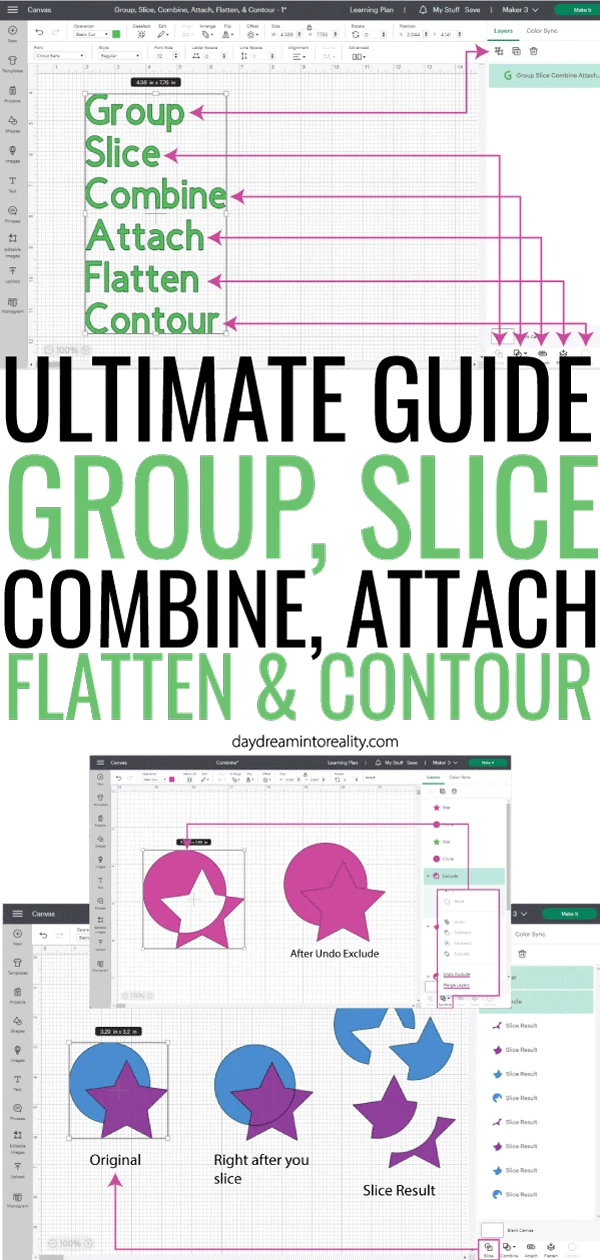
Group, Slice, Combine, Attach, and Flatten are some of the essential tools you’ll ever need while using a Cricut, and it’s in your best interest to master each one of them.
If you’re a beginner, this may sound a little intimidating, but no worries, this tutorial will walk you through some of the most important things you need to know about each concept.
Tip: Some tools may have an extra tutorial that I’ll link to so you can expand your knowledge even further.

If you’ve never even opened Design Space and need extra help, check out my Cricut Design Space tutorial, where I give an overview of what every tool is for in Cricut’s software.
Oh!
Just so you know, I also have a library full of free SVG files and Printables for all my subscribers, a.k.a. Daydreamers. You can see a preview right here or get access by filling out this form.
Are you ready?
Let’s get started!
Note: This article has been updated; some pics may look different if you’re coming from IG or Pinterest.
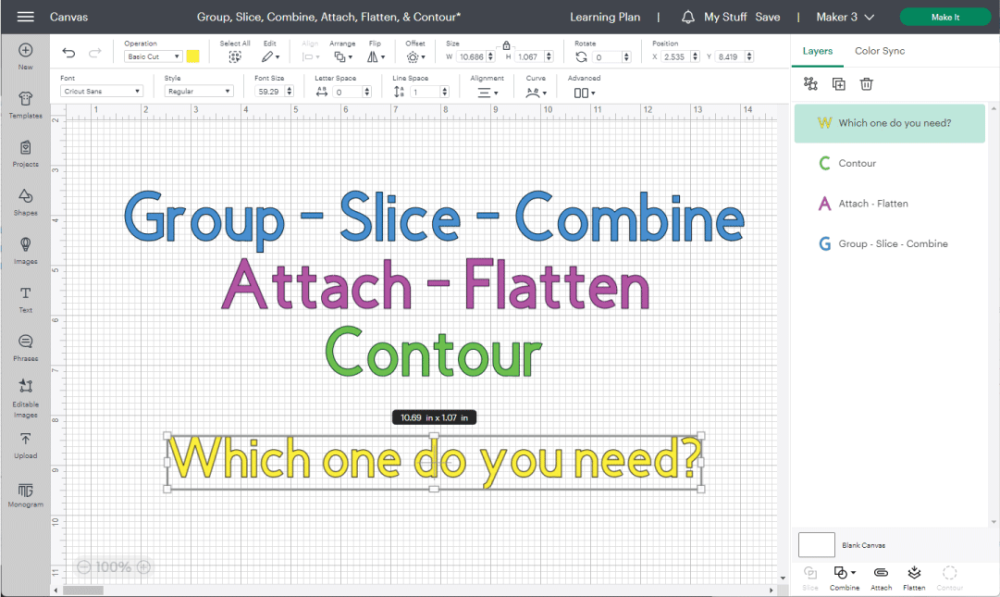
Where to Find the Group, Slice, Combine, Attach, Flatten, & Contour tools in Design Space
Before diving into each concept, let’s see each tool’s location.

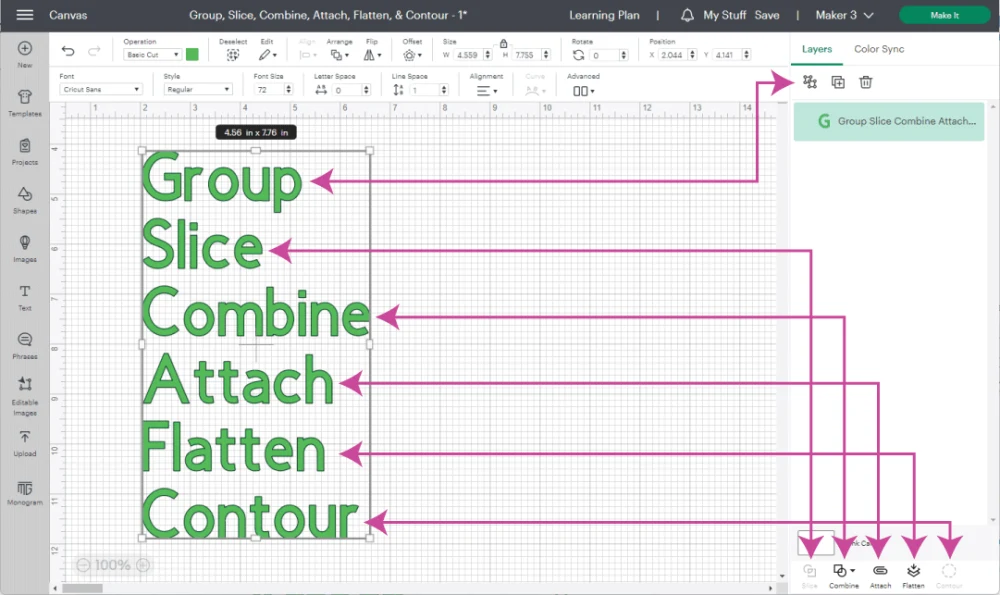
- Group: located on top of the layers panel, it will become active when you have two or more layers selected. Group will also be active when selecting a single text layer with two or more letters.
- Slice: the first icon at the bottom of the layers panel; will become active when you select two or more layers.
- Combine is the second icon at the bottom of the layers panel, which will become active when selecting a text layer with more than one letter or two different layers.
- Attach is the third icon at the bottom of the layers panel, which will become active when selecting a text layer with more than one letter or two different layers.
- Flatten is the fourth icon at the bottom of the layers panel, which will become active when selecting a text layer with more than one letter or two different layers.
- Contour is the fifth icon at the bottom of the layers panel and will only become active when selecting a layer that scattered pieces. It doesn’t work with text or solid layers.
As you can see, many of the tools become active every time you select either text or multiple layers; now, let’s see an overview of each tool and when to use it.
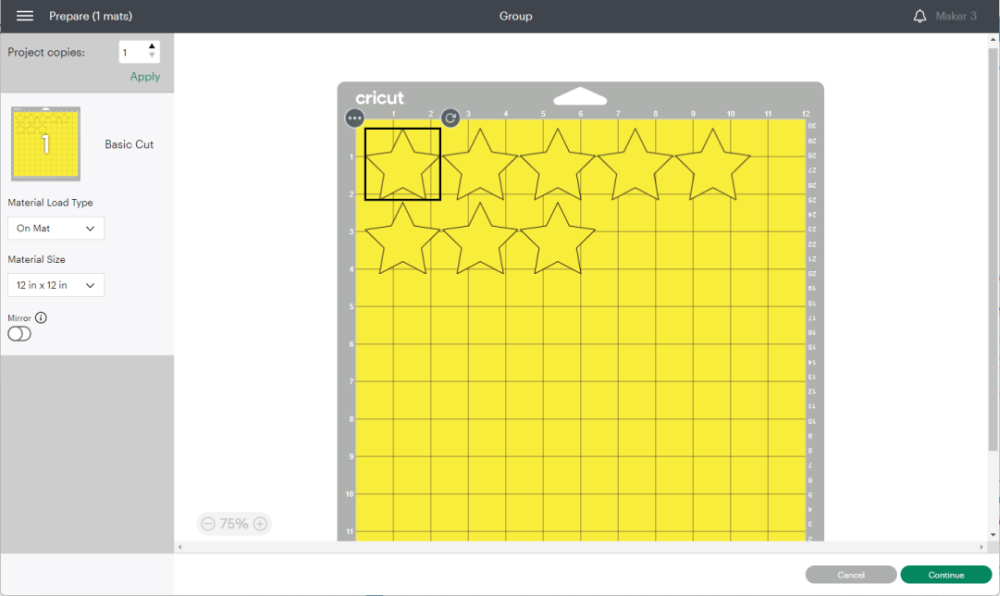
Using Group in Cricut Design Space
The “Group” tool doesn’t get the love it deserves in the Cricut community; the reason why it’s that it doesn’t affect anything during the cutting process, and quite frankly, you can work on an entire project without ever having to use it.
Grouping allows you to associate pieces of a design that have similar characteristics.
If you are working on a very complex and large project, you will want to group certain elements to change them in just a few clicks.
Here are some things you can change instantly for all of the elements that belong to a group.
- Choose a different color
- Change the operation
- Hide the elements
- Change other editing options like rotation, position, etc.
To use “Group,” select all the elements you want together and click on the group icon at the top of the layers panel.
You can also find “Group” inside the “Arrange” drop-down menu or right-clicking the selected layers. My favorite way to access this tool is using the keyboard shortcut Ctrl(cmd)+G.
If you need to ungroup, select the group and press the “Ungroup” icon on the layers panel. You can access “Ungroup” in the same places you would find “Group.” The keyboard shortcut is Ctrl(cmd)+Shift+G to ungroup.

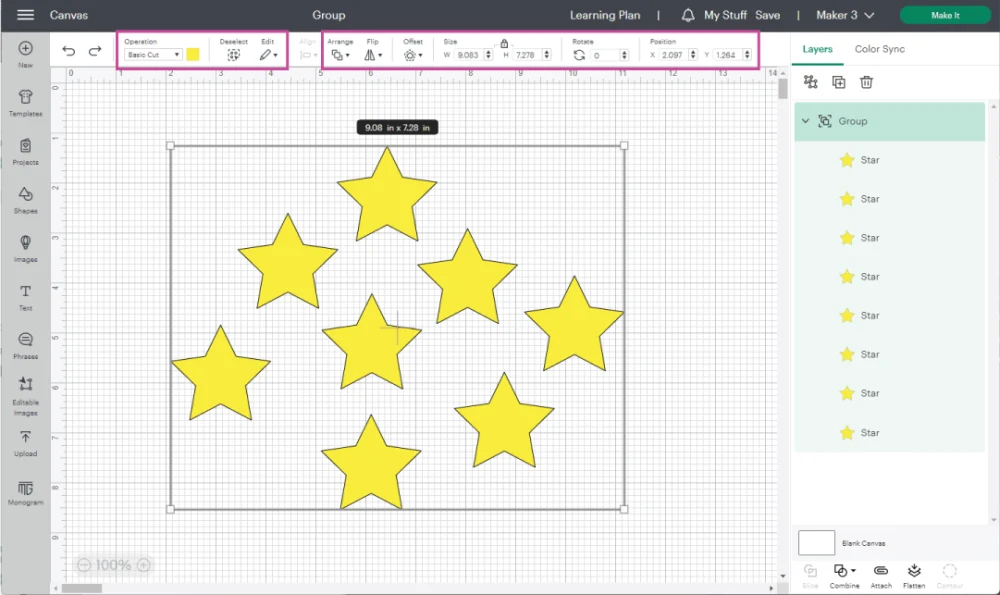
Note: the stars didn’t keep the grouped position once I sent the project to be cut.

Using Slice in Cricut Design Space
“Slice” allows you to split or crop out two overlapping images or layers to create a new design. Anytime you slice, the images must be overlapping; if they aren’t, nothing will happen.
Let’s see the following example to see how to use slice.


Step 1: Overlap two images; I used a circle and a star.
Step 2: Select layers and click on “Slice tool.”
Step 3: Move the resulting pieces to reveal your new images.
After slicing, you will always have three or more layers called “Slice Results. “The number of results doesn’t matter. Just delete the pieces you don’t need.
Sometimes, even without a clear vision of my project, I slice things that don’t make sense to see how a shape will change into another one.
Read my guide on How to Slice in Design Space to learn more tricks and tips!
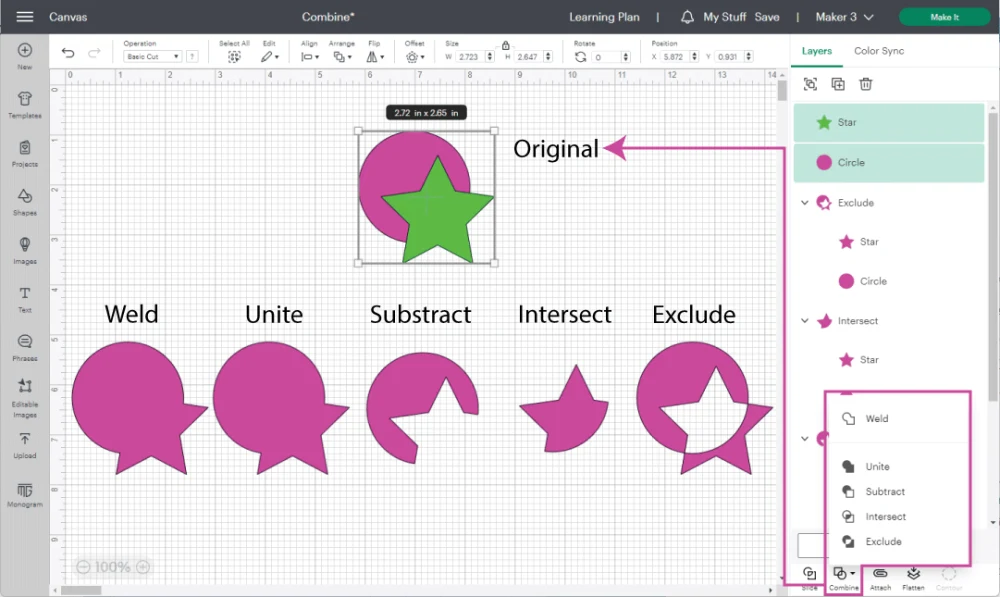
Using Combine in Cricut Design Space
The Combine tool is a relatively new concept in Design Space. It’s a five-in-one options tool.
- Weld: combines all layers into one; you can’t undo this step.
- Unite: does the same thing as weld, but you can undo the option even after exiting your project.
- Subtract: will deduct the front piece from the one in the back
- Intersect: will only show where both shapes are overlapped
- Exclude: will make a cut-out where both layers are overlapped

At any point, you can reverse the changes of all the “Combine” tools except for “Weld.”
Select the combined layer you want to undo, click on “Combine,” and select “Undo.” On the other hand, if you’re happy with the result and don’t see yourself returning to the original, you can click on “Merge” to turn it into a single layer.
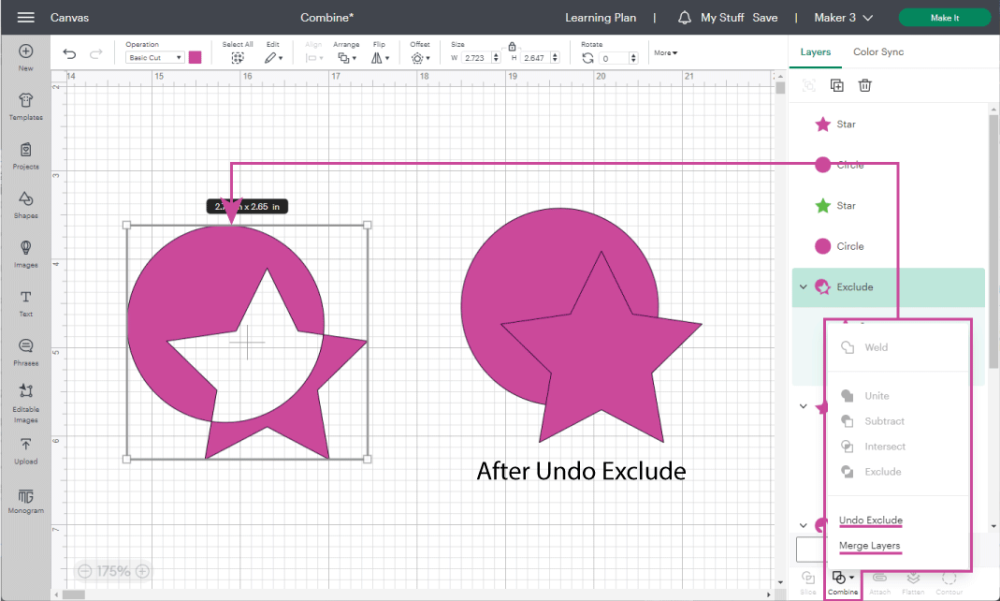
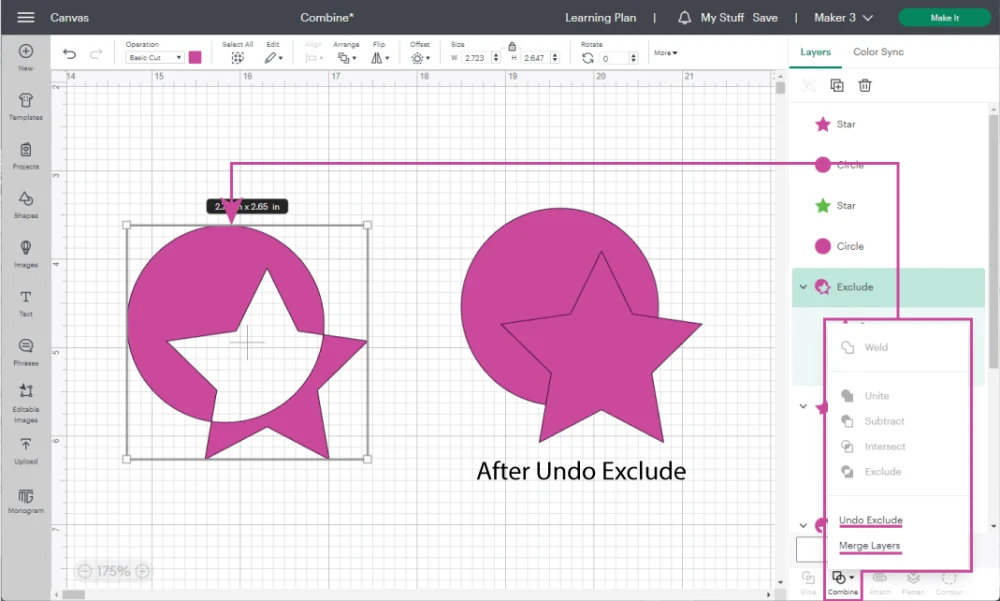
Why would you merge, or use “Weld” from the get-go?
Some projects are pretty large, and you can merge if you want a single layer or color.
Look at the following screenshot.
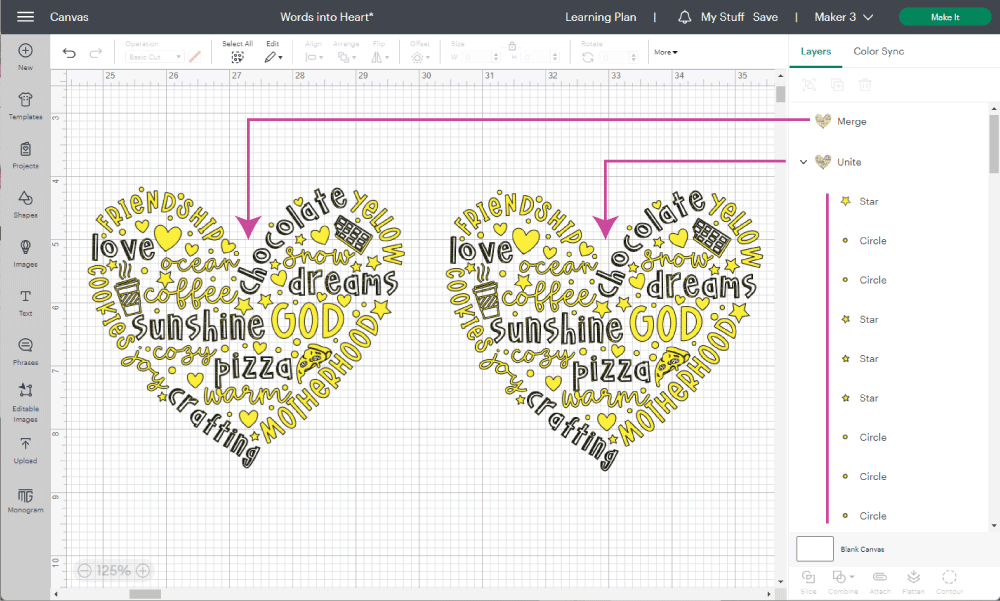
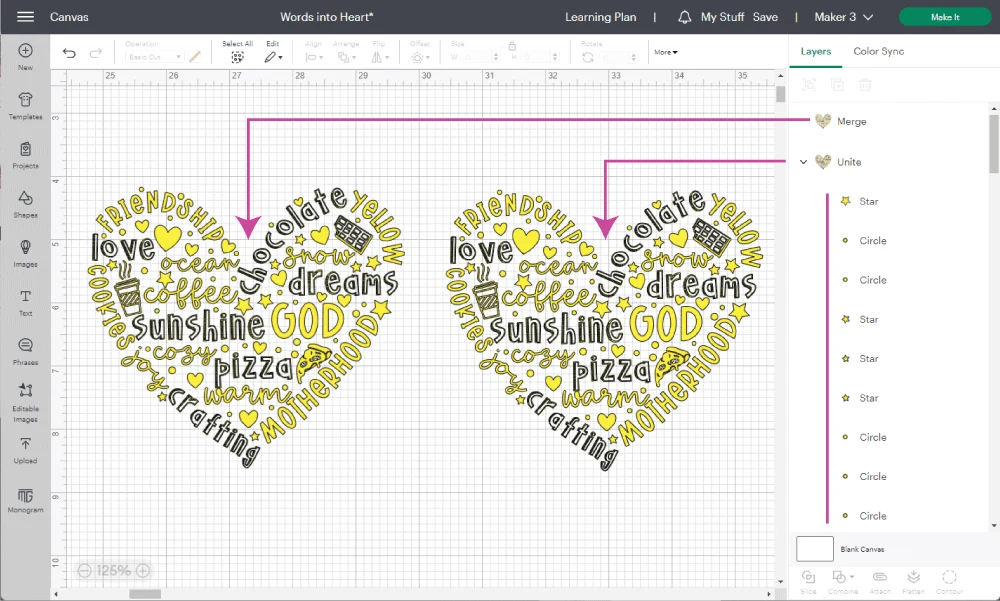
Keeping the layers united can make Design Space a little slow. Personally, I wouldn’t say I like having so many layers on my projects; I always like to consolidate whenever possible.
Using Attach in Cricut Design Space
Attach, in my opinion, is an essential tool inside Cricut Design Space. Usually, this little setting causes THE MOST HEADACHES for beginners.
In all of my tutorials, I have to give the “attach warning” because things will be all over the place if you don’t use this tool correctly.
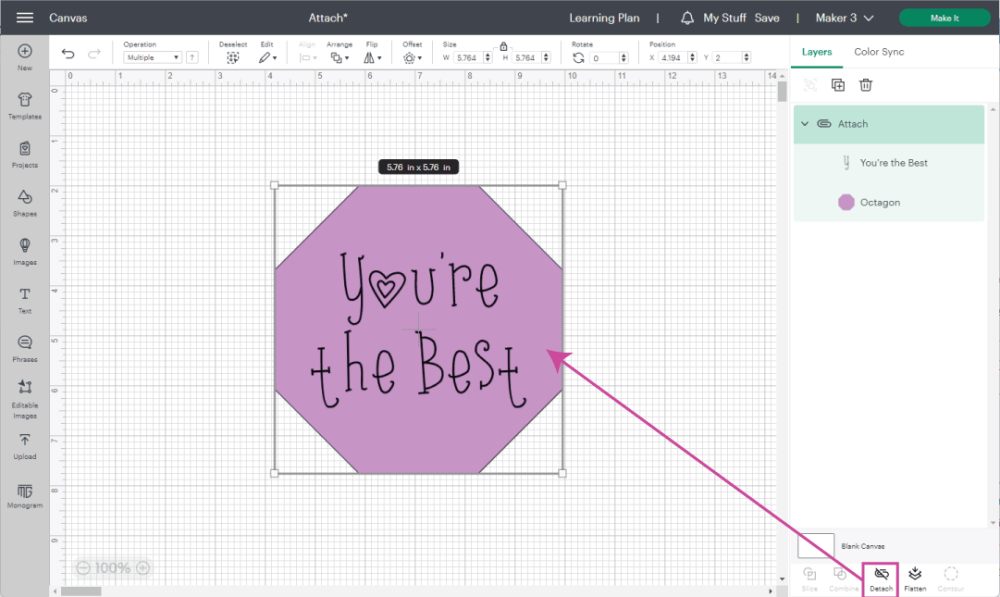
Attaching allows you to keep all of the – attached – layers together. This means that everything will be organized when you send your project to cut, just like when you designed it in Cricut Design Space.
Not only attaching keeps everything in place, but it also allows you to attribute a layer to a specific cut. For instance, you need to tell your machine where to draw or score to add scoring lines or draw on a project.
Attaching the score or drawing lines to any other element tells your machine where exactly to draw or score.

To use attach follow the next steps:
Step 1: Add all of the elements you want to cut
Step 2: Add any text or scoring lines you want to include in your design.
Step 3: Organize your elements in the order you want to draw, score, or cut, select them all, and then click the attach button at the bottom of the layers panel.
Note: If, for some reason, you need to change the size, font, and or color on just one of the elements of that particular attachment, you either need to detach or select the specific detail you want to change from the layer’s panel and proceed to change it.
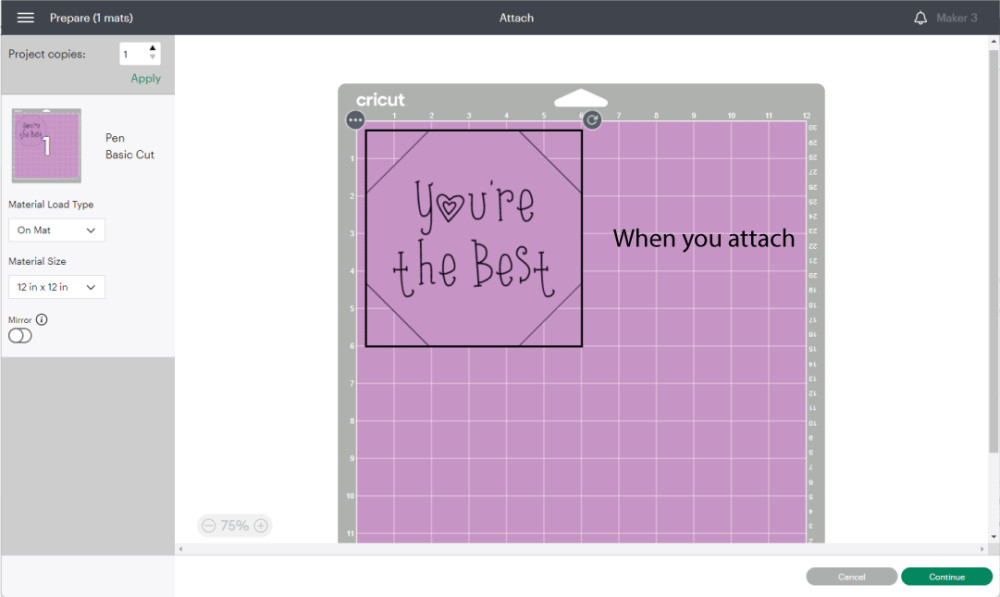
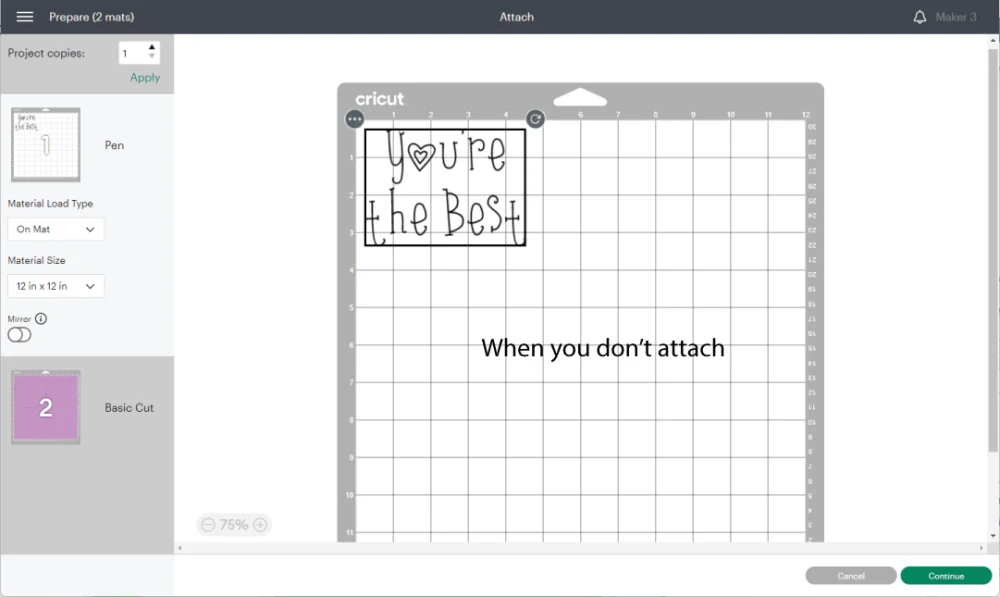
This is how your project should look when you send it to your machine. Everything should look just as you designed it on the canvas area.

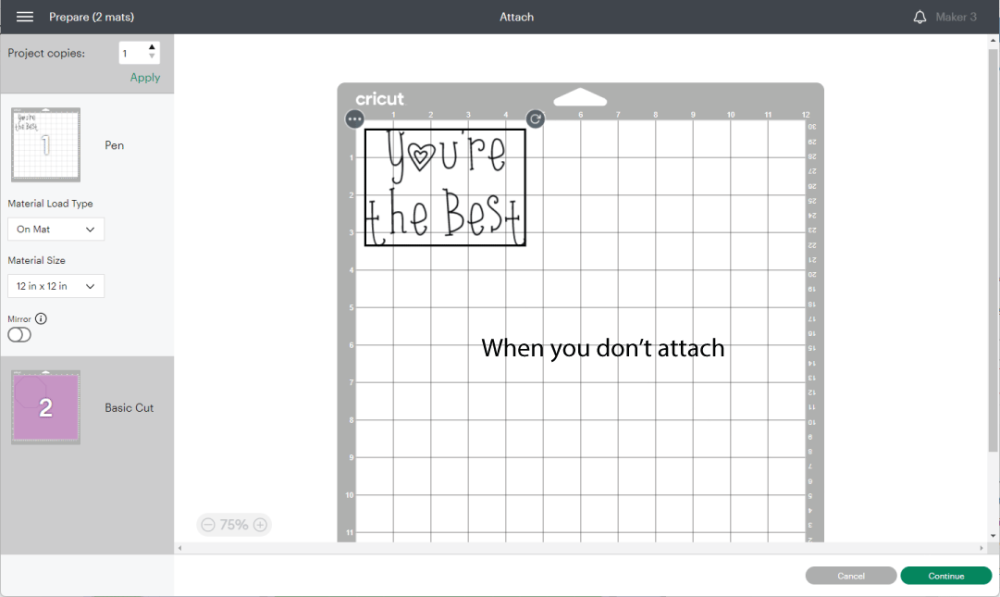
Here’s what happens when you forget to attach your layers. The text and shape will be on a different cutting mat.
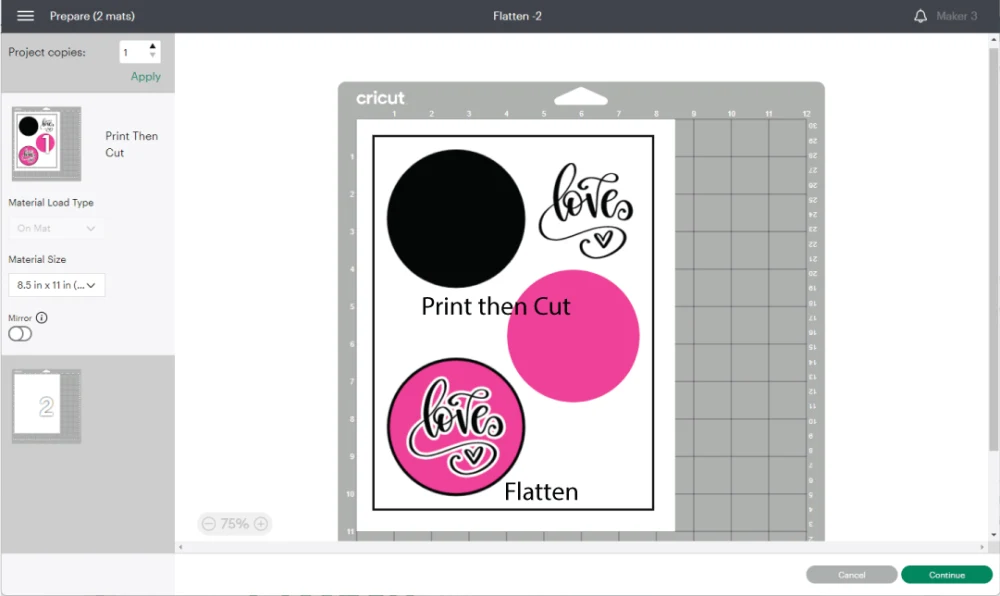
Using Flatten in Cricut Design Space
This little tool, in my opinion, should be in another spot because it serves a different purpose.
Flatten is a tool that allows you to combine a design in a single layer to use “Print then Cut,” a setting where you print your design, and then cut it with your machine.
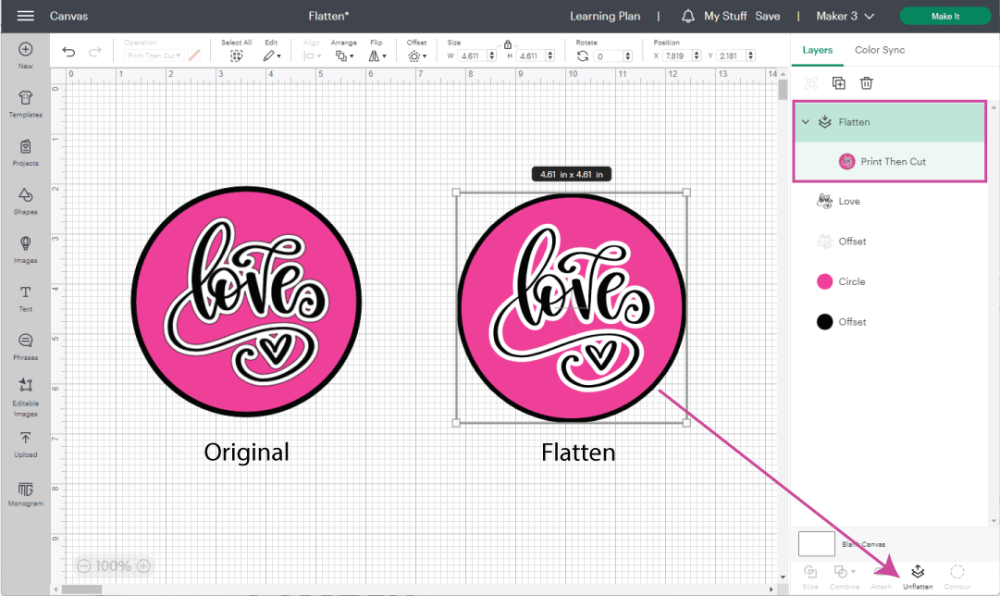

To use flatten, select all the elements you want to print and cut, then click on the flatten icon at the bottom of the layers panel.
Flatten is the tool to go for making stickers, labels, and printable iron-on t-shirts.
Why would you use flatten instead of changing the operation layers to “Print then Cut.”
I’m glad you asked!
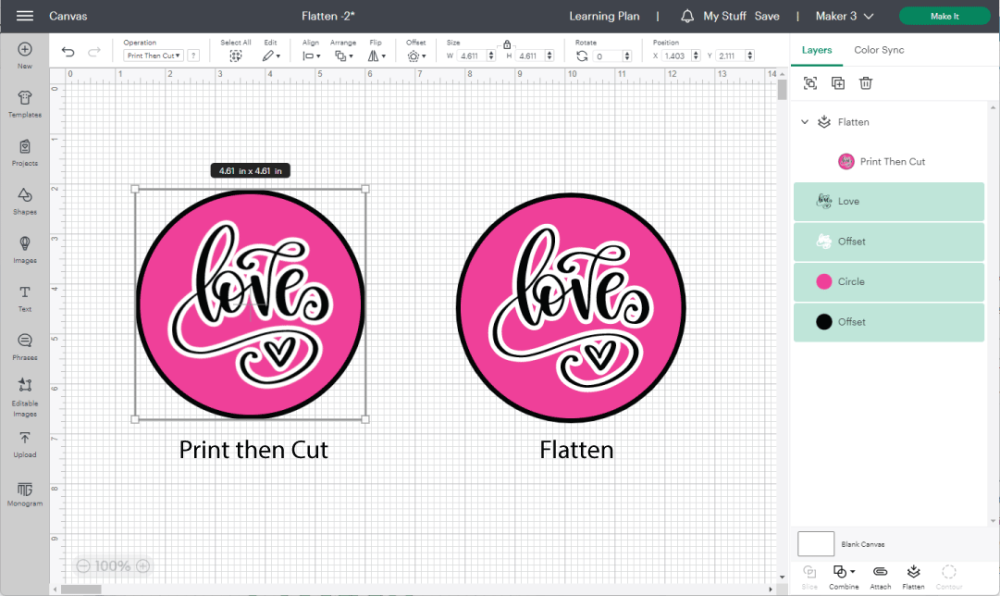
You see if you change operation instead of flattening when you send your project to your machine, the print then cut layers will be all over the place.
Flatten is the “attach” of print then cut; it keeps everything together on the mat.

Print then Cut it’s a whole new setting you’ll want to learn if you want to take advantage of your machine. I use it all the time, and it’s one of my favorite ways to use my Cricut machine.
Using Contour in Cricut Design Space
Contour allows you to delete/hide unwanted pieces from your projects. This tool is handy because you can modify your projects to create a different effect or feel.
There are a couple of things you need to keep in mind when using Contour:
- It only works with one layer at a time. So if you have more than one layer selected, the tool won’t activate.
- You can’t contour a text layer.
- It only works with SVG or cut files. Even if your PNG or JPEG images have blank spaces or loose/scattered parts, the contour tool won’t work on them.
As I mentioned, Contour is used mainly to hide or delete unwanted pieces of an image or design.
Check out the following screenshot.
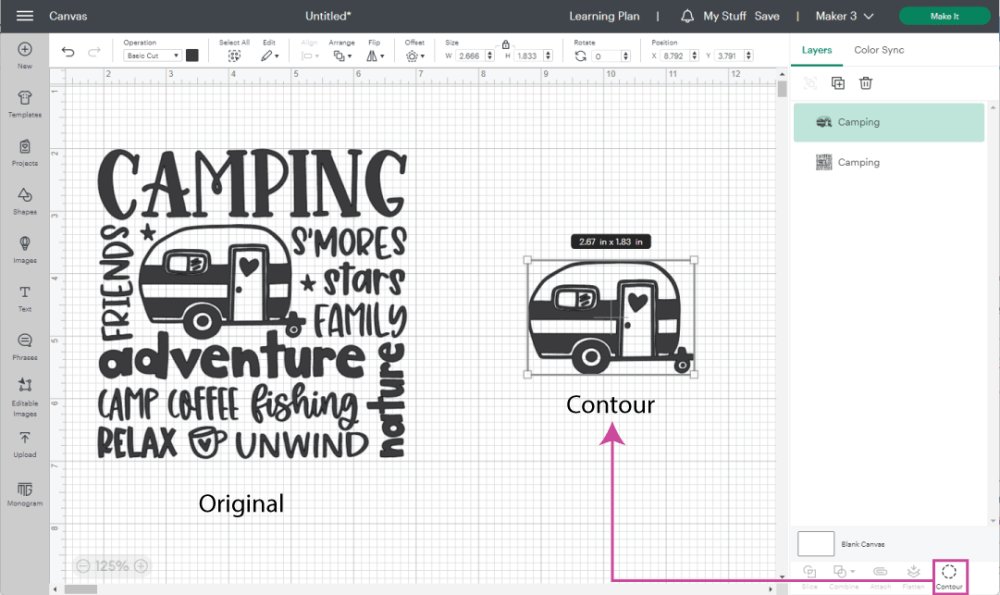
The original image is a beautiful camping file. You may want to use the image as it is or want just a part of it.
By contouring, you can extract an element you love from an image. Select the image on the canvas, and click on the Contour tool at the bottom of the layers panel.
A small window will pop open.
Each scale of grey represents a separate element that you can click on to either hide or show. The grayest color represents the blank spaces or holes in your image.
Images like the one in this example have many details; if you only want a particular element, it’s better to click “Hide all Contours” and then click on the parts you want to keep.
I also like using the zoom in and out to select better all the details I want.
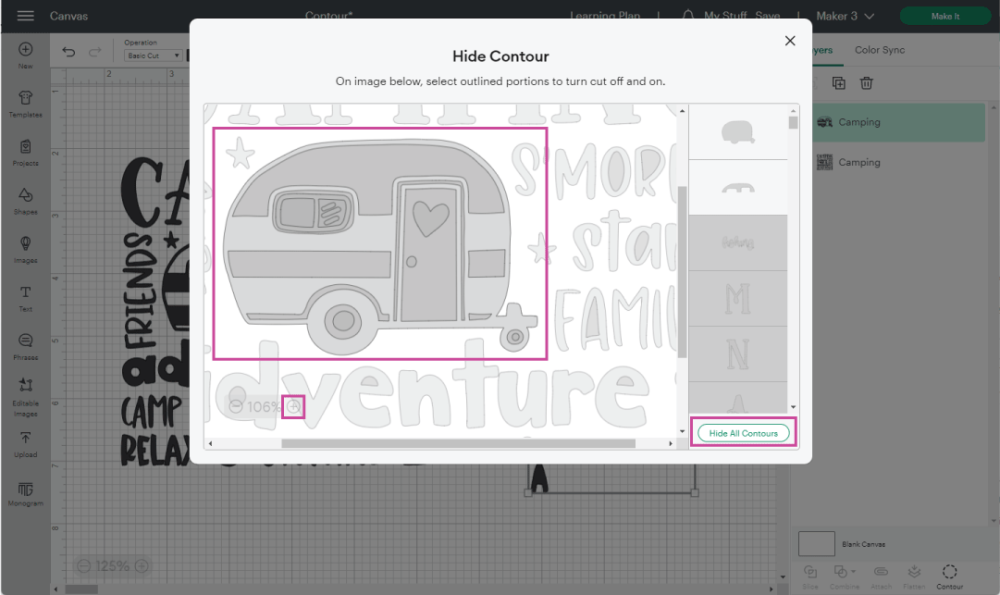
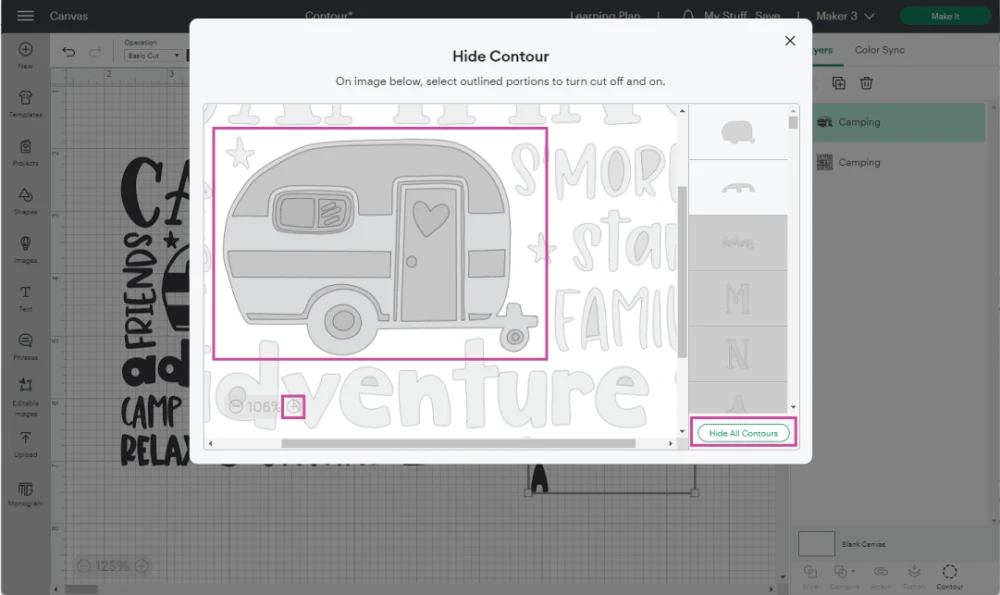
Once you’re done, click on the upper-right corner x of the small window.
Read my contour guide for a more in-depth tutorial full of tips and tricks.
How to know which tool you need for a project
At this point, you should clearly know what tool you need for a particular project. Nonetheless, I also understand it cannot be easy to grasp all the concepts.
The truth is that you’ll find out what tool you need as you practice.
Sometimes, you can use different tools and accomplish the same results; there’s no right or wrong. I love getting comments from my readers saying they do things differently than I’d ever thought.
Let me show you a couple of examples.
Using the same image from the contour tool, I wanted to keep the word “Camping.”

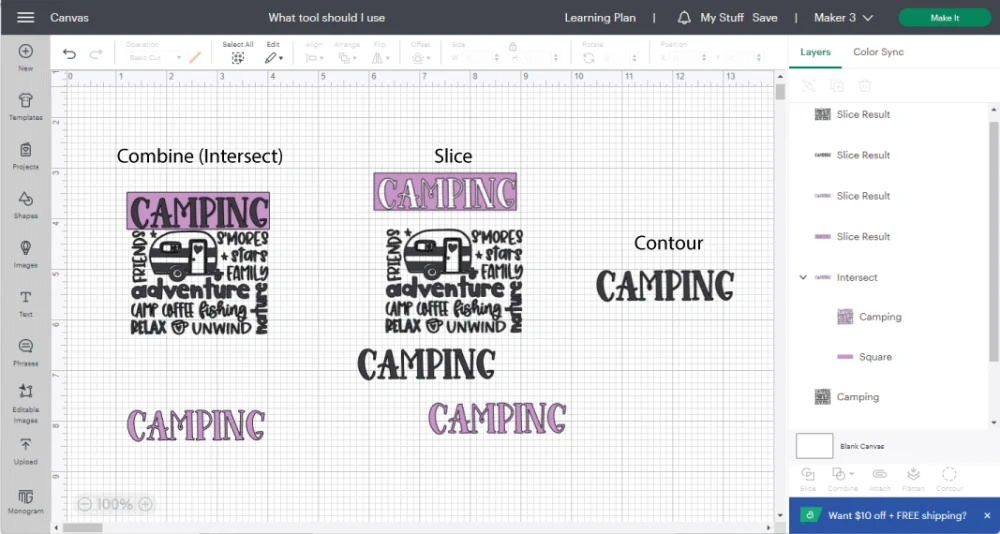
I was able to do it in three different ways.
- Adding a rectangle on the back and using the “Combine – Intersect” tool.
- Slicing the same rectangle against the image
- Using Contour on the file.
Let’s look at the other example.
I wanted to make a cute summer image out of two files from Cricut’s library.
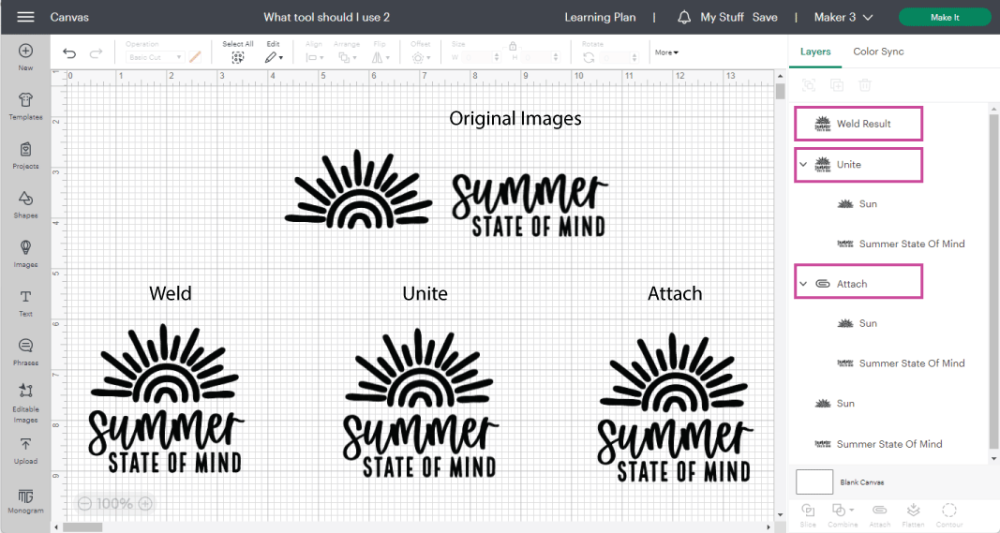

Again, I accomplished the same results using three different techniques.
- I used “Combine – Weld” the images
- Using “Combine – Unite”
- Attaching both images.
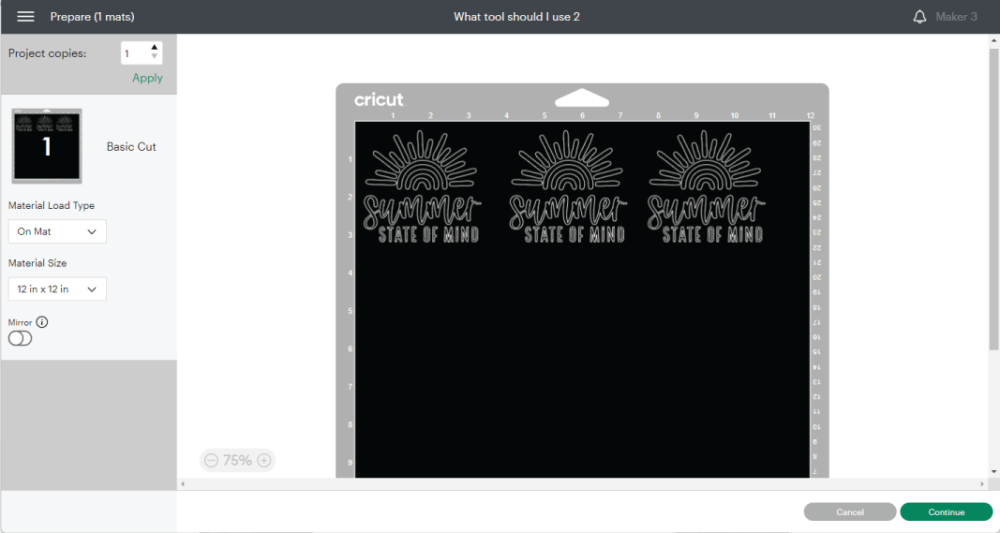
Notice when I send the project to cut, the mat shows the same file, even though we used three different tools.
Do you know it takes me over 25 hours to complete a single Cricut article? I know it’s wild, but I want to make sure you understand everything!
I would appreciate your support on Instagram , Pinterest , and YouTube as I try to grow my audience and continue producing great content!
Jen Heath
Tuesday 28th of November 2023
Thanks for clarifying the process for me, so much easier to understand what I’m doing.
Lisa Demma
Friday 2nd of September 2022
this was very helpful. i do have one other question, can you name these groups, attachments, and welds on the right side. so for instance, you have 4 things you are working on, each is a different group or attachment etc. can you name that on the right , so you do not need to constantly go back and forth opening and closing to figure what you are working on.
sue-ellen
Thursday 29th of February 2024
@Catalina, you can now! (2024)
Catalina
Thursday 29th of September 2022
No! It's so annoying I hope we can one day.
Jadine
Thursday 18th of August 2022
I have win10 and using edge (same issues on chrome). When I view your tutorials, there are many large grey boxes with 3 flashing dots inside this box, often following one of your images of DS. I am wondering what I am missing. It happens in every one of your tutorials
Catalina
Thursday 29th of September 2022
That's so odd, I don't know why that was happening. Hopefully, things are fixed now.
Kacey
Sunday 31st of July 2022
I am fairly new to Cricut and SVGs. This Cricut thing can be very frustrating, but thanks to tutorials like yours I am learning with each project! Thank you; you just saved me a ton of frustration today as I had a multiple layer sign I was creating and wanted it to print as one thing. Attach - my new best friend!
Catalina
Tuesday 2nd of August 2022
Good to hear! :)
WendySue
Friday 8th of July 2022
I design. I design a lot. But I have never been able to get my designs to actually work on T-shirts cups and cards the way I imagined. Your blog and tutorials have been Just what I needed. Thank you.
Catalina
Monday 11th of July 2022
So happy to hear :)