Hello Daydreamers!
Today you are going to learn how to make the most beautiful stickers with your Cricut Maker or Explore.
Yas!
Not only will I teach you how to make your stickers from scratch, but I will also provide you with six different types of layouts that will help you build and create the most stunning stickers in the world.
Before we go into a step-by-step tutorial I want to give you a little preview of the things I will be covering for you on this article (I don’t want you to get lost).
- Print then Cut: the option in Cricut Design Space that allows you to cut your stickers.
- Overview of your machine specifications and size limits.
- Step by Step tutorial How to Make Stickers within Cricut Design Space.
- Examples of how to use the Free Templates I provided you with to Make Stickers.
I am sure that If you follow this tutorial to the tee, you will be empowered to make stickers any time, for any occasion.
Are you ready?
Let’s Daydream Into Reality?
Tip: If you want to learn everything you need to know about iron-on (HTV) and master its use on different surfaces, make sure to check out this amazing tutorial I put together.
What is Print then Cut and how does it relate to stickers?
“Print then Cut” is the option in Cricut Design Space that allows you to print your designs and then cut them with your machine.
There are two ways to tell your machine to Print then Cut. The first one is by changing the “Operation” from “Basic Cut” to “Standard.” The second one is flattening the layers with the “Flatten” tool located at the layers panel’s end.
For best practices and zero frustrations, don’t worry about this during your design process. It will only stress you out.
Just add your shapes, text, images, and at the end, flatten the whole thing. (I will show you this in the step by step tutorial)
Note: Although I cover some topics of “Print then Cut” in this article, keep in mind that this tool is a very robust one. So, if you want to learn all there’s to know about it, go ahead and read my Print Then Cut Ultimate Guide.
Machine and Settings for Making Cricut Stickers
There are two things you need always to make sure of when making stickers with your Cricut.
The first one is the size. You can only Print then Cut designs that are up to 9.25 x 6.75in. So check the size before you send your project to cut, or you will get a warning saying the image is too large.
The other thing that you need to consider is your machine’s limitations:
- If you have a Cricut Maker, you can use colored paper (that’s not too busy) and glossy white materials.
- If you have an Explore machine, you need to use white paper with matte finishes.
Step by Step Tutorial / Make Stickers with your Cricut
Now that you know your machine requirements, it’s time for you to learn how to make stickers.
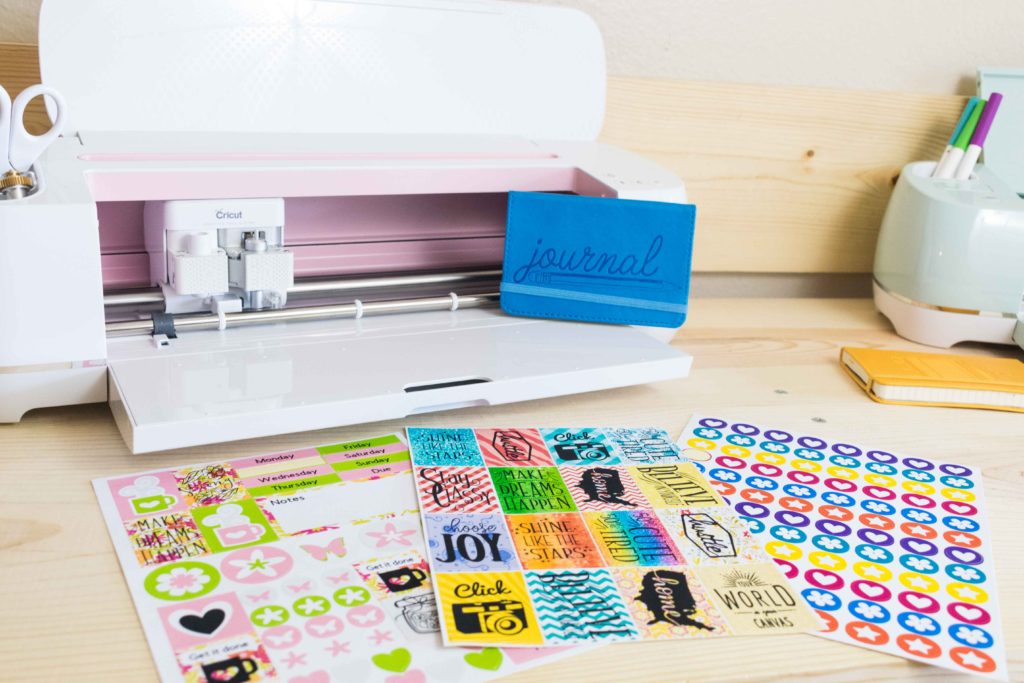
Materials
- Cricut Maker/Explore
- Sticker Paper
- Printer
- Fine Point Blade
- Light Grip Mat (blue)
Note: I usually love Cricut’s products. However, their sticker paper is very thick and got stuck in my printer (I have an HP 4520 Printer) so, if you haven’t bought your sticker paper, I recommend you to buy the Silhouette Brand.
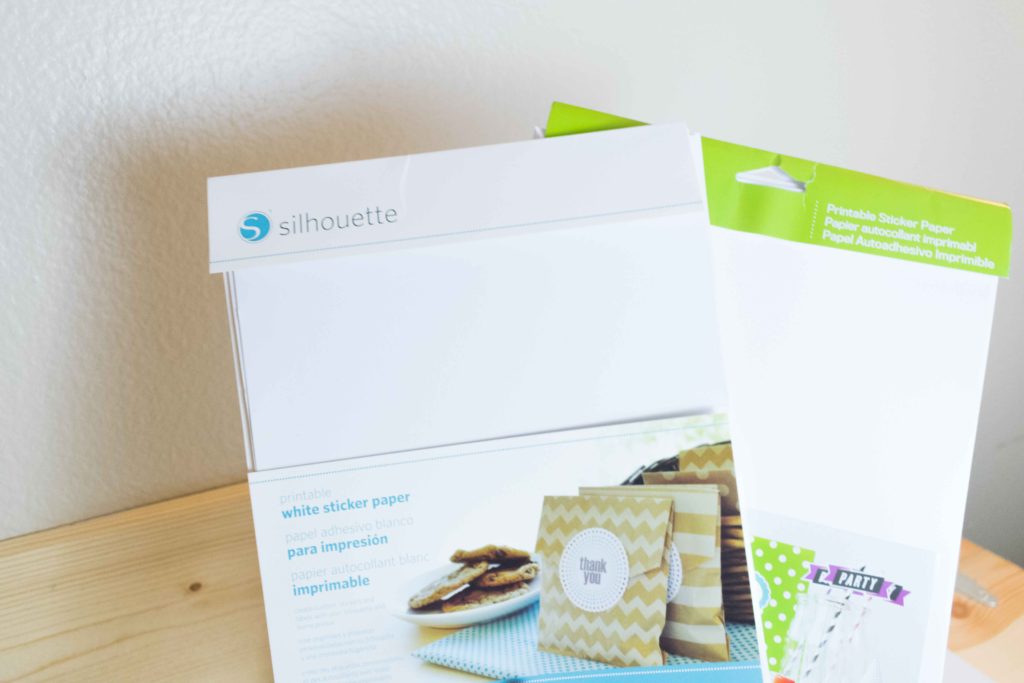
If you already have the Cricut Sticker paper, try saving the print and take it to Staples or Office Depot, for them to print it. Or if that’s too much hassle get the other one.
Time is money!
Creating a Methodology
Since you can use text, images, shapes, and pretty much anything in Design Space to make stickers, you may get overwhelmed and don’t where to start.
So, for you to have a pleasant experience with making stickers, I’ve developed a “frustrationproof” method.
These are the steps we are going to follow:
- Create a layout (By adding shapes)
- Add Color or Patterns
- Add text and Images
- Check the size and “Flatten.”
- Cut your stickers
When you follow this order, you can concentrate and focus on one step at a time, and that, my friend, is powerful!
Note: Save your project as you go. It’s very time-consuming, and Cricut doesn’t have backup options.
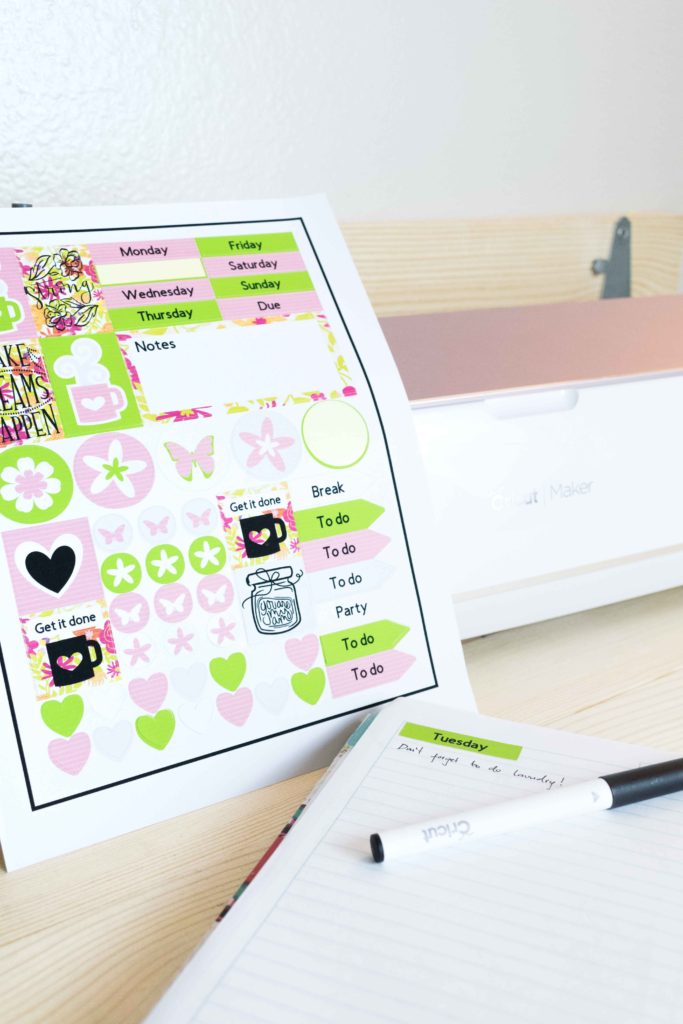
Step 1 – Create a Sticker Sheet Layout
Since Cricut Design Space only allows us to Print then Cut in a size no bigger than 9.25 x 6.75in. I recommend you add a guideline so you are always aware of your space and can create a Sticker Sheet Layout.
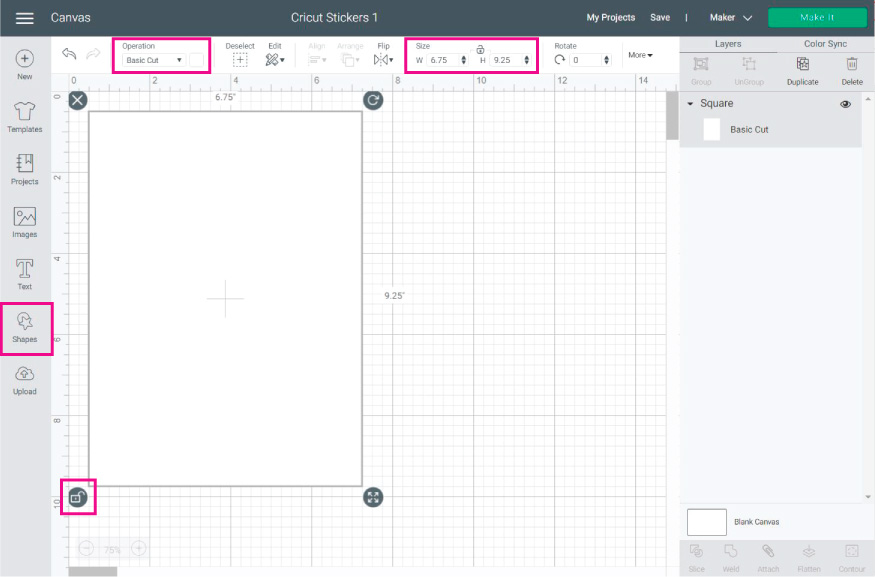
To add the guideline, click on the shapes button located on the left of the canvas and select the square option. Then (while selecting the square) go to the edit menu on top of the canvas and click the little square in the middle to unlock proportions. (we will be using this term throughout this tutorial)
Then on W (width), type in 6.75 and, on H (height), type in 9.25. After resizing the square, change the operation color for white, so it’s easier for you to have a better idea of your design.
Note: Check out my how-to edit shapes If you feel confused with editing the proportions, etc.
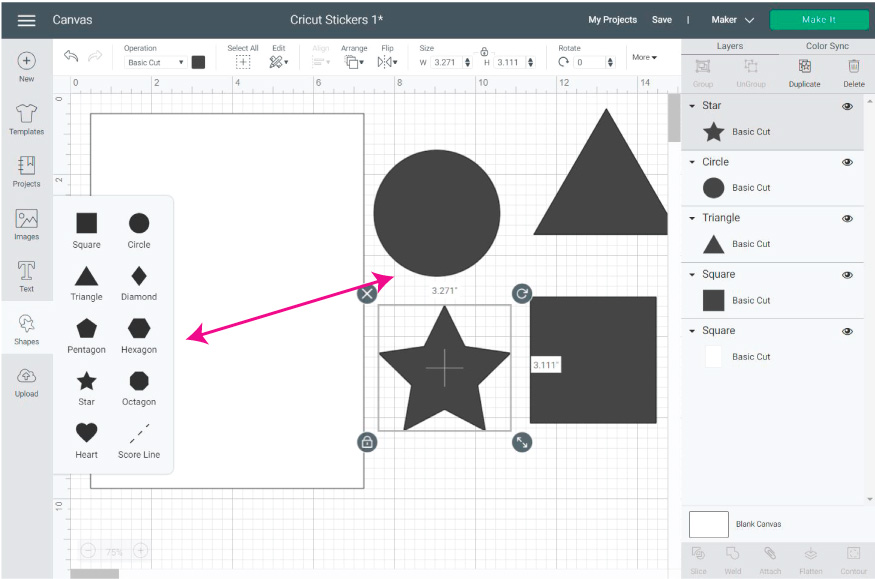
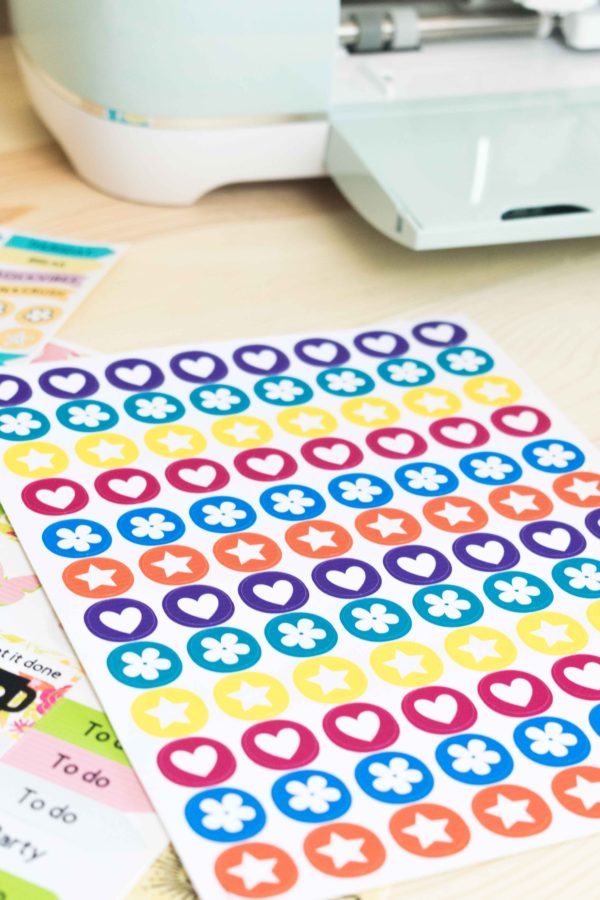
After creating your guide, add the shapes you want for your stickers. Cricut has nine different options for you to choose from. For this tutorial, I used squares, hearts, circles, and triangles.
What we need to do now is fill our guide with all sorts of different shapes. Don’t forget to unlock proportions so you can create all kinds of rectangles.
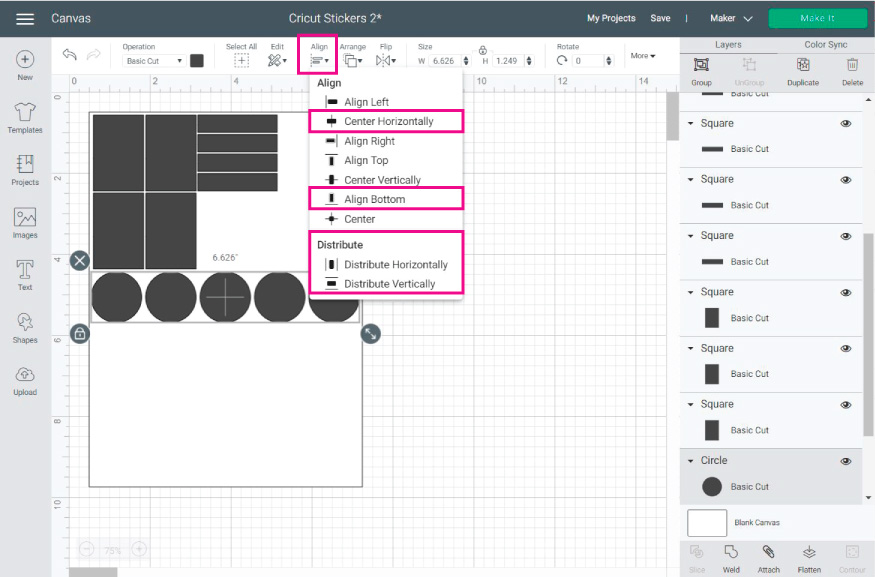
Tip 1: Use the align option to keep your shapes and all the other shapes you’re adding to your sticker layout organized.
Select the elements you want to align, and depending on how you want to align them use the different options.
In most cases, you will be using “Center” and “Distribute horizontally or Vertically.”
Give it a try!
You will make a couple of mistakes while you get used to it, but you won’t go back once you get the hang of it.
Tip 2: Create different figures for your stickers. Check out the following image for a step by step process.
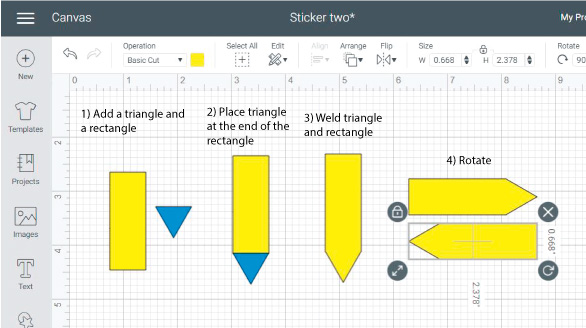
- Step 1: Add a rectangle and triangle (you will need to rotate the triangle, so it’s upside down)
- Step 2: Place the triangle at the end of the rectangle. They must be overlapping (just a notch).
- Step 3: Select both shapes and weld to create a new element for our stickers. (Weld is located at the bottom of the Layers panel)
- Step 4: Rotate to fit your sticker layout
Continue adding shapes in different sizes and let your imagination fly! Your stickers will be so cute at the end.
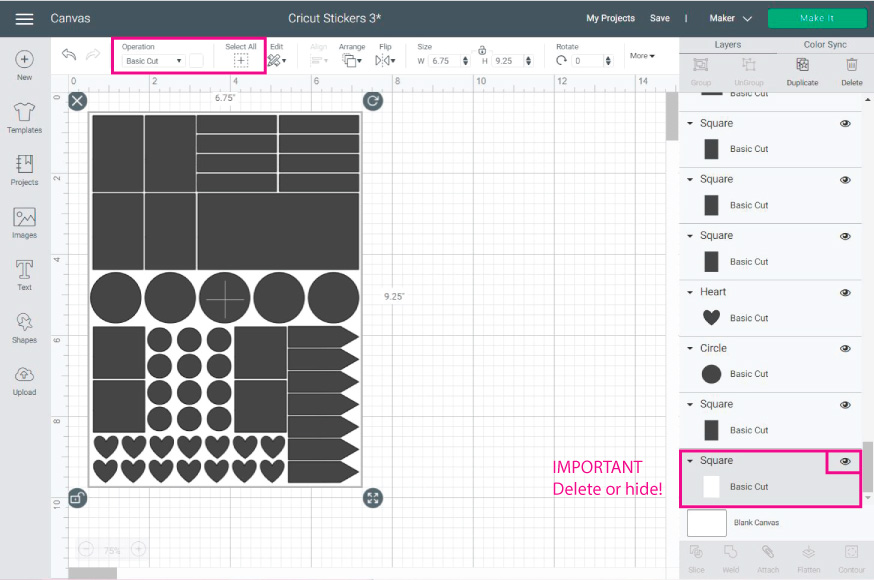
When your layout is complete, you have to delete or hide your guide. PLEASE don’t forget to do this. Otherwise, your stickers won’t cut after you flatten.
Now, select all of the shapes and change the “Operation” color to white; this will allow you to have a sharper vision of what you will be doing next.
Step 2 – Add Colors and Patterns
It’s time to add color to your stickers!
As I mentioned above, don’t worry about “Basic Cut” or “Flatten.” We will cover that later. To add color to your sticker, you can choose a solid background or a Pattern.
Add a Solid Color to your Stickers
Select the element you want to add color to and change the color box next to the “Operation” setting, located at the canvas area’s top panel.
If you click on advanced, you will be able to see a broader spectrum of colors, and you can also use a code to find a specific color.
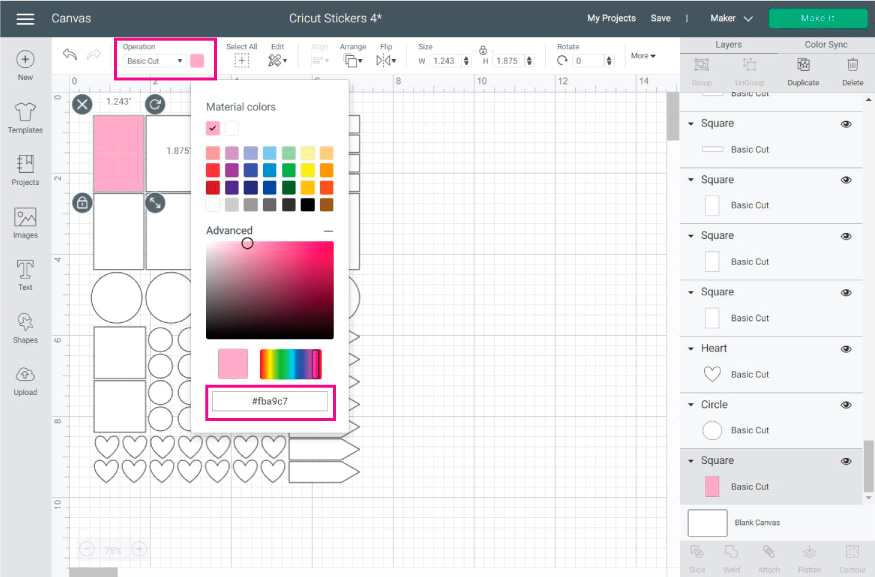
Tip: To change the color of multiple shapes simultaneously, press shift on your keyboard (at all times) and click on all of the elements you want to edit; this also works with patterns.
Adding Patterns to Cricut Stickers
Patters are backgrounds you can use for your stickers or other “Print then Cut” projects. There are hundreds of them for you to choose from.
Cricut used to charge for them, but they are free for now, so take advantage of them.
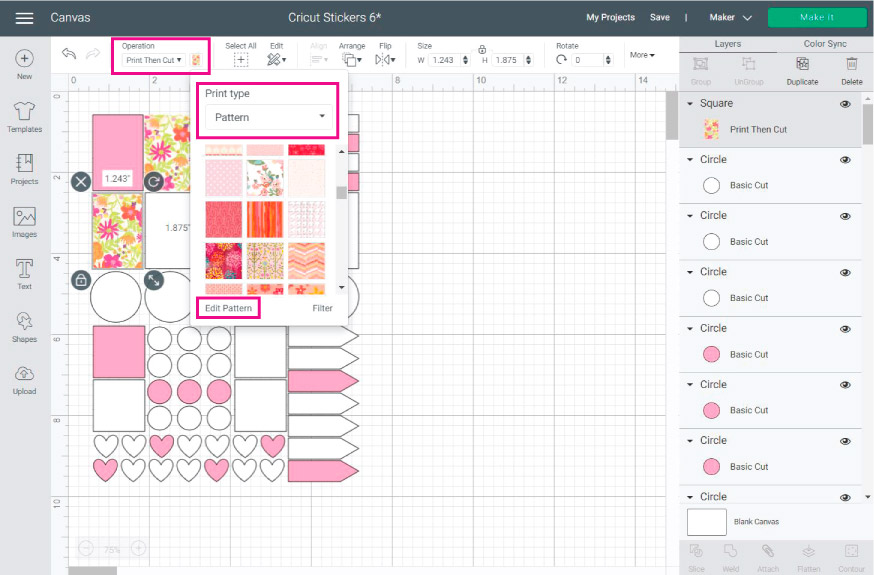
If you want to add patterns, change the operation to “Standard Print then Cut,” then click on the color box next to “Operation,” and from the “Print type” drop-down menu, select “Pattern.”
You will find many patterns to choose from. Since they don’t have a code, I can’t show which one was used; So, you’ll need to scroll down until you find it.
When you find the pattern you want to use, make sure to explore the editing options.
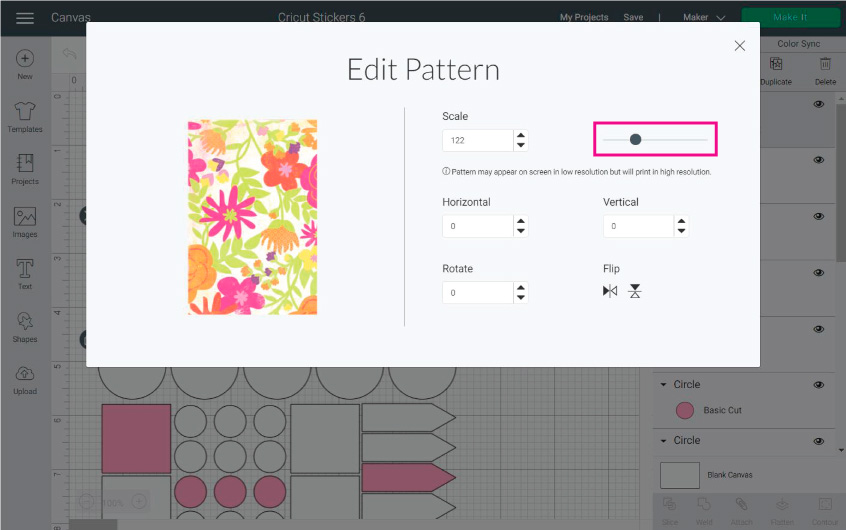
Sometimes, Patterns will look very small; therefore, most of the time, I edit them.
The things I usually tweak are the scale and horizontal position. As you modify a Pattern, you will see all of the changes on a little preview.
Step 3 – Add Text and Images
To add text, click on the Text button located on the left panel of the canvas. If you don’t know how to edit text in Cricut Design Space, make sure to read my tutorial on this topic.
Once you are done adding colors and patterns to your stickers go ahead and type in the text you want to use.
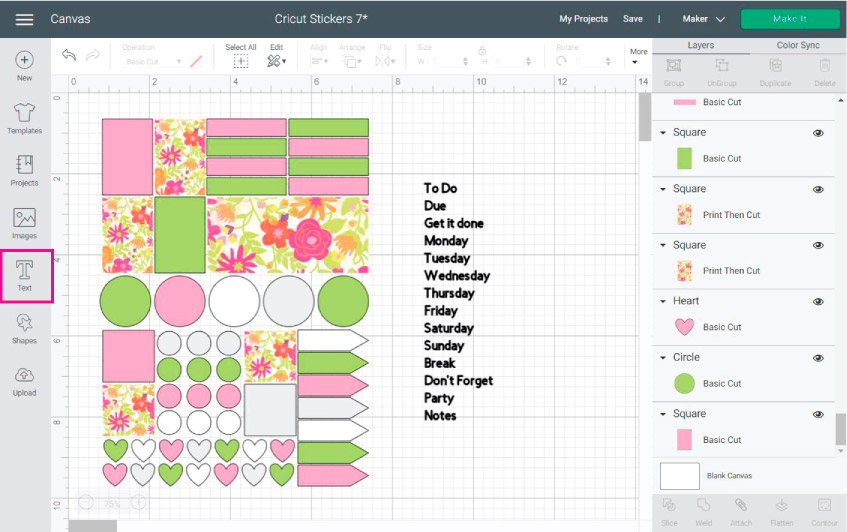
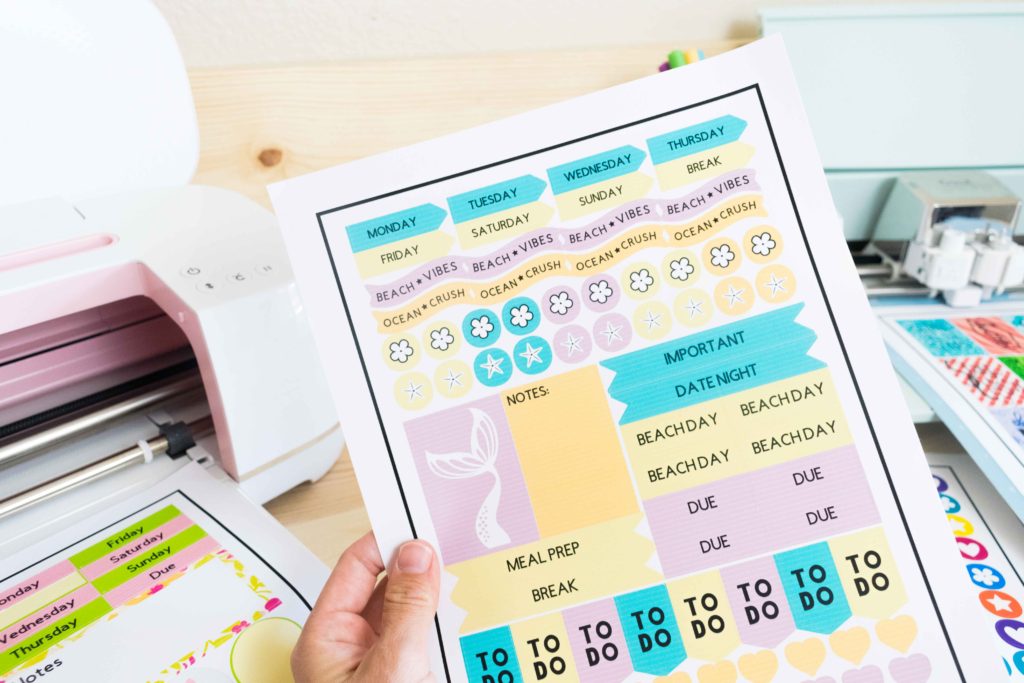
Here are some ideas for different types of sticker sheets:
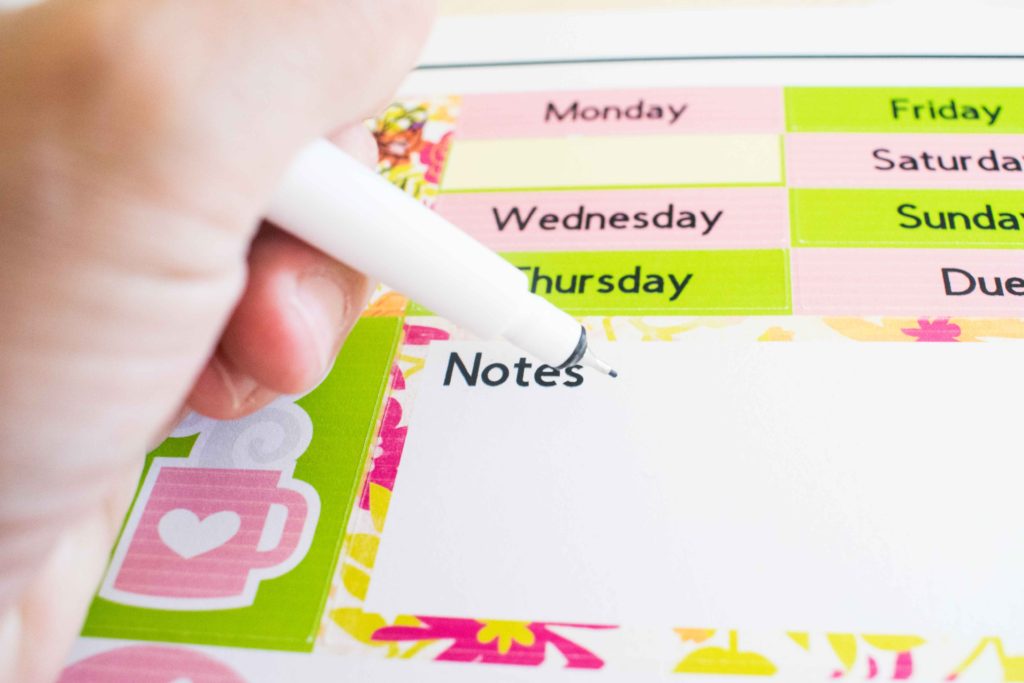
- Text for Planner Stickers: To-Do / Due / Get it Done / Days of week / Notes / Don’t forget / Important / Break / Appointment… etc
- Text for leisure stickers: Beach Day / Break / Party / Vacation / Snowboard Day / Date Night / Ocean Vibes / Enjoy life / Brunch / Girls Night Out… etc
What I love about making Cricut Stickers is that you can personalize the text to fit your likes and life in general, and that is something you would never be able to get or buy in a regular store.
After typing in your text, place it on the shapes you want them to be.

Tip: If needed, add more shapes to add contrast between the patterns and text.
Now it’s time to add images to your stickers! (Click on the Images button located on the left panel of the canvas)
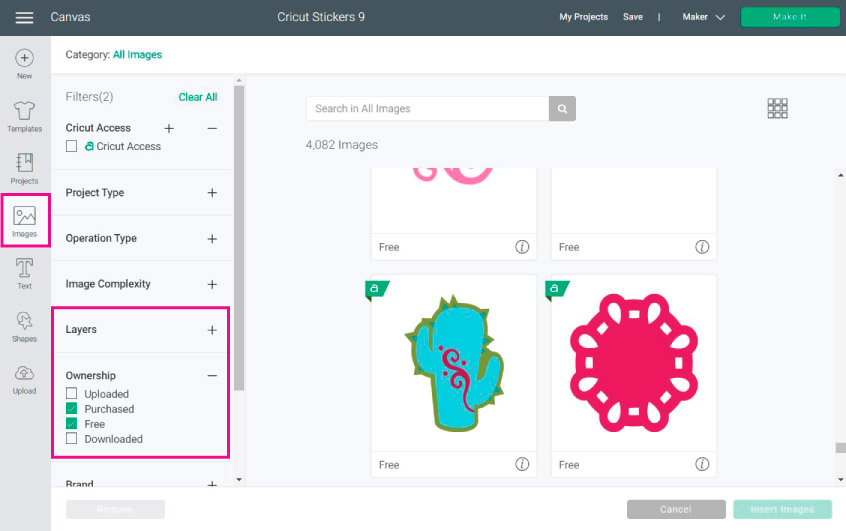
You can add your own images, or you can also use som images Cricut’s Library. They do have a membership but if you like free stuff as much as I do, filter images and select:
- My Images (check the ones you’ve uploaded to the software)
- Free (Some are always free, other ones are only free for a specific time)
- Purchased (your machine comes with a set of free images)
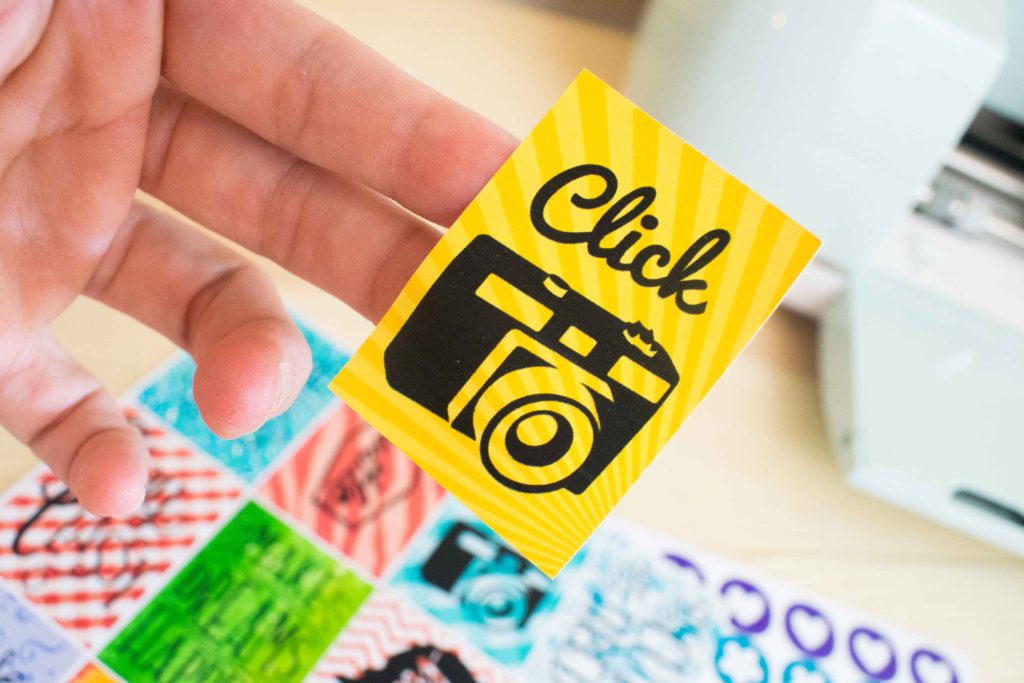
These are the images I used (I don’t know if they will be free when you try to follow along). To find them, paste the code in the search images box.
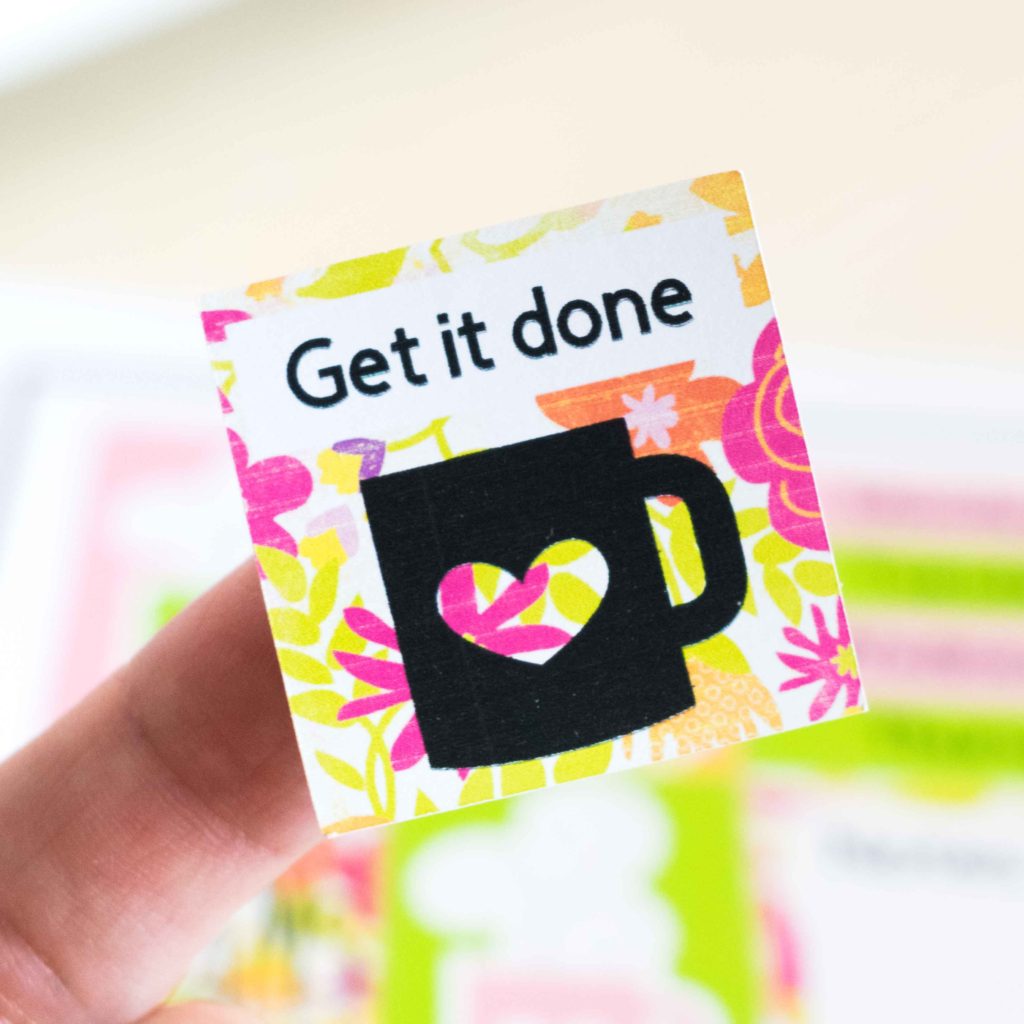
- Coffee Mug: #M3F404
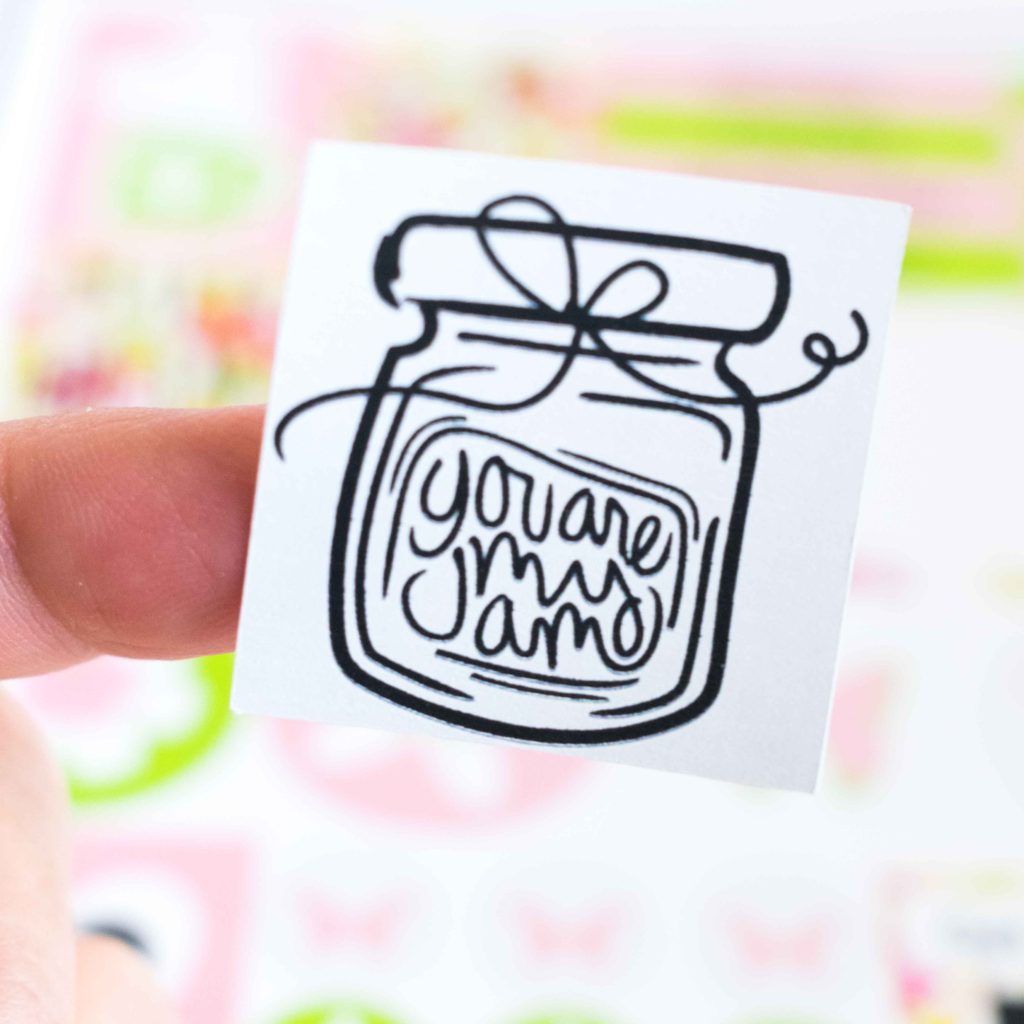
- Jam Jar: #M203B548
- Strong: #M9F82684
- Flowers: #M3D82D / #M4687B
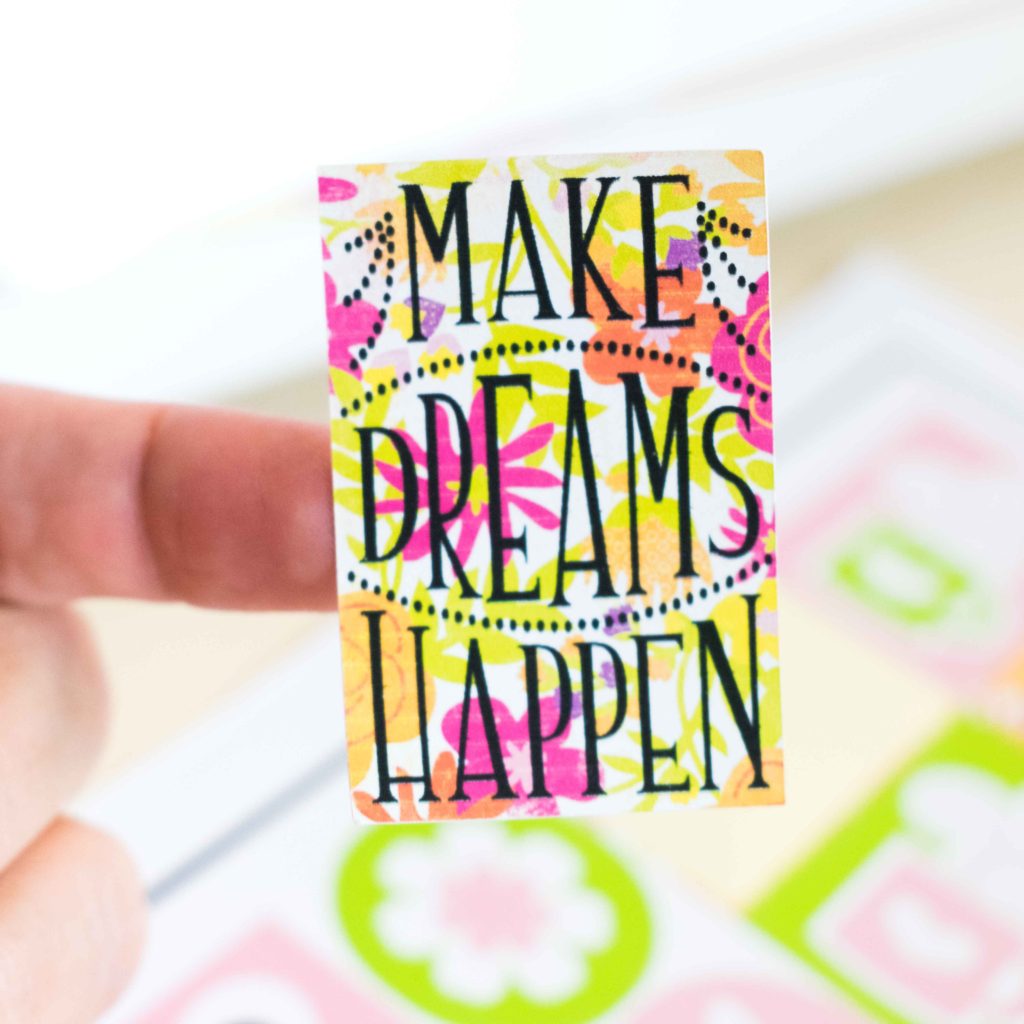
- Make Dreams Happen: #M3D9AE98
- Butterflies: #M45BA6 (For this set of butterflies, I had to use the contour tool; read my guide to learn how to use this setting).
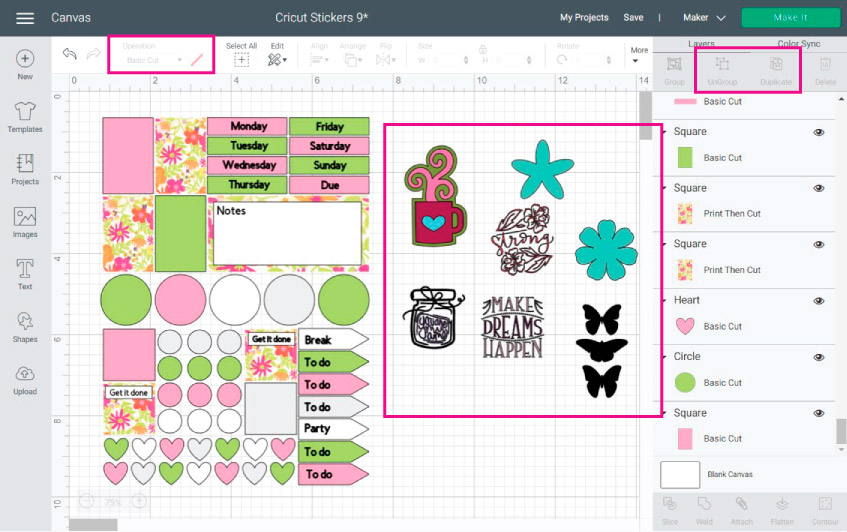
I recommend you inserting one at the time and then resizing it because if you add them all at the same time, your canvas will be a mess!
Keep in mind that when you work with images, sometimes they are grouped and have different colors and sizes. You will need to ungroup them to edit the colors and size of every little element.
You may also need to alter the proportions to fit them in your sticker sheets.
Step 4 – Check Size and Flatten
Check out how I used the images to fill the rest of my sticker sheet. Now we are about to get into some serious stuff!
Note: If you still have the GUIDELINE we used at the beginning, YOU HAVE TO DELETE IT!
When you complete your stickers, select everything you have on the canvas (that makes part of the sticker sheet) and click on the “Flatten” option located at the Layers panel’s bottom.
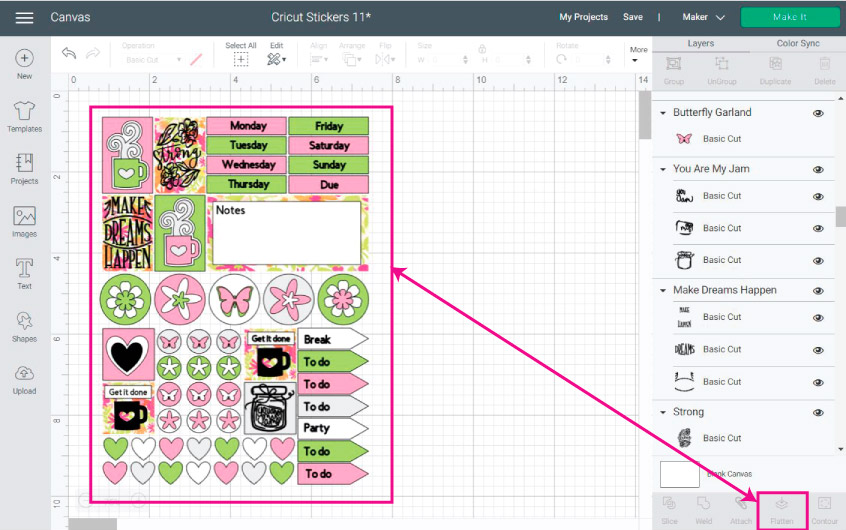
As you can see in the screenshot down below, our stickers look so much different. Everything is on a single layer, and the blade will go through all the outlines of each shape.
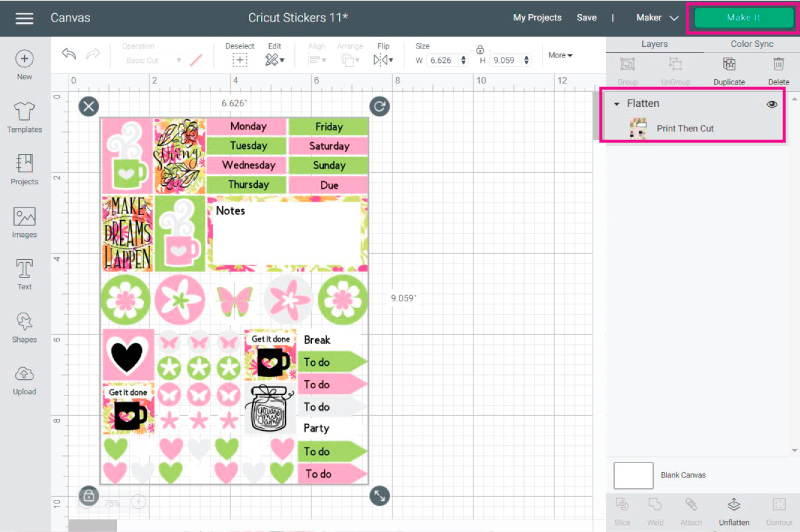
When you are ready to cut, click on the Make it Button located at the upper right corner.
Finally!
Let’s cut these cuties.
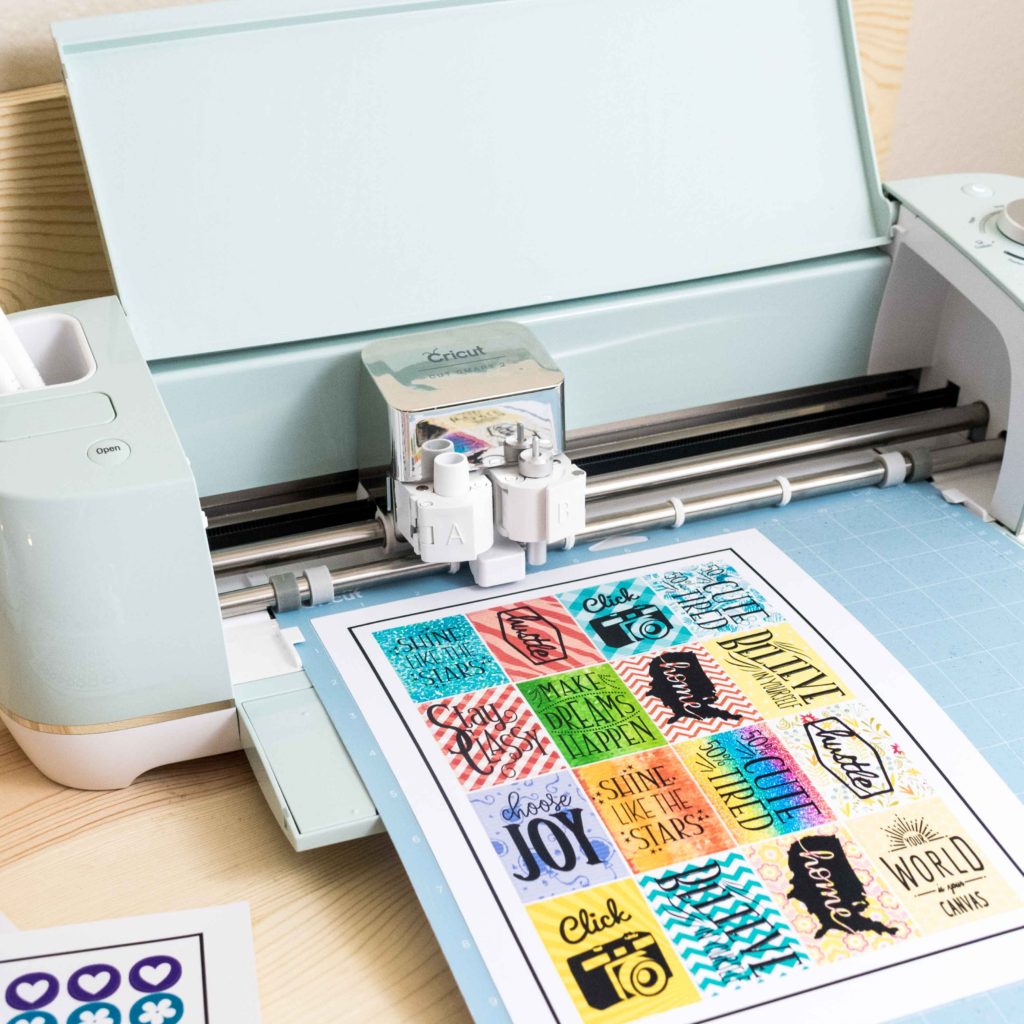
Step 5 – Print and Cut your Cricut Stickers
The following screenshot is the view that you’ll have when you start the cutting process.
We used all the space! – Sticker paper is quite expensive, so make every inch of it count.

Check out everything looks in place and hit continue. (This is how you need to place the printed copy on your Mat)
First, we need to send our project to the printer, so click on Send to Printer (leave all the default settings on) and then on Print.
WARNING: Make sure you print on the right side of the Sticker Paper. If you aren’t sure what side of the paper your printer prints, use a regular piece of paper with a mark on it to find out.
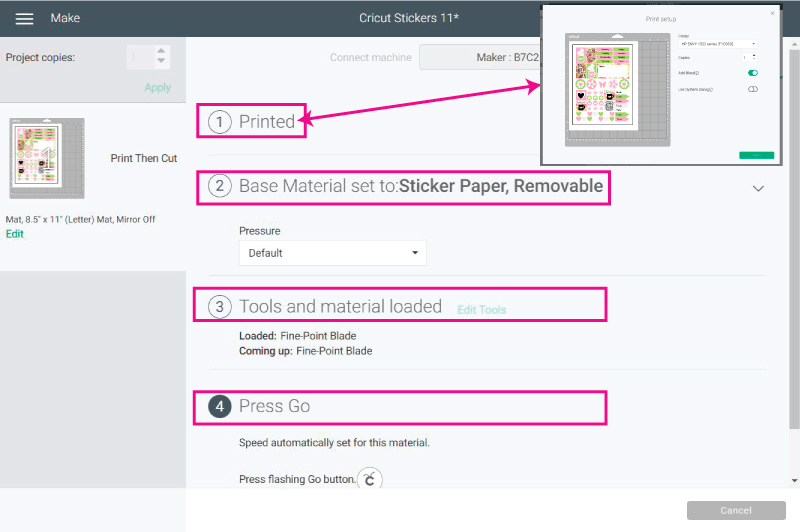
After you Print, it’s time for you to select the sticker paper you are working with.
If you have a Cricut Maker, browse all materials and type in “sticker” to narrow the search. I picked Sticker Paper, Removable because I didn’t use Cricut’s brand.
If you have a Cricut Explore, move the smart set dial on your Cricut Machine and then browse materials on design space and choose the sticker paper you are working with.
Now let’s move to real-life photos!
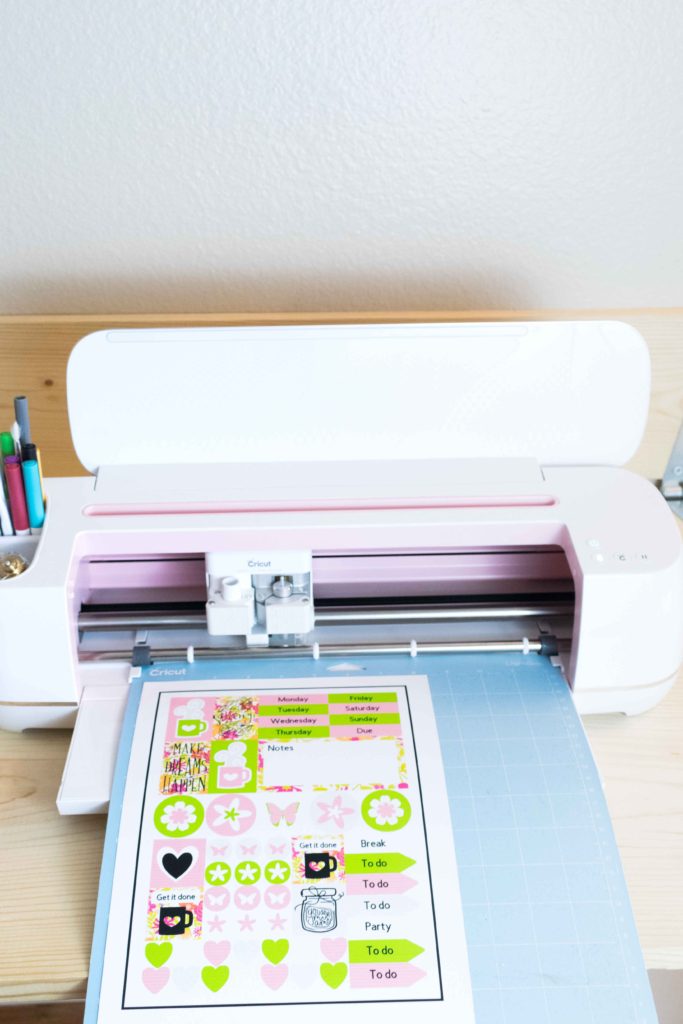
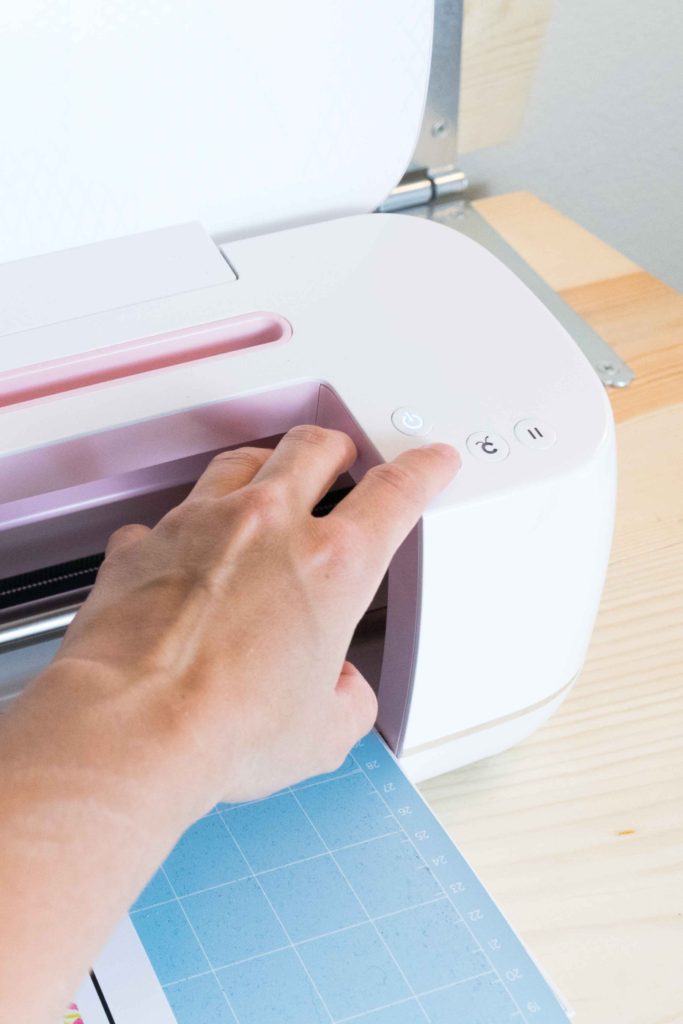
After selecting materials, install Fine Point Blade and place the already Printed Sticker Paper on your Mat, load it to your machine and press the flashing Go button on your device.
See the magic happen before your eyes!
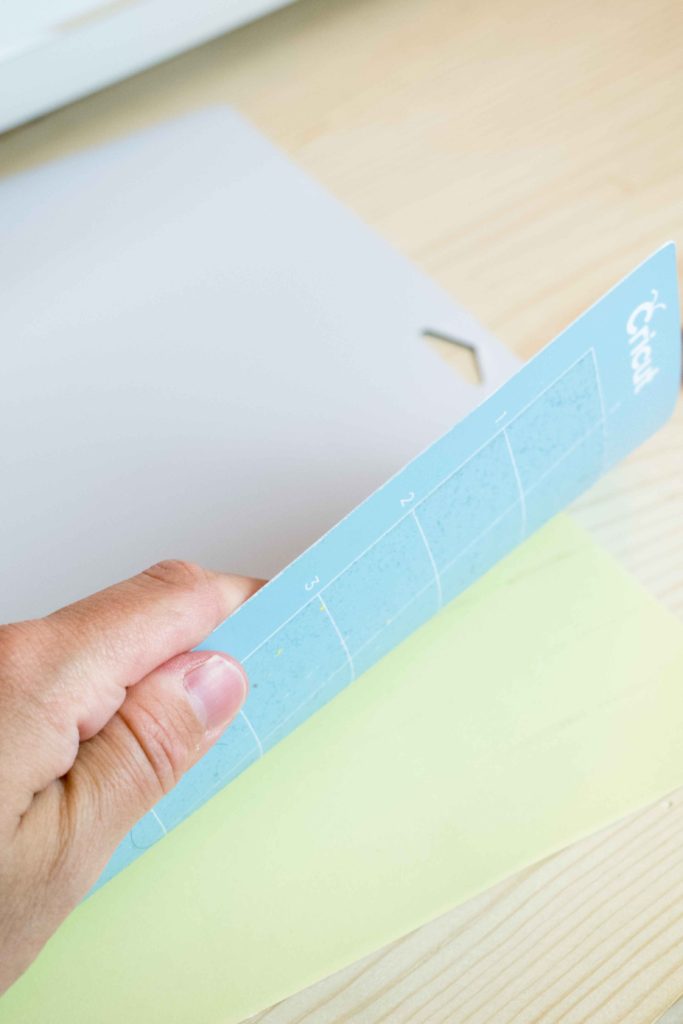
When Design Space informs you that the cut is complete unload your Mat for the Cricut and finally remove sticker sheet from the Mat.
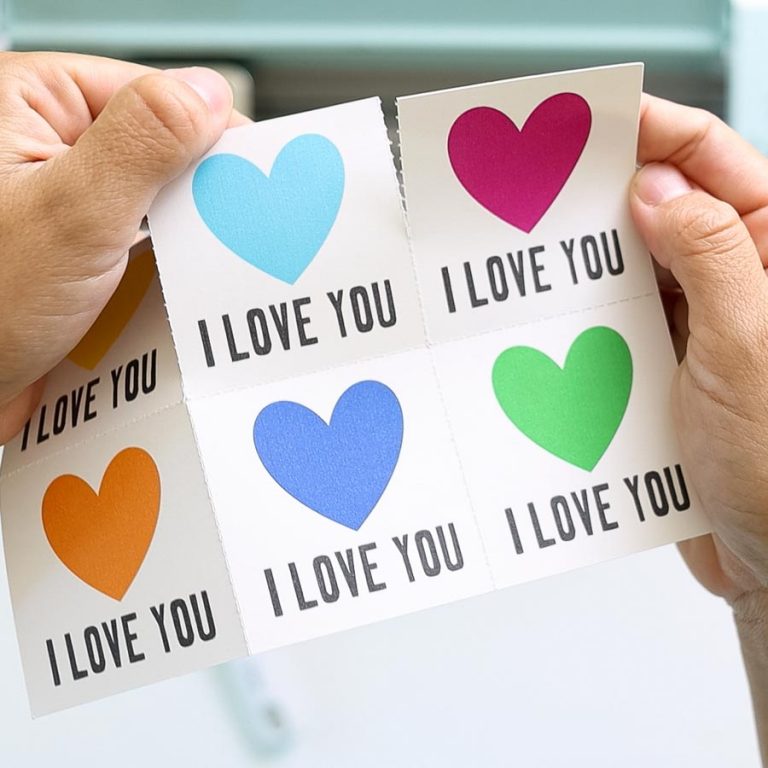
There you have it! Beautiful stickers you can use for your planning activities.
Using Layout Templates to Make Cricut Stickers
If you’ve been reading my website, you know I love throwing extra goodies and SVG files to make your life easier.
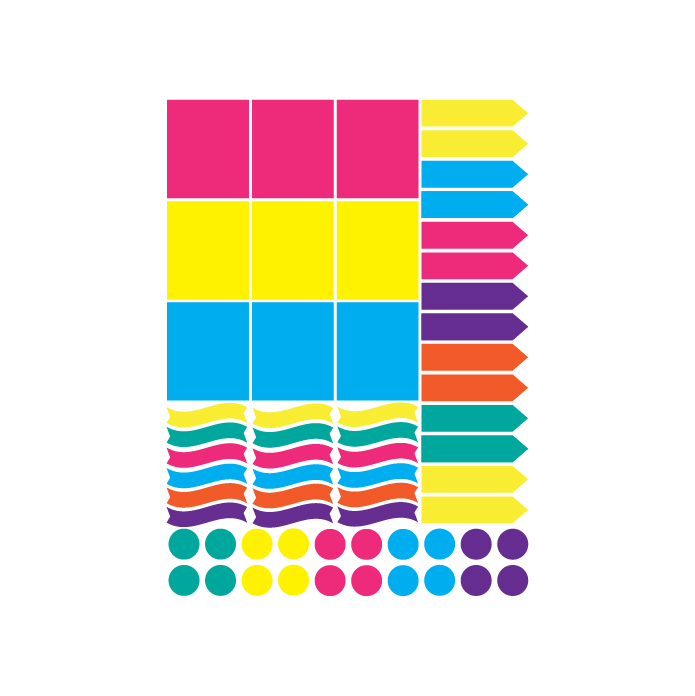
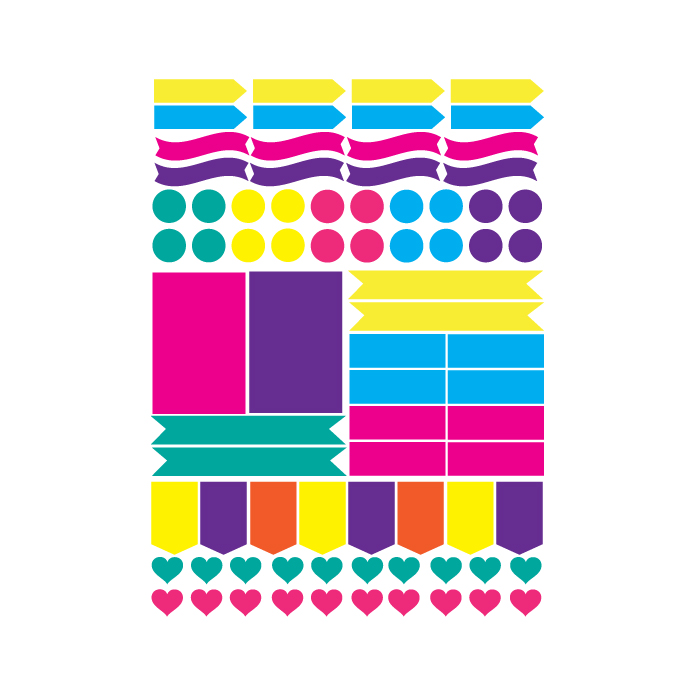
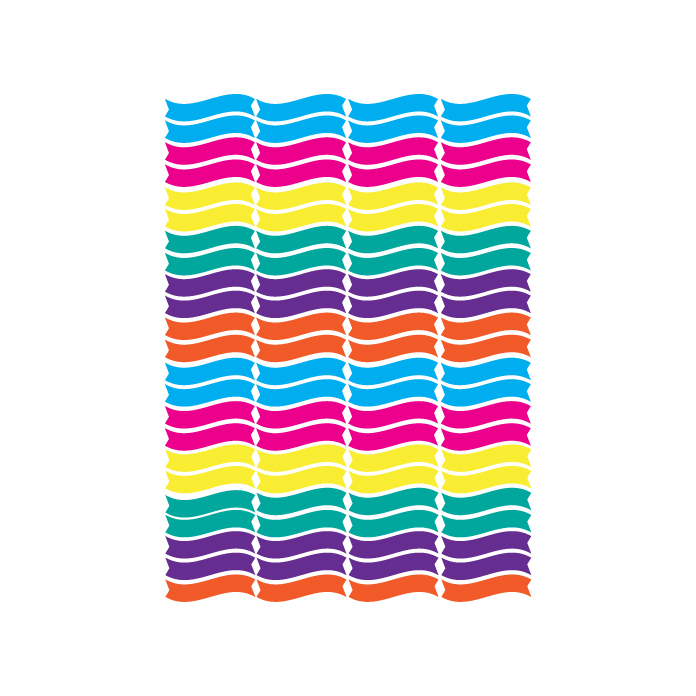
Here I have six different layouts you can use for your projects.
To download the file(s), you need to be on a desktop or laptop and click on the button to trigger a download file on your PC. However, I’ve noticed that I can also download them from my iPhone.
Depending on your browser settings, your PC sometimes asks where to save the file, although most files will be in your download folder.
If the image opens in a new window (this may happen because of your browser settings), right-click on it, select the option “Save Image As,” and choose where you want to save the file.
SVG files look like web page files when you download them.
They already have colors, but feel free to use the techniques I showed you above to personalize them however you want!


I won’t be covering again a step-by-step tutorial on how I did the next ones, but I will show you how to upload them and use these templates in Cricut Design Space.
My purpose with these files is to give you extra resources and ideas to work with, so you don’t feel intimidated and want to go for it!
Oh!
Just so you know, I also have a library full of free SVG files and Printables for all my subscribers, a.k.a. Daydreamers. You can see a preview right here or get access by filling out this form.
Upload Sticker Templates to Cricut Design Space
To upload your project, log in to Cricut Design Space, and click on to the Upload button located on the layers panel. Next, click on “Upload Image” and select it from your computer.
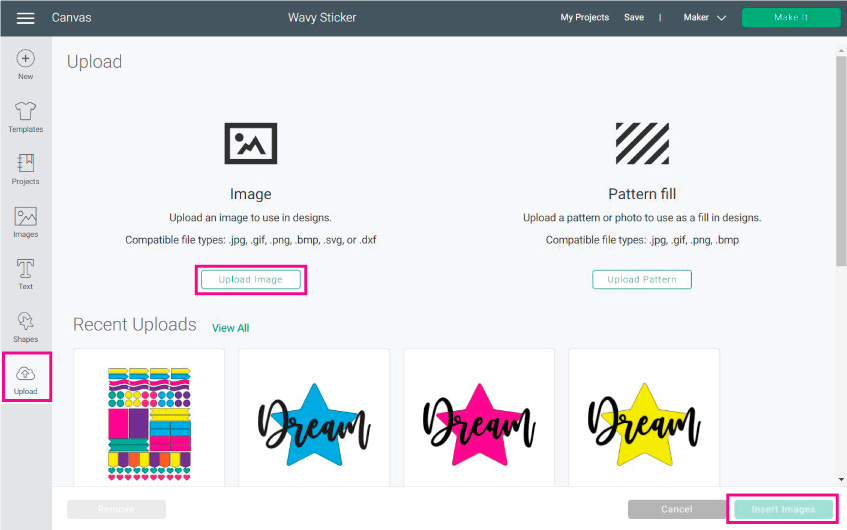
Once uploaded, the template will be under recently uploaded images. Select it and click on insert images.
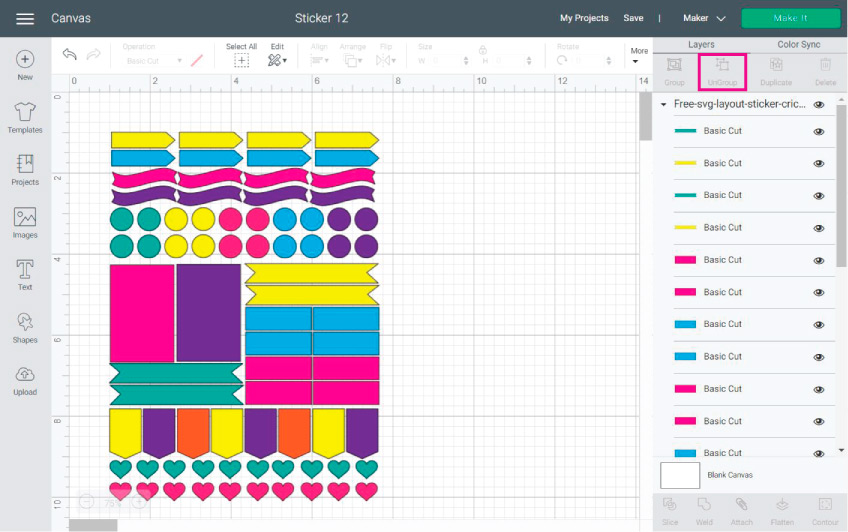
All of these templates are sized correctly, so you don’t have to worry about that. To edit every single shape on its own, you need to select the file and click on Ungroup (located at the top of the Layers panel).
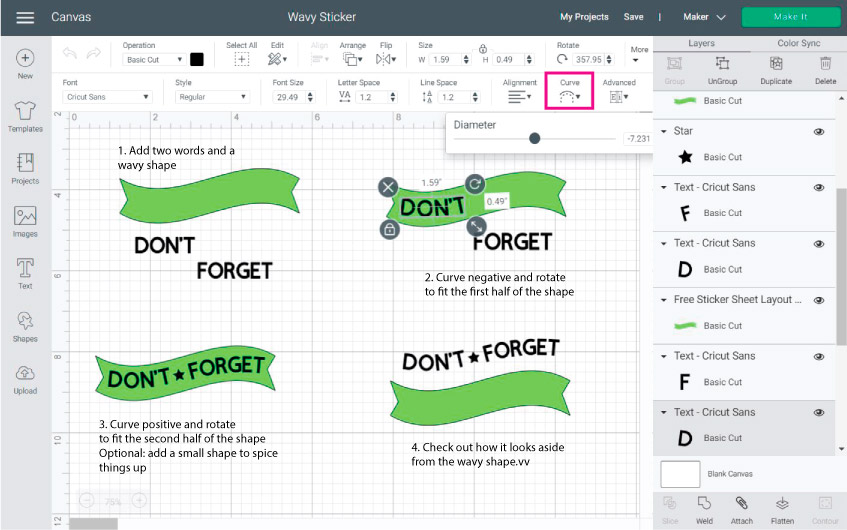
If you notice, there is a curvy shape there. To add text to it follow the steps I show you in the screenshot right down below.
Now check this out!
Do you see how different it looks? I used different colors and images to create a different feel.
This one is more of beach and mermaid style stickers.
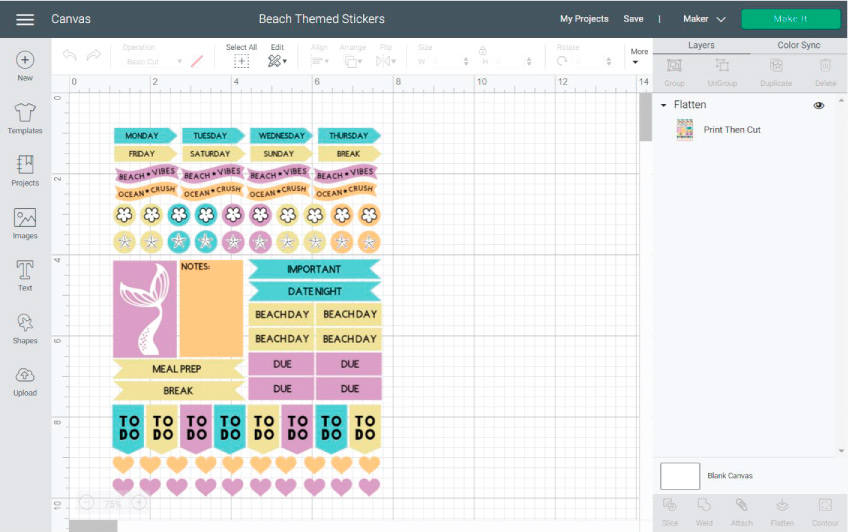
And just in case you are curious these are the codes of the images and colors I used:
- Colors: Blue (84D1D4) Peach (F6C785) Yellow (ECE09C) Purple (CA9CC1)
- Images: Mermaid Tail (#M111122A) / Flower (#M3F100) / Star Fish (#M1110734)
- Fonts: Cricut Sans / Cricut Font and Basic Shapes
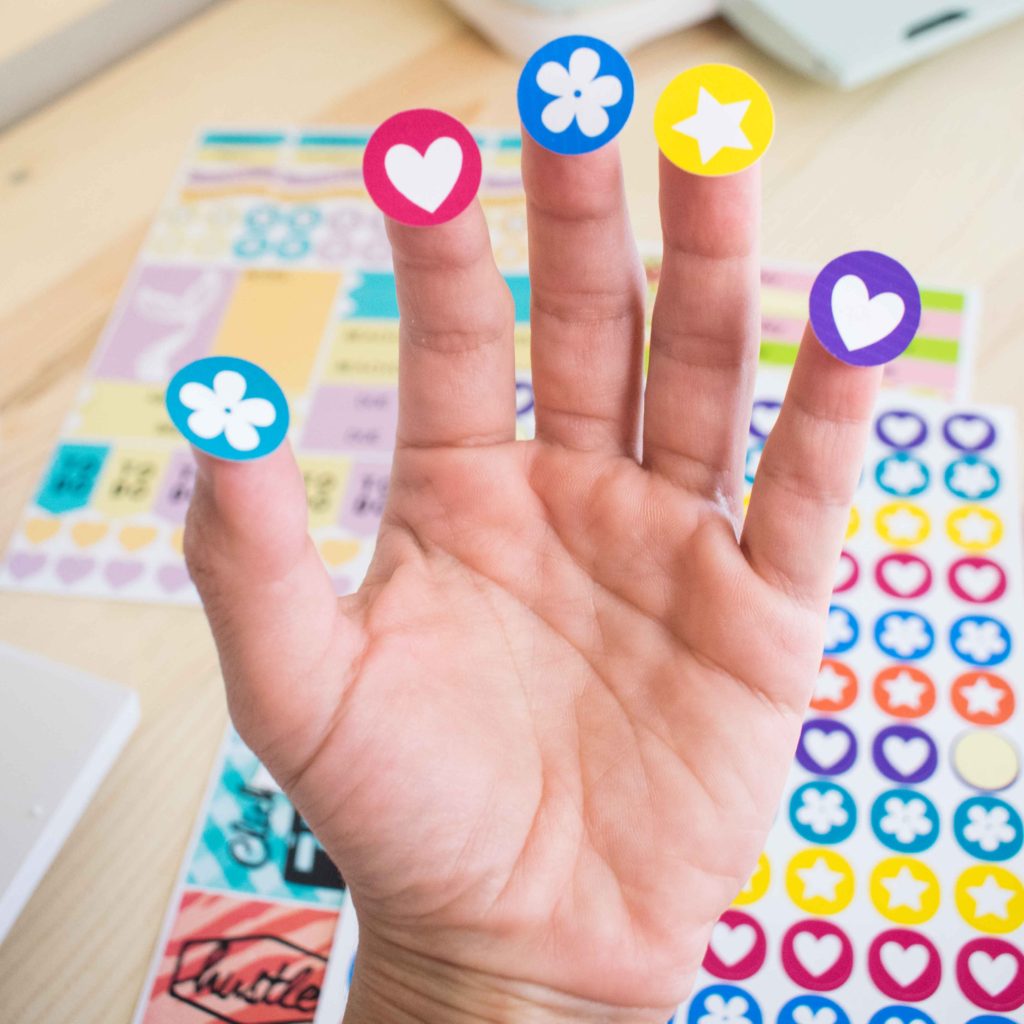
You can also make a whole page of the same shape. These are perfect for marking your journals, or if you have kids, you can use them as a reward system.
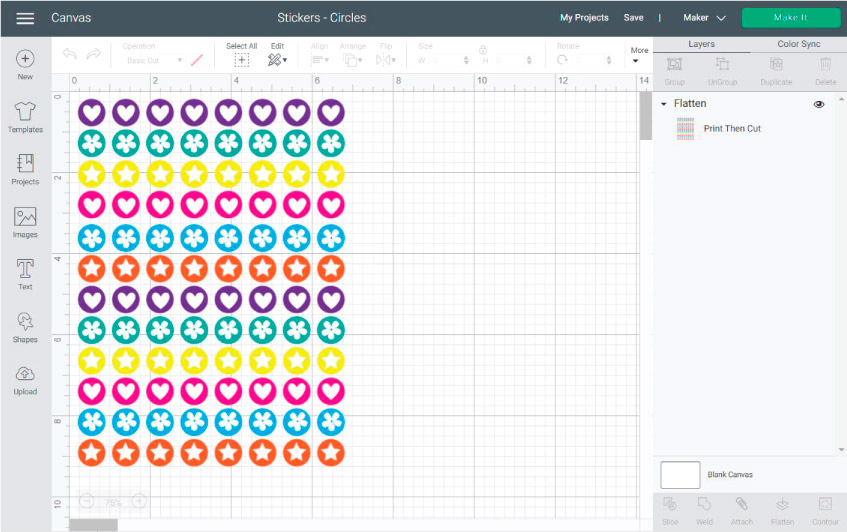
I used the circles’ layout template and very basic shapes to put on top of them.
I love how vibrant and beautiful they look. Wouldn’t you agree?
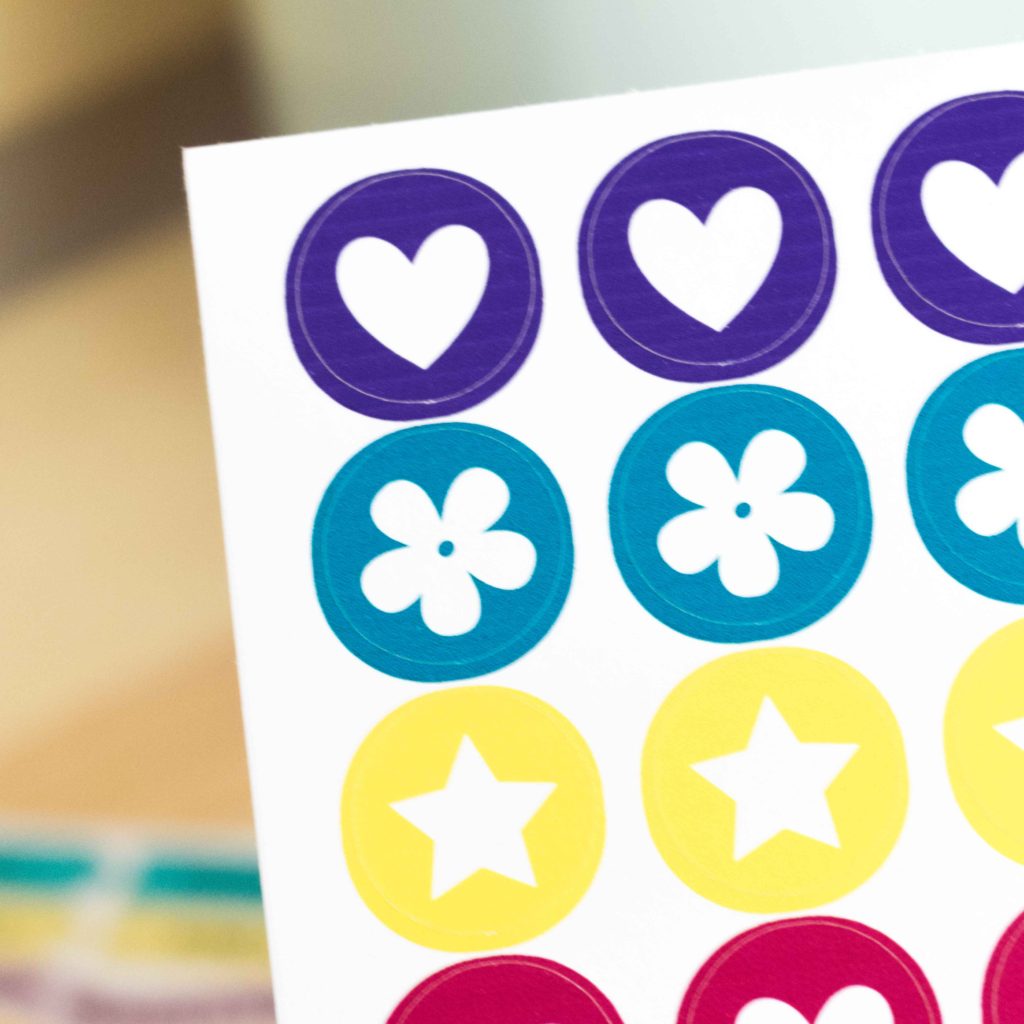
Images Used: heart, star, flower (#M3F100)
Last but not least, I want to show you how to use layout that only has squares on it.
I really love how It ended up!
For this sticker sheet, I decided to only use patterns for the background, and Free (at the time) Cricut Images. You can use your quotes or text as well.
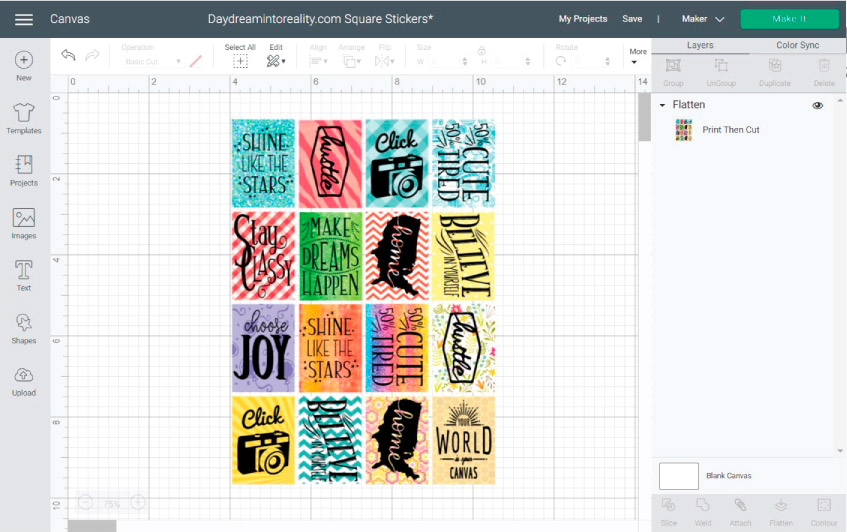
Patterns don’t have a code, so you would need to scroll to find them (sorry). But here are following images I used:
- Shine Like the Stars: #M3D9AEFB
- Hustle: #M7E83274
- Click: #M323BF
- 50% Cute 50% Tired: #M3D9ABEE
- Stay Classy: #M3D9AFA3
- Home: #M9C1E374
- Choose Joy: #M3D9AD86
- Make Dreams happen: #M3D9AE98
- Your World is your Canvas: #M539A69
- Believe in yourself: #M33EA4C0
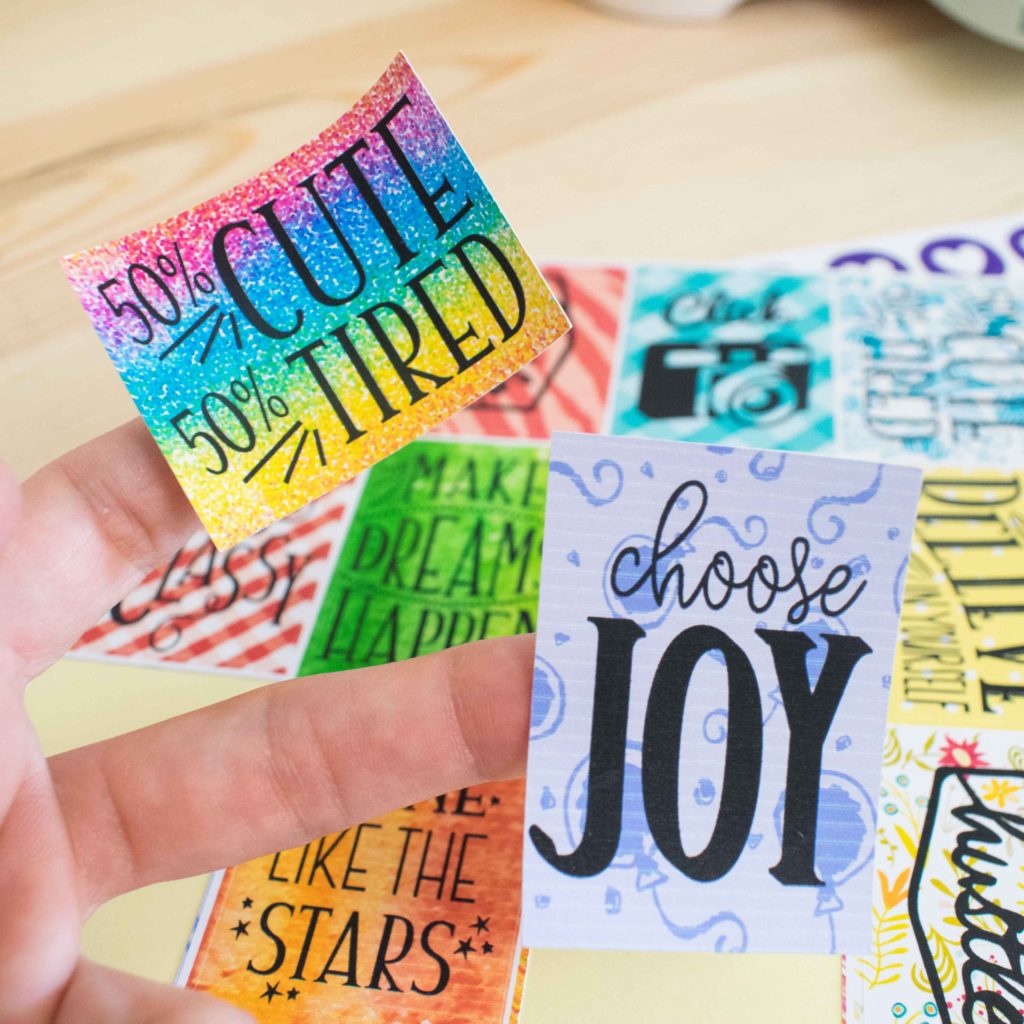
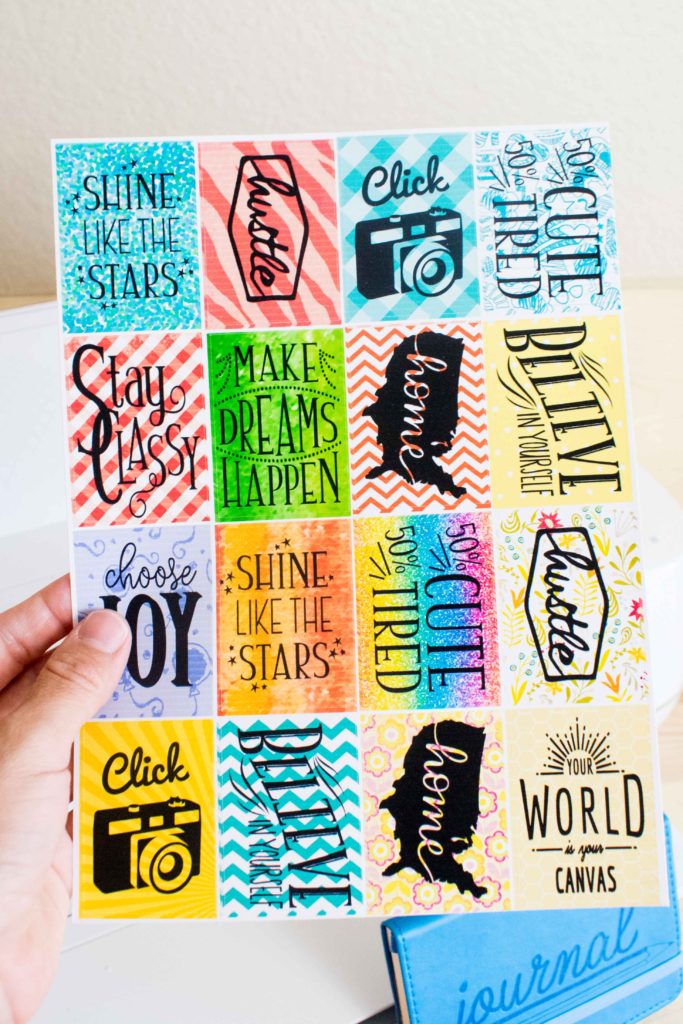
These last ones turned out so great. Pictures don’t do it justice.
I think this sort of stickers can work as a present for a friend or someone you love. You can also add encouraging phrases, etc.!
What do you think?
Congrats You are a Pro at Making Cricut Stickers!
Do you know it takes me over 25 hours to complete a single Cricut article? I know it’s wild, but I want to make sure you understand everything!
I would appreciate your support on Instagram , Pinterest , and YouTube as I try to grow my audience and continue producing great content!
This is a wonderful tutorial. You explain everything so well. Thank you! I will be using this when I purchase my Silhouette paper.
Hi!!! This is an amazing article. You hit so many point others miss. And some great tips 😉
One question I have that seems to be more difficult to find: how to make it so the stickers get cut all the way out? As opposed to staying on the page. And including a laminate sheet?
Thanks for all you do!
I am new and trying to remember all the things. Is there some way to print these instructions? You did a great job explaining but would like to have to print out so I do not have to write everything out.
You can Ctrl + P to send to your printer.
These are fantastic! Thank you for sharing the templates and how to do everything! ♥
I bought a Cricut 3 years ago to learn to make stickers for my planner. I have watched a few dozen YouTube videos on making stickers. I have also taken a class at Michaels (the instructor was awesome). But your written guide, along with the notes I added to it while watching your YouTube video, is the best and most comprehensive guide to making stickers on a Cricut. Thank you! Thank you! Thank you!
You’re very welcome 🙂
I love this, you did a great job. Thank you for shareing.
thank you for posting this. I learned some things that were new and got a confirmation about what the Lord was giving me. Stay encouraged and don’t stop believing 🙂 press towards the mark for the prize of the high calling that which is in Christ Jesus. <3
Amen!
You are an excellent teacher. Now if you taught other things I need to know about such as, plumbing, auto repair, electrical, cooking. I am sure if you knew, I could learn from you. You have the gift of teaching. Thank you so much for this tutorial
This is one of the kindest comments I’ve ever read! Thank you so much 🙂
My Cricut keeps giving me an error message that it can not scan the cut lines… Do you know what I am doing wrong?
What machine do you have? Do you have glossy or dark paper? If you have an old Explore, you can’t use these types of materials.
What absolutely amazing articles, you have taken the time to write for us Cricut users. I cannot thank you enough, I have learnt so much with these & everything is easy to follow.
I really appreciate all your hard work. Thank you
You’re very welcome 🙂
Wow! I absolutely loved reading this and can’t wait to try making my own stickers! The instructions were all so clear and I can’t believe how great they look! My only concern is I’m not sure if my printer quality will look that good – color vibrance, etc. and I’ve never used sticker paper before. I’ve had issues with glossy mailing label stickers smearing before with my printer. What kind of printer do you use? Is the sticker paper glossy?
I agree, I am still testing different products, I’ve had glossy sticker paper that smears as well, that’s why I recommend the one on the article.
Thank you for posting amazing tutorials! Everything is clear, concise, & right to the point! Your hard work and dedication is greatly appreciated! I kept waiting for you to ask for my credit card number to be able to keep going & was greatly surprised that you offered all of your expertise for FREE!!!! You are a true blossom among the weeds!!!
I have been trying for weeks to master making my own stickers this was so easy to follow and whilst i was learning this i also mastered how to put text onto card shapes too. Thank you so much!!!!
I just got my cricut and you have THE BEST blog posts. I’m not just saying that …. I’ve read through a lot. Thank you so much! Keep up the great work!
Catalina,I can’t thank you enough for the wonderful tutorial on making sticker pages for my journal.
I can’t tell you how long I have looked for a walk thru tutorial on making full boxes and doing pattern fill and adding text.You are amazing and I appreciate so much you sharing your knowledge with us.
Thank you, also introduced me into using patterns, now I’m addicted to using that setting.
It has been weeks struggling to make the perfect stickers and out of all the tutorials I watched yours are the first to help me to get that perfect sticker !! I absolutely love your blog, designs and inspirations.
Is there a way to make a kiss cut on the back of a die cut sticker for easy peeling?
Not really, but Avery sticker paper comes with kiss cuts lines on the back for easy removal.
That was incredibly helpful and I learned some new tools to use for other things too!! Thank you so much for sharing your knowledge!
Thank you for this wonderful tutorial. Do you have another one that explains how to create stickers that cut all the way through? For the purpose of selling or giving away as freebies for customers? Thanks!!
Not yet! However, you can use a thicker material to cut them through.
Hello, what Cricut do you use? A Maker or Explore?
I use them all! I use the one I feel at the moment! For stickers, though I wouldn’t use the Joy because it doesn’t support Print then Cut.
Hi Catalina
Thanks for an informative and the most amazing tutorial. You are a star! I viewed so many tutorials and yours was everything I needed. Thanks for all your hard work. I really appreciate it!
Hello, thank you for a fantastic tutorial and templates! I just have a quick question. I have everything designed and have highlighted them all and ‘flattened’. When I click on ‘make it’, it’s not showing any of the stickers in the next screen (just a blank white image). What am I doing wrong? It’s all within the 6.25×9.75 frame? Thanks 🙂
Did you delete the guideline?
Thank you so much for this tutorial! the instructions are very clear and easy to understand. Yet, I am missing something lol I am using a Cricut Explore 2. When I am printing, it cuts out everything, not the outline. I have tried putting a square or circle behind, but it still cuts out the words or patterns. Can you help with what step I am missing? Thank you!
Are you flattening? If you just change to operation to print then cut, things will get messy!
I have tried all kinds of things in downloading and uploading to DS. The file is all jumbled when I see it in DS. The only option given to me is a cut option, not print and cut.
Hi Carrie! I am sorry for the late reply. I just double-checked and I had no idea this was happening. I just went and fix it. The file should upload with no problem right now. The shapes are with basic cut because I want you to be able to edit them as you please.
The tutorial covers the info!
I’m new to the Cricut bandwagon. I’m in awe of your talent. I can’t wait to delve in and do this. Thank you.
You’re very welcome 🙂
Thank you for doing this for all of us! I have been wondering how to do this!
You’re welcome 🙂
How does a cricut machine print the images onto the sticker paper? Do the machines have ink cartridges?
No, they don’t. You send them to your home printer first and then cut with your machine.
I as well want to thank you for this tutorial. One question. Is there a way to add an image to all the desired shapes at once, or do they have to be added individually to each?
If it’s a particular image from Cricut’s library, or uploaded, you need to add them one by one.
Appreciate your time and how u explain things x
You’re very welcome 🙂
absolutely great post! i followed all your social’s for more how to’s. Thank you for being so generous with your time and your expertise I will definitely be following along!
Yay! You’re very welcome 🙂
This tutorial was the first one that helped me to make rectangle shapes in Design Space; I’ll be grateful for a LONG time. Thanks for simple directions that even this grandma could understand. 🙂
Yay! Happy I was able to help!
We spent hours creating a sheet of stickers, but my cricut won’t load it… just says. preparing. I’ve done everything including restarting everything. Deleting the app and starting over. The folks at Cricut said maybe it was too complicated. I didn’t do anything as complicated as yours. Do you know what I should do? We love your stickers. Help if you can. A cricut that just gets stuck on preparing……
Have you tried from your desktop? Are you using very large images?
Sometimes, if you’re using very large images Cricut can crash. It’s so annoying. Also, try cutting them from a desktop. I also have had to wait up to 2 minutes or so for Cricut to read the project.
Thank you! This helped a lot. I signed up for the newsletter. 😉
Yay!
Thank-you for this tutorial. I think that your instructions were the clearest ones I have found so far!
Happy to hear!
Hello Catalina… Your how to on stickers is a God send! Thank you. I have 2 questions regarding Print and Cut. My project is to be able to fill the maximum 9.25×6.75 for stickers. All I want to do is label my jars. I chose my font, typed each word and since the font is script, I took care of the spacing and also welded. I filled my sheet with all the words I needed. I flattened and also attached. I ran the Print option and my printer did its job successfully. I placed the sheet on the mat for the cut portion. This part didn’t produce my desired result. My desired result is for my Explore Air 2 to cut around the words on my sheet instead of each individual letter. Do I turn on bleed? How can I make my Explore Air 2 cut around each of the words so they can be peeled off as individual words from the sticker paper? Thank you!
Make sure the word doesn’t have a shape underneath it or the guideline I mention on this article. It should be able to cut the welded word.
@Myka, You need to select the entire sheet and click flatten to make it into one layer. Once you do that it will cut around the shape and not inside it and yes you want to use bleed or it’s possible to get a white edge at either the top or bottom of your individual stickers.
Thank you! I just made stickers for my son’s school supplies.
How fun! 🙂
Is there any way to stop design space from changing the layout of the stickers?
I have been playing with Paint shop pro, Inkscape, Gimp, and STILL haven’t found a solution.
So far importing seems impossible as well..
(I refuse to pay $21 a month for Adobe!, or $650 of Corel draw)
Even your templates get rearranged!
Remember to flatten the entire layout. On the step tutorial I cover this, I hope this helps!
Great Video!! My daughter and I are excited to make our own stickers. My question is what is the best printer to use to print stickers?
Thank you!
Nicole
I really don’t know because I have such a cheap HP Envy 4520 and I don’t plan to upgrade anytime soon. I would hate to recommend something I haven’t tried myself.
Thank you so much for this, one of the reasons I got a Cricut was to make my own stickers for my planners. Your instructions worked great and my Maker cut them out great with only a couple of deep cuts all the way, lol.
Thank you
That’s awesome! I am really happy to hear!
Hi there! This was a great tutorial! I made stickers for my kids!! They love them! But when I went to cut them, my Cricut didn’t have the Sticker Paper, Removable option. And when I cut them it didn’t make a sticker sheet it cut them individually. Any chance you know how I can change that? Thank you so much!
Did you flatten? I have to try to see what other material can work. But I would try regular copy paper with “more pressure” if I were to guess.
Hey! I found this really helpful, thanks. Does all of this apply to the Cricut joy too?
No, it doesn’t :/ The Cricut Joy doesn’t support print then cut.
This tutorial is exactly what I was looking for! I’m had one question – would I be able to print the image onto sticker paper and then come back and cut it later? I wanted to make stickers to use in my classroom, so I was hoping to print onto the sticker paper using the color printer at school, but then cut them on my Maker at home.
Yes, you can, as long as you don’t modify any of the design. Click on make it and where it says print click on Already Printed.
So print your images first on a printer, then go into DS and ‘cut’.
Yes. But you need to print them from Design Space, like the tutorial explains.
I knew reading this would be dangerous! Now I think I’ve just decided to buy a Cricut Maker!
Thanks for the great tutorials and normal explanations!
Lol! Welcome to the fam! I am glad I was able to help on that decision 🙂
Thank you so much for this fabulous tutorial!!
You’re very welcome! 🙂
Hello Catalina!! I am a newbie I have had my cricut explore for a few months and finally getting the courage to do stuff with it! So here I am following step by step on everything and I get to the print and its charging me to print! Why if everything as in the text and design that i choose is free items, I so lost and confused and I honestly can’t figure out why its charging me for something that I have created step by step from your tutorial. What could I have done wrong? Any ideas?
Some of the images I used for this tutorial were free at the time. If you are using the same codes this might’ve changed. I hope this helps! 🙂
I’ve been working on stickers as end of year gifts for my students and am so excited. BUT when I get to the print stage of print then cut, there’s just a spinning circle forever after I hit print. Any ideas? Thank you!
I would try to restart Design Space. Also, make sure your PC is not running a lot of programs. Stickers can be quite a large project sometimes!
I was having the same problem. It seems my project was too large. I duplicated the sheet and then removed some items from each one so that the 2 sheets together would make the one project. I did discover it was important to make it where each sheet has stickers on the top and bottom and on the edge of each side so that the total size of each sheet was the same as your original project. I then printed the first side and cut it with the “sticky note” cut so that the stickers are not not completely cut out. Then I put the same sheet back in and printed the second side and cut those with the “sticky note” cut also. This will not work with the sticker cut that cuts the stickers completely from the sheet. I hope this helps.
Thank you for this information. What if I want to create my own templates and stickers and make them available for purchase on my FB Business page. How would I link them to my page?
You need Adobe Illustrator or any other designing software. You can sell them on Etsy, or other creative platforms.
Your article was super helpful! I thought it was super cool that you provided us with svg files. How did you make them with the cuts included? I just got my Cricut Explore 2 so I am new to cutting machines
I designed them in Adobe Illustrator 🙂
This is a great tutorial. Is there a way that you can put words at the top of the sticker sheet without them being cut like the stickers?
Ex: Sticker Sheets as the Title
Then the stickers underneath it.
You can’t The Cricut would cut the letters. You can write on it though.
Hi Catalina,
Amazing video!!
I am in the process of making my own Halloween stickers, all of different shapes, not all of them were print files so flattened them, but it only cuts in the circles or squares I put behind them. Is there a way to cut round the actual shape?
Chloe x
Skip the circles and squares. Your image needs to be solid, though. Otherwise, it will cut in the inside as well.
Hello! I’ve been trying to print and cut on Avery sheets. However It is not recognizing it and just spits it back out. I have tried to find the setting sticker paper, removable but it is not there. Any recommendations?
Is it a shiny paper? If you have an Explore you can only cut Matte finishes. I’ve used Silhouette’s brand and I haven’t had any problem.
I love your tutorial!!
Do you know of a way that you can type words on the top of the sticker sheet and it will not cut the words? Example:
Sticker Sheets
Then images and shapes underneath the wording.
That one is a hard one! I don’t think you can because the pattern on which the blade cuts is so unpredictable. You can use Pens, and Cricut won’t cut! I hope this helps 🙂
This is amazing! I really appreciate you taking the time to both compose and share this document. I am encouraged and empowered to create some wonderful stickers with my Maker.
I am glad I can help 🙂
This was so helpful! I was prepared for a little trial and error but it came out great on the first attempt! Thanks for the great directions.
Yay! This makes me so happy.
Hi…
I have a question. I downloaded your round sticker SVG template. I want to add all stars to my circles. Is there a way to copy and paste the stars as a group and make sure they are all aligned to fit on the circle correctly?
You can but you need to at least a row of circles. Place a start, resize, copy and paste and align them with the first line of circles, then group them and copy and paste and place on each line.
Thank you for the best Cricut tutorials!
I have learned so much from your site and I am grateful for the time and attention you pay to detail. My classroom will look spectacular next Fall thanks to you!
Yay! I wish I could see your classroom. I am glad I am able to help!
Hi thanks for the detailed explanation, however is there a way to get rid of the black border all around the sticker sheet when printing? Many thanks
No there’s not. The black line is the guide for Cricut to know where to cut. When you are done cutting the stickers you can use a paper trimmer to get rid of it.
Hope this helps 🙂
Hello Catalina. I have followed your directions, everything is flattened. The project prints and then when it’s time to cut it scans and then spits it back out again. I have calibrated the machine, Explorer Air 2, but it wont cut the project. Any suggestions?
Are you using white paper? If you have the Explore you can’t use colors.
WONDERFUL tutorial. Thank you so much.
Thanks so much for your tutorial. I’m trying to learn to make stickers that have a white outline around the whole picture so that cricut would cut out the entire picture. Do you know how to do that? I have a circuit maker. Thanks so much!
Check out my how-to outline tutorial in design space and combine it with this article! I hope it helps 🙂
Hey Catalina! I came across your video on Pintrest and I love it! I’m wondering though, if i have a sticker with lots of printed detail, how can I get the Cricut to cut around the outside line and not any of the inside detail? lol Does that even make sense? I don’t want to have to put a shape behind it but not sure how to just cut around it.
Use a copy of the largest image (that contains all the duplicates) then with contour hide everything so you have a solid shape. Send it to the back and align everything on top of it. That should work.
Where are the actual templates?
Check out the title “Using Layout Templates to Make Cricut Stickers” there are download buttons.
Hi, which paper sticker can I use to do some sticker. Im really new at this and I want to make some sticker. Thanks
I prefer to use silhouette sticker paper. It’s linked in the “Materials” section of this tutorial.
Hey I really found your blog helpful but I have 2 questions that I am having a lot of trouble with. Firstly how did you get to use almost an entire 8.5×11 page? everytime I try it run into errors, mainly it put my artwork on a second page or as they call it mat.
My second question is how do you cut out the stickers without cutting through the paper? I use paper from online labels I was told its a great place to get labels when using a cricut, the only problem is every time i try to adjust the setting it either cuts through the paper entirely or doesnt cut deep enough to peel the sticker off. Please help!
thank you
Hi Adina. To use the whole page I created an outline of the biggest size Cricut allows Print then Cut. For cutting the stickers I used the material “Sticker Removable” it’s the none Cricut one because Cricut’s sticker paper is really thick!
Hello!!
I was wondering how to outsource my printing? I have a really crappy printer and would like to print my stickers at staples 🙂
Hi Ariane. It’s quite easy, actually! Instead of sending the file to your printer from DS, choose the option to use your PC dialogue, and from there save the copy as PDF. Once saved you can go to Staples or Office Depot and print from there. I hope this helps! 🙂
Hi Catilina,
I’m wondering if I can use the write feature on the Cricut Maker to write a name on clear printable sticker paper with a cricut pen instead of using a printer. If not, do you know of a material I can use to do this. I’m trying to make circles with a name and birth date to adhere to a 1.5 wooden disc for a homemade family calendar.
Loved your tutorial!
Hi Michele. I recommend you abstain from using pens on glossy materials like vinyl or clear sticker paper. The ink is not really designed for this purpose. If you want a writing style font you can use it still and then change the fill for print.
I hope this helps!. Check out my Pens tutorial.
Hi Catalina:
I am SO grateful for your tutorial on making the stickers. My only question is if you always have to use a black font? I wanted to do different colors with patterned background.
Thank you!!
You’re welcome, Gina!
You don’t need black fonts, you can use any font of any color! I just love how black looks. 🙂
Thank you so much!! I have been buying planner stickers on Etsy, while cute and functional, they are not in the color scheme I’m wanting and to keep buying is expensive!!! I’ve been trying all weekend to find a way to make my own. This was finally it!! Exactly everything I needed to know. I tried messing around on my cricut but with two girls running around there isn’t much time. You are such a blessing. Thank you. I thank you and my girls thank you. I now know what to do so I’m not wasting time with my kids.
That’s awesome Heather! I am happy I can help. I also have trouble crafting and blogging with my toddler trying to reach for everything!
Hi Catalina! Thank you so much for sharing your knowledge. You are amazing and a life-saver!
I have a question about a sticker page that I’ve attempted about nine times and design space stops working while I am preparing it for printing. I’m working with stars and hexagons, about .75″ x .75″. I’ve inserted a small amount of text (“You did it!”). I’ve used “attach” on each sticker so the text would float with the sticker and not separate. While duplicating, the design space starts slowing down, until the point where it will not respond at all. I’ve gotten the page to “flatten” a couple of times, but it took about 25 minutes to flatten and then all my text turned into the background color instead of staying black, and I was just left with the shape.
I’m sure I’m doing something wrong. Any advice you can give would be appreciated.
Hi Anne! Skip the attach. You really don’t need it and I think that’s what is causing the change of color. As for the time, how many little stars do you have? Sometimes design space can get slow with big projects. Are you using the online or desktop version? Or from your phone? I’ve noticed, although faster the newest desktop version has some glitches when saving.
Just like the tutorial says. Have fun designing with the guideline shape, then delete the shape and select everything and flatten. Save as you go so you don’t lose any work.
Please let me know how it goes!
Thanks for your help. I’ve learned alot over the past few days, but unfortunately, I’m still having download/upload issues. I have to believe it’s on the cricut end at this point because I’ve run several tests on my internet speed (and talked with the company), but things only work sporadically.
With that said, I usually use the internet connection design space because the beta version wasn’t allowing for background patterns. Today, my whole project crashed, but I was able to save it, moved over to the beta to open it again, and it took about 25 minutes just to flatten.
Maybe its the size of the project? I can’t find any information about limitations on the internet. I have 98 little 1/2″ stickers on one page. I’ve seen other examples of this out there, but I’m wondering if it’s too big of a project.
Lastly, I’m having problems with using design images from design space. The cricut seems to want to cut in between every little gap within the design, even cutting out marshmallows on top of the cocoa. My final product is a bunch of tiny cut out pieces. Is there any way to just TRACE AROUND AN IMAGE AND HAVE THE CRICUT CUT JUST THE TRACE MARKS and leave the inside alone. Again, I can’t find that answer anywhere and was wondering if you could help me out.
Again, thank you for sharing your amazing expertise and your time.
Hi Anne, maybe the project is to big? 98 images can be a lot. Can you divide the project?
You can cut it multiple times instead.
About the marshmallows I understand what is happening.
You need to have some sort of shape that will hold everything in place. You see, your blade will go through any blank space on the canvas.
If you read this tutorial on why I have to delete the “guideline” you will grasp this concept.
Also, use flatten at the end.
For example place a circle, then put your marshmallows on top, then select them both and make the amount of copies you want and finally, flatter the whole thing.
Your marshmallows will be contained in a small circle once cut. I hope so make sense.
Have a great weekend.
Hi. I’m still new to using my circut maker. I would like to know how to change the view settings on my canvas in design space. I can only see a maybe 5 x 7 screen so it’s frustrating trying to see how things look in one pic. I have been trying to figure this out for awhile
Hi Liz, have you tried zooming in and out? You can do it within the canvas area in the lower-left corner. I hope this helps!
I can’t seem to access print type. I just get the solid colors, not patterns. Any ideas?
You can only use patterns from a Desktop computer. Are you making the stickers on your phone?
Hi Catalina,
This is just the most amazing tutorial for me as a total newbie to any cutting machine!
I do have one major problem though; I can’t select more than one item on the canvas (when you selected the two small rectangles at the beginning to copy and paste them I couldn’t work out how to do that). I can select one, or select everything, but not just part of the canvas. How do you do this please?
Many thanks.
Hi Denise! It’s very simple. Select them while pressing shift at all times. I hope this helps 🙂
Hi Catalina! I too stumbled across your site from Pinterest. Your tutorials are wonderful and so easy to follow. I love the easy set by step on making sticker.but for the life of me I cannot get the right size you have on the tutorial. So I gave up and wanted to use your template but I can’t seem to find them. Can you provide a link?
P.S the step by spet tutorial on shapes was great as well. once again thanks for taking (15 hours of your time) to make these tutorials
Evelyn
Hi Eve, I am sorry to hear this, are you are right-clicking and choosing “Save image as?” What template you want the link for, I will gladly share it.
Hello! Here’s my Question….When you upload a sticker template, what option do you choose?
“Simple” “Moderately Complex” or “Complex” and I am assuming you save it as a “print then cut”.
Hi Jess. The template is an SVG file so you won’t need to choose any of that. Those options are for PNG or JPEG files, I hope this makes sense.
Have a great day!
Thank you for sharing this I have a question about stickers. I do not want a sheet of stickers that are kiss cut. I do want to make stickers in a square shape with my own design and have the Cricut cut all the way through. I want to end up with several of the same stickers. I’ve had my cricut maker for about a week and get so frustrated trying to understand all that it can do.
Please help?!?
Hi Kim! You can totally do this as well. You can use more pressure in your settings, or select a slightly thicker material than the want you are using. So if the material feels like a light cardstock, use a heavier cardstock material instead.
I hope this makes sense!
Would Avery sticker paper work just as well as the Cricut or Silhouette brand?
Hi Chrystie, I sure think so. Just try the same setting (Sticker Paper, Removable) and see if it works for you. If it cuts through use less pressure; and if it isn’t cutting enough use more pressure. It’s all about trying. But I am sure Cricut can cut it.
Have a great day! 🙂
Wonderful tutorial!! I’m definitely going to follow your directions
You’re welcome. I am happy I can help!
Thank you so very much for this tutorial! I was able to make some custom stickers for my daughter before going away to camp for the week. Some of the cuts didn’t quite align on the circles so I would love to know what I did wrong. I’m a new maker owner and I didn’t know where to start; now I feel empowered to tackle more projects. Thanks again.
Hi Heather,
I am glad I could help, try aligning the Print then Cut feature, also, did you leave bleed on? Last, it’s normal for things to not look 100% align, that’s why Cricut recommends leaving bleed on. I hope this makes sense.
Read my Print then Cut tutorial for more answers.
Hi Catalina! I stumbled across your site from Pinterest and SO HAPPY I did. Your site is one of the BEST. Your tutorials are wonderful and so easy to follow. I have a Cricut Maker and have struggled with making stickers. It seems no matter what setting I put the sticker paper on, it still cuts completely through the paper. I am taking your advice and trying the paper and settings you suggest. Thank you so much for such a great site and sharing your knowledge.
That sound great Lucy! I am glad I was able to help you out, let me know how it goes!
Hi Catalina! I have some questions, I just bought the cricut and I want to make vinil stickers waterproof it’s posible to do it on the cricut? I also want to know we’re I can print in white ink do wow know that?
Hi Ximena, I am sorry I am just getting back to you. Quite frankly I don’t know, and sincere I haven’t tried it myself I would hate to give you bad advice.
What about laminating paper over top before cutting.
I’m having issues with design space aligning right. I have followed all your directions and the cricut doesn’t cut where the sticker is printed. Any tips? I have wasted so much paper and ink.
I have even calibrated my machines cuts. It will cut great 1 time after that and I get my hopes all up and then the next time I spend all that time designing something new and same problem. The cut is off.
I would love some help and insight.
Hi Melissa. Are you using the right size of paper? Also, you need to make sure that you are flattening. Want to share your design link with me?
Do you use an inkjet printer? Do you have issues with the color printed on the paper coming off? I am sure if it got wet it would. Just asking your experience.
Hi Chanda!
I use a regular inkjet printer, and it looks like a normal printed sheet. Haven’t had a problem with it coming off either. And you are correct, if the stickers get wet, they would get ruined.
Whether it’s just my iPad but where you detail how to cut the stickers is covered by an image of other stickers. Is it just me?
Hi Debbie. I am not sure about your question. But I have step by step of how to make stickers inside Design Space. And I also have more photos of examples on how to make them with the free templates I provided.
What exactly do you see?