Hello Daydreamers!
In today’s tutorial, I will teach you how to upload images to Design Space for all your projects.
Uploading a picture is easy; however, there are some considerations to avoid frustrations and become a better crafter and designer.
In a nutshell, these are the topics I will be covering today:
- What types of images are compatible with Cricut
- What type of image should I use
- Upload images from a desktop computer
- Upload images from the Cricut app.
- Identify images that you shouldn’t use

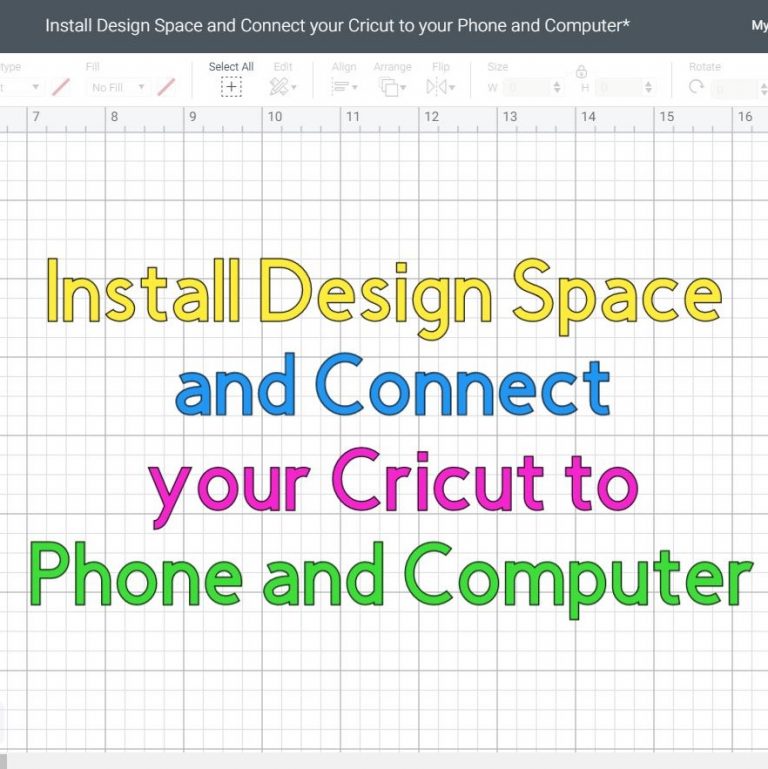
Related: Learn how to use Cricut Design Space.
What Types Of Images Are Compatible With Cricut:
In the Cricut world, there are two different types of images you can work with:
- Vector Files (.svg and .dxf)
- Raster Files ( .png, .jpg, .gif, .bmp, .heic)
Vector files are the best images to use with your Cricut machine because you can increase or decrease their size without losing any quality. The designs are built using mathematical formulas and are usually called “Cut Files” by the Cricut community. You can recognize them because they end in .svg and .dxf.
You need a program like Adobe Illustrator, Corel Draw, or Inkscape (free) to create vector files. It’s a lot of fun, but it requires dedication and practice to learn; that’s why many people just buy the files and upload them to Design Space.
Raster files are made out of blocks of color called pixels. The more pixels, the better the resolution of your image. Raster images are great for “Print then Cut” projects but not so great for projects where you may want to change colors or extra details.
Although all raster files are made of pixels, there’s a special raster file called PNG.
PNG images have a transparent background. Therefore, they are the easiest raster file to work with because you will usually upload an isolated object.
You can also upload .png, .jpg, .gif, .bmp, and .heic (iOS picture) files.
What Type Of Image Should I Use
Use vector files whenever you have the chance because you can manipulate the image in many different ways. You can increase and decrease the size without losing quality, change colors, etc.
Use raster files when you want to print and then cut a very detailed image. For instance, if you want to make magnets with pictures of your kids, your only alternative is a raster image because it’s pretty much impossible to have a vector image with so many details.
Step-by-Step Tutorial
It’s time to put into practice all the concepts you just read so you feel confident the next time you upload images to Design Space.
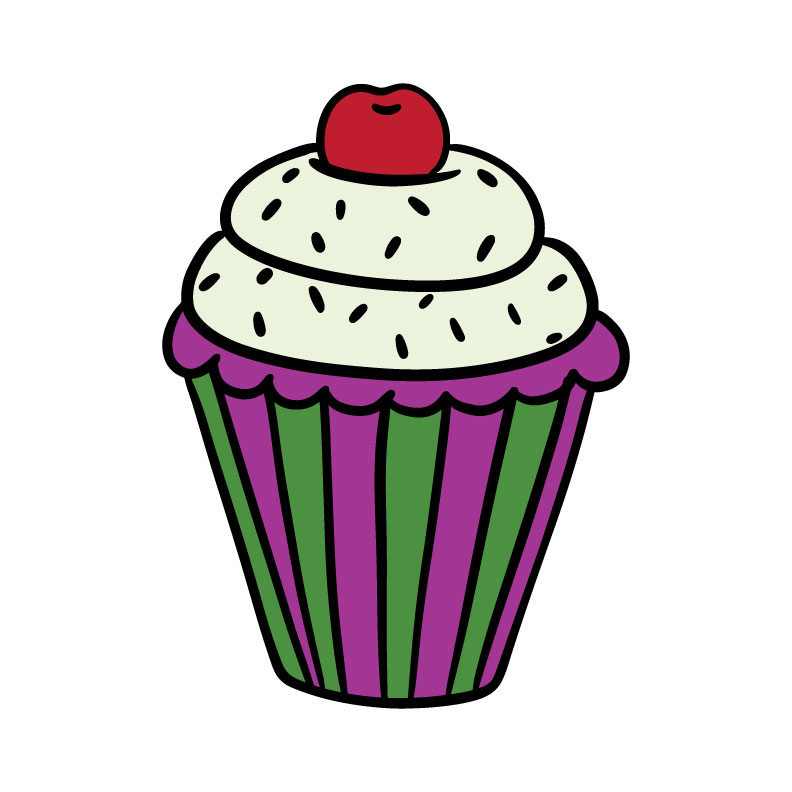
To follow along, go ahead and download the following pictures by clicking on the download buttons. We’ll upload a .jpg, .png, and .svg file.
Note: .gif, .bmp, and .heic should be similar to .jpg files.


Upload Interface
To upload an image, you must first be on the Design Space canvas tab and then click on the “Upload” icon on the left panel.
The “upload” window will display your recently uploaded images, but more importantly, it will have a button named “Upload Image.”
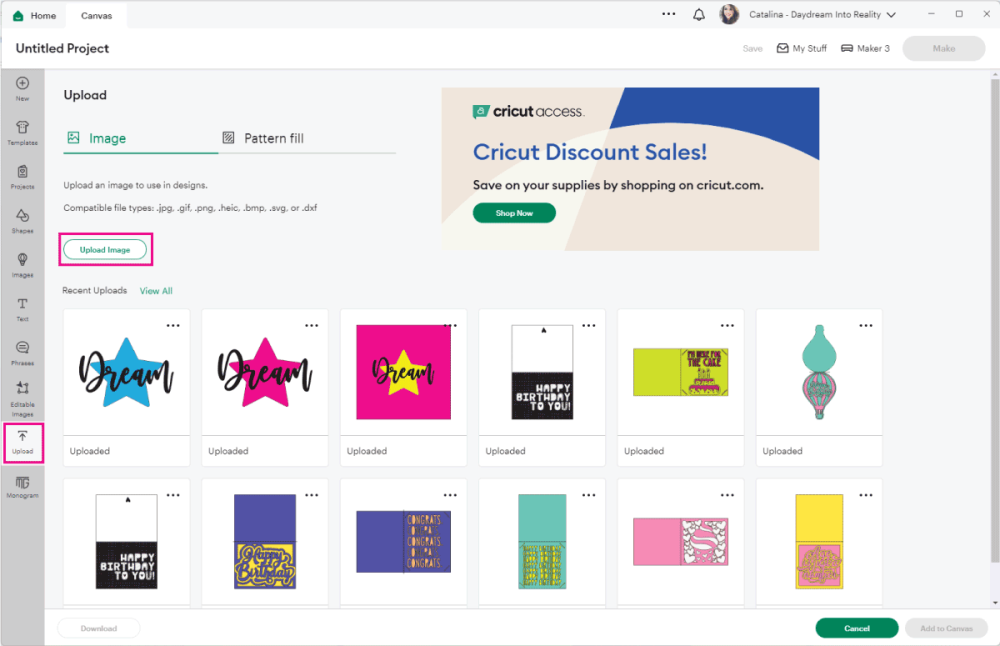
When you click on “Upload Image,” you’ll have a view like the one shown in the screenshot below.

You can upload an image in two different ways. First, you can click on the “Browse” button and locate the file on your computer, or you can drag the file from the folder where it is located and drop it in the box.
Keep in mind you can only upload one image at a time. Unfortunately, there are no bulk uploads in Design Space at the moment.
No matter what type of image you’re uploading, the preview steps are all the same.
Upload JPG, BMP, and HEIC Files
Let’s see what happens when you try to upload a JPG file (the other types will be similar).
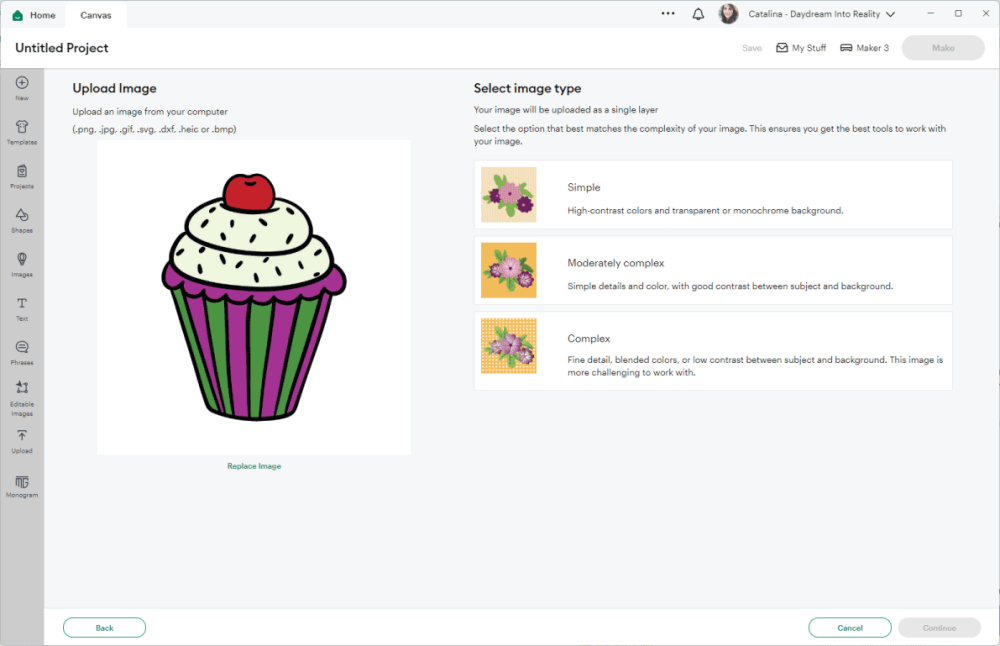
On the left, you have a preview of the image or picture you’re trying to upload; on the right, you have three different options.
- Simple: high-contrast colors and transparent or monochrome background.
- Moderately complex: simple details and color, with good contrast between subject and background.
- Complex: fine detail, blended colors, or low contrast between subject and background. These images are harder to work with.
Before you can continue, you must pick an option.
Usually, illustrations like the one we’re working with fall into the “Simple” category. However, Design Space changed the colors of my design drastically on the first two options; therefore, I picked “Complex.”
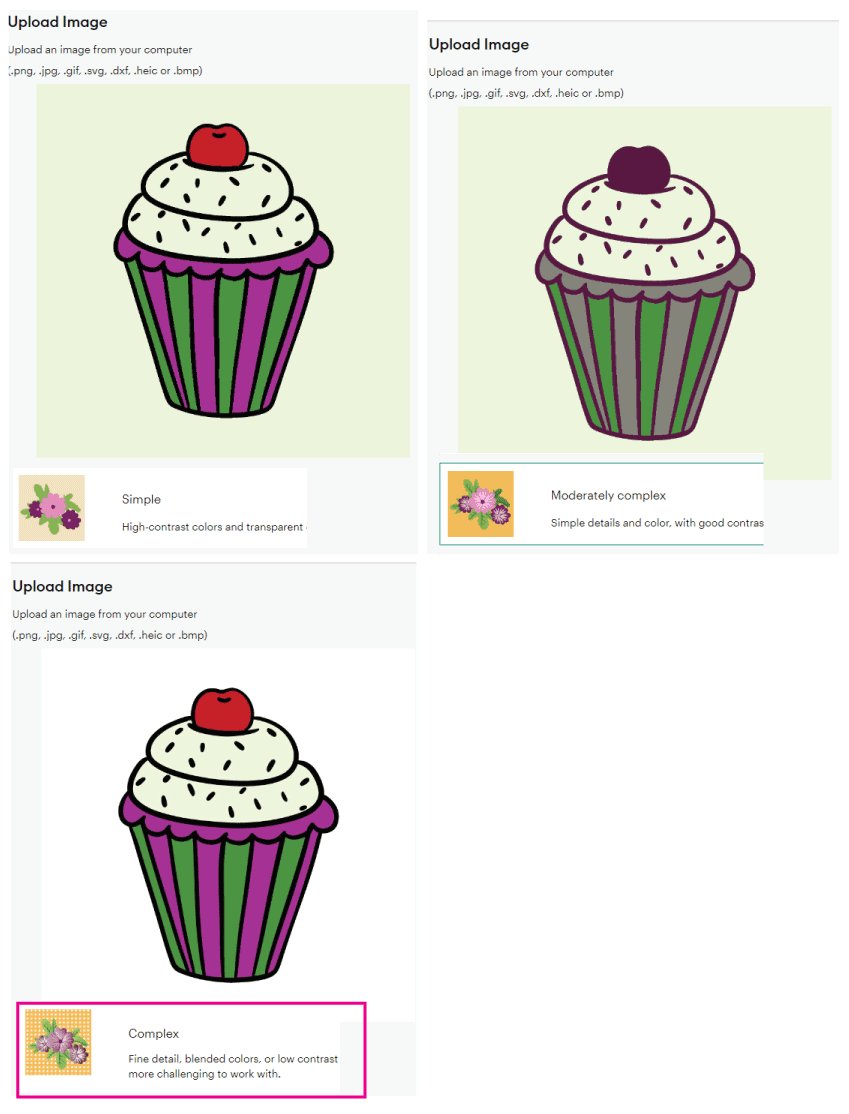
At the end of the day, pick the result that matches the look of the image you want to work with. Once you pick the type of image that best fits you, go ahead and click on “Continue.”
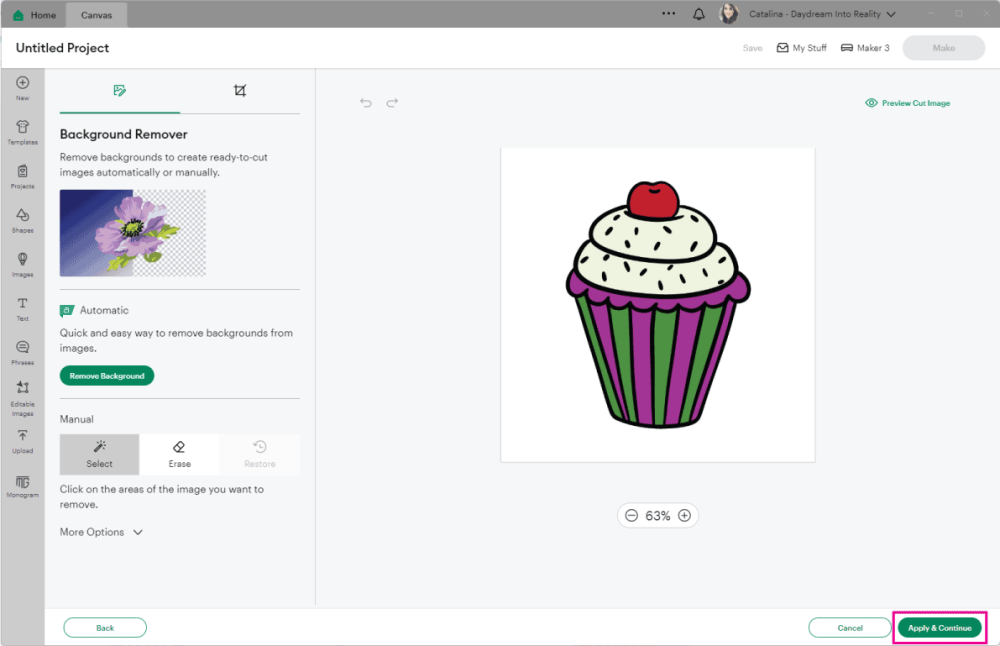
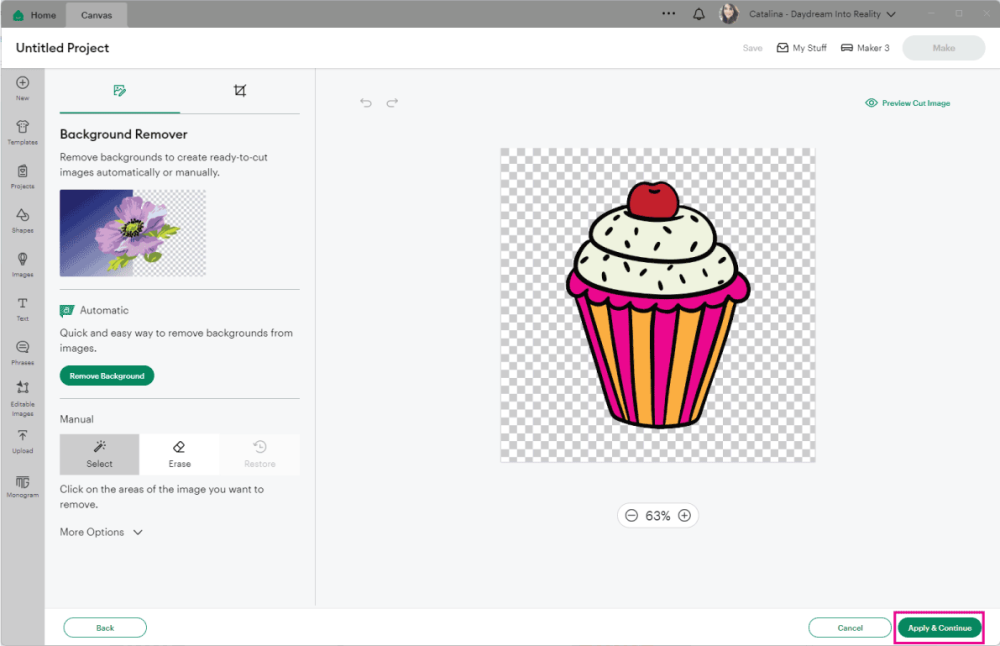
A new interface with different tools will appear. This image will be cut as a square because it is on a white background. However, if you want to cut around the cupcake itself, you would need to remove the background with the automatic remove background button or with the magic wand.
Sometimes, the automatic background remover is great, but on other occasions, it’s not. If the program doesn’t do a good job, use the magic wand or manual eraser.
I am going to upload the image for this tutorial. Click on “Apply & Continue.”
Tip: Don’t click cancel unless you don’t want to upload an image. It will take you back to the canvas, and having to start again is bothersome.
At this point, you will be prompted to choose how you want to save your image. Usually, when we upload raster files, we upload them as “Print then Cut Image.” However, that’s not always the case.
Maybe you’re trying to upload a quote and want it in vector format. In that case, you would select the other option.
Related: Master Cricut Print then Cut
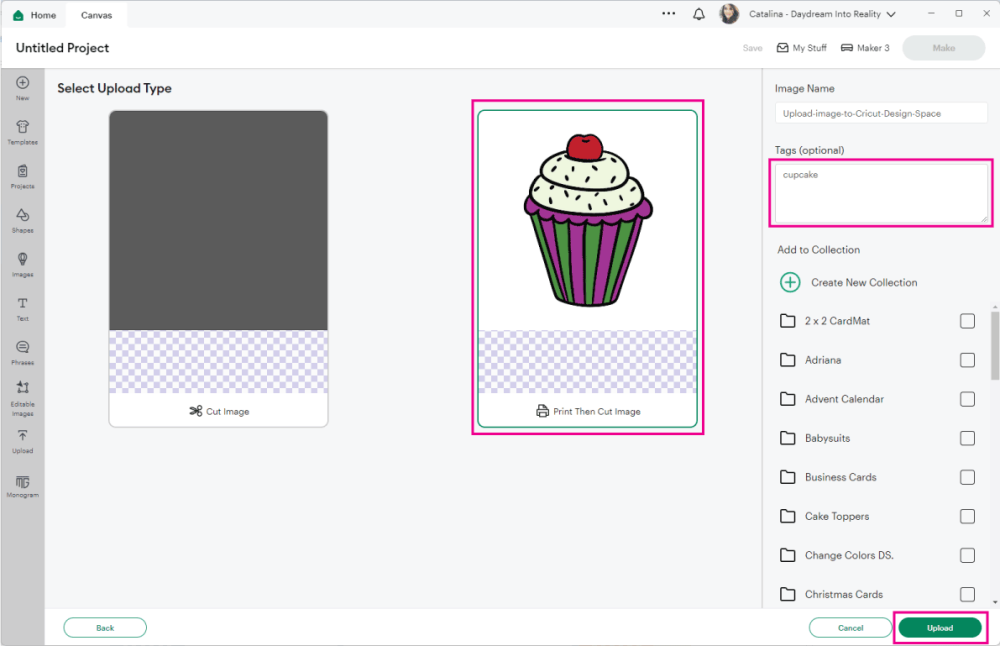
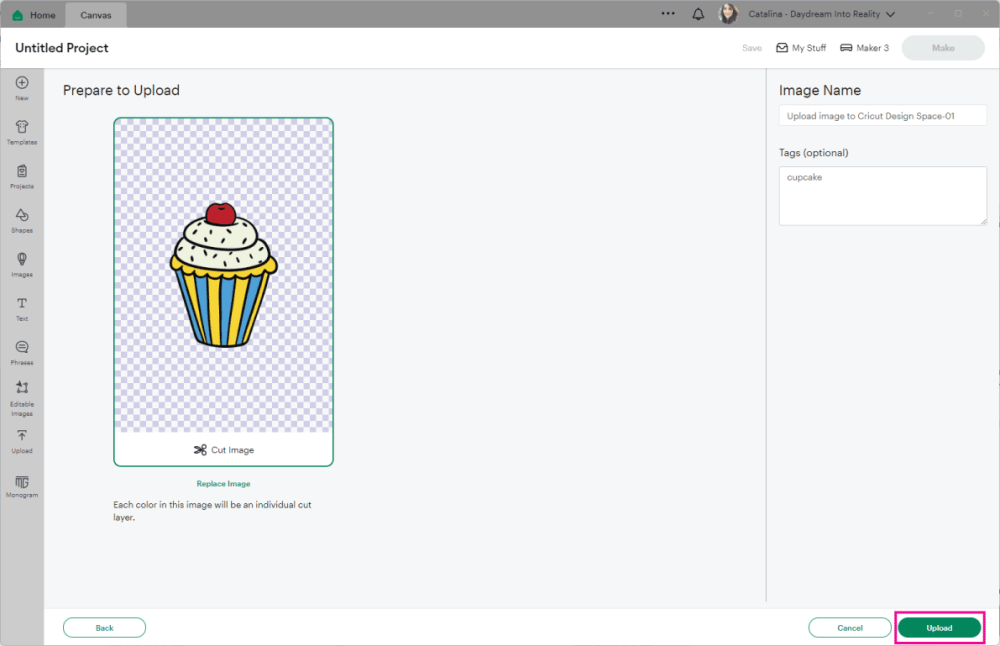
You can tag your image on the right panel of the program to make it easier to find. If you plan on uploading many images, tag them so you don’t have to scroll down to find the perfect image for the project later on.
Click on “Upload” to finish up the process.
Upload a PNG Image
Although PNGs are also raster images, they are sort of “special” because they have a transparent background, meaning the subject is isolated from the background.
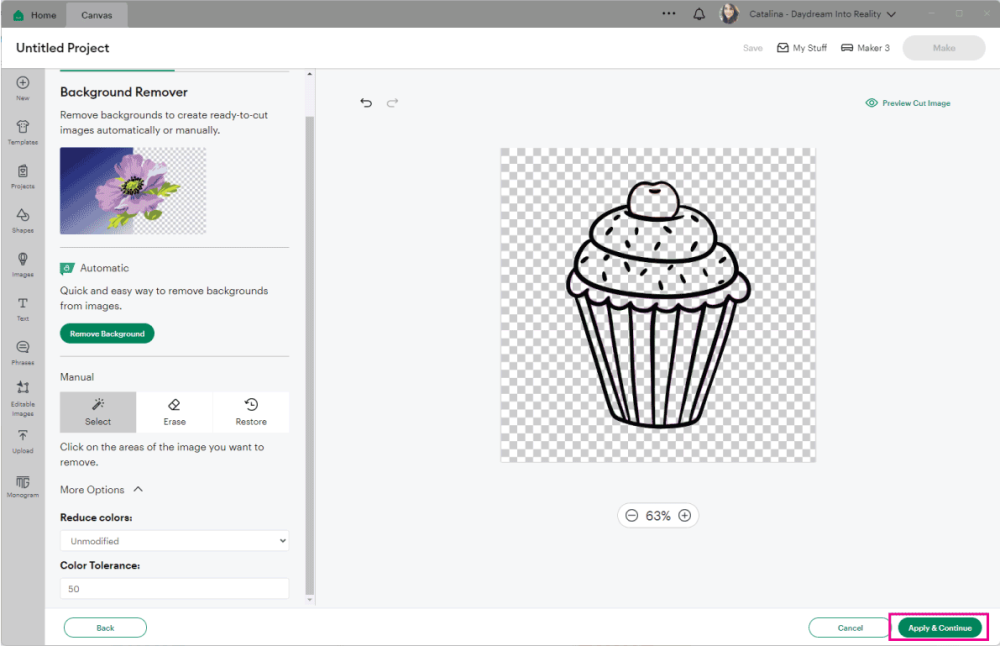
At this point, there are other things you could delete. Maybe you only want the outline of the cupcake and no color whatsoever. That’s totally ok! Play around with the erasers
For example, I used the “Magic Wand” to erase all the interior colors. However, I went back because I wanted color in my picture.
Just as we did with the JPG image, select the upload type of your image and add tags so you can locate it later.

Go ahead and click on “Upload.”
Upload SVG Files
As we did for the preview files, click “Upload” and follow the prompts until you locate the SVG cupcake you downloaded for this step-by-step tutorial.
You won’t have to select the complexity of your image, and you will be prompted to tag the picture so you can find it later.
Insert Image to Canvas
No matter what type of image you uploaded, once you finish the process, you will be redirected to where you started.
Your image will be under “Recent Uploads.” You can also click on “View all” to see past images.

Click on the images you want to insert and click on “Add to Canvas.”
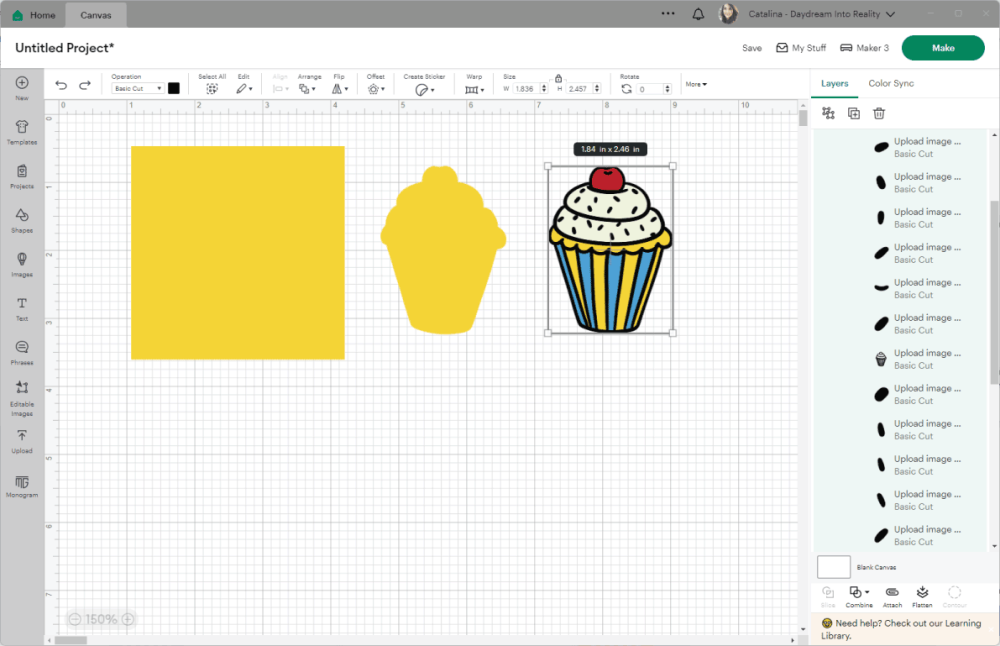
Here are all the images we uploaded to Design Space. Although they all look similar, they will be processed differently if we send them to our machine.
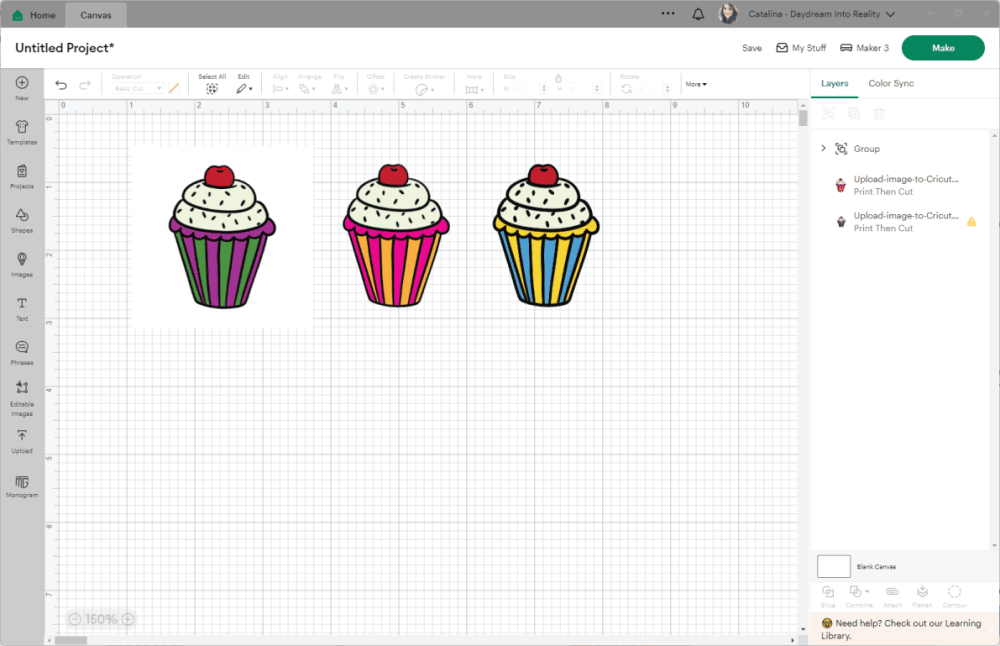
The raster images will be sent as “Print then Cut.” The JPG will be cut into a square, and the PNG will be shaped like a cupcake.
The SVG file, however, can be modified further. You can change colors, move things around, etc.
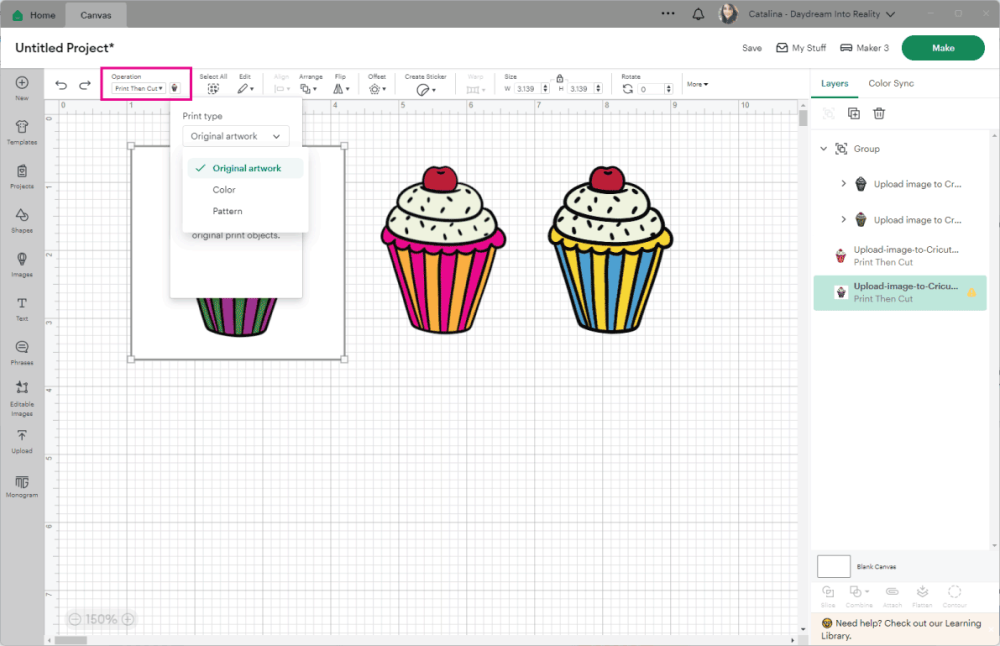
If you change the operation of each image, you can reveal the “cut file” of the JPG and PNG images we just uploaded.
Find and Uploaded Images in Design Space
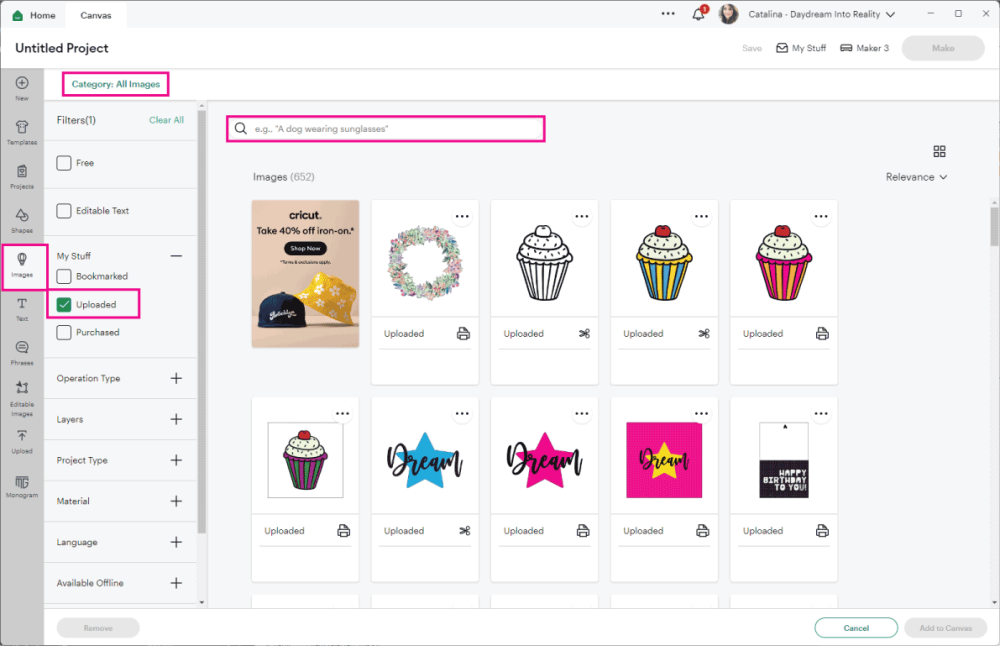
To find old images you uploaded to Design Space, go to the “Canvas” tab and click on the “Images” icon on the left panel.
Click on “Browse All Images” to see a screenshot like the one below.
On the filter, go to “My Stuff” and check the box “Uploaded.” In the search box, type in the tags you used when you first uploaded the image. If you didn’t use tags, you can also type in the file’s name (or a part of it).
When to Give up an Image
Some images are not worth your time!
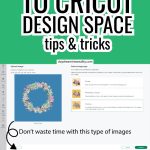
For instance, let’s say you want to upload a beautiful wreath, but it’s on a blue background. Unless you plan on using the image as is, I won’t try to delete this background because it’s pretty much impossible.
When you try to delete the background, there will always be leftover blue pixels, no matter how hard you try.
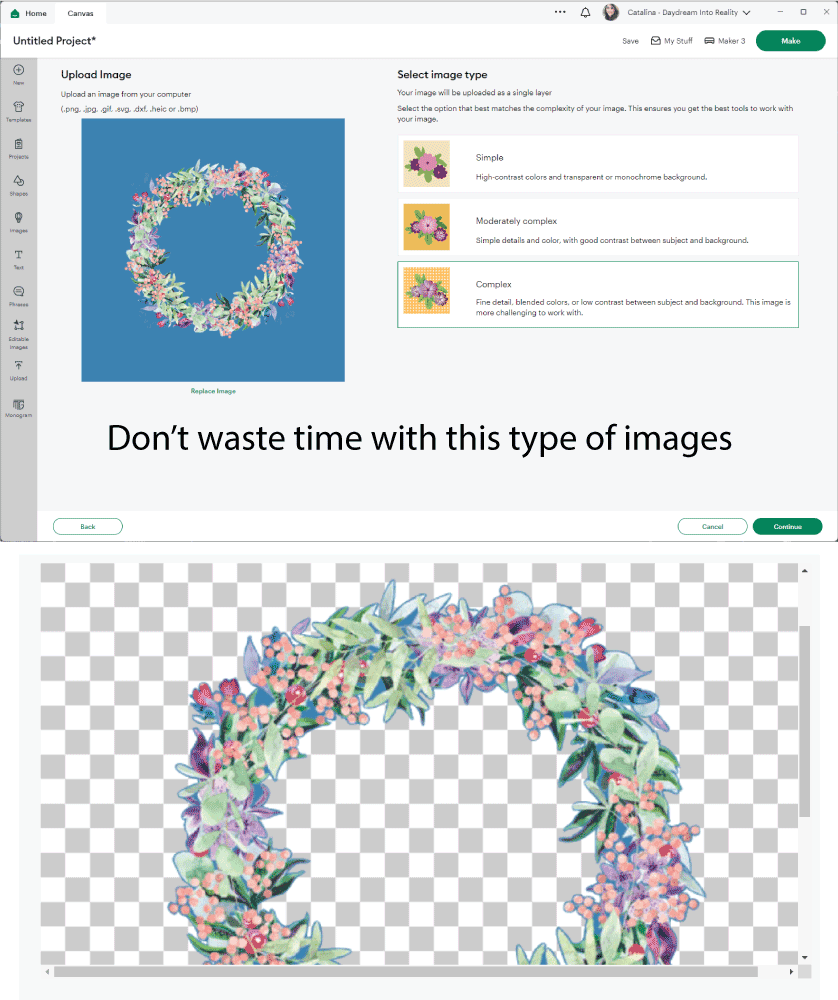
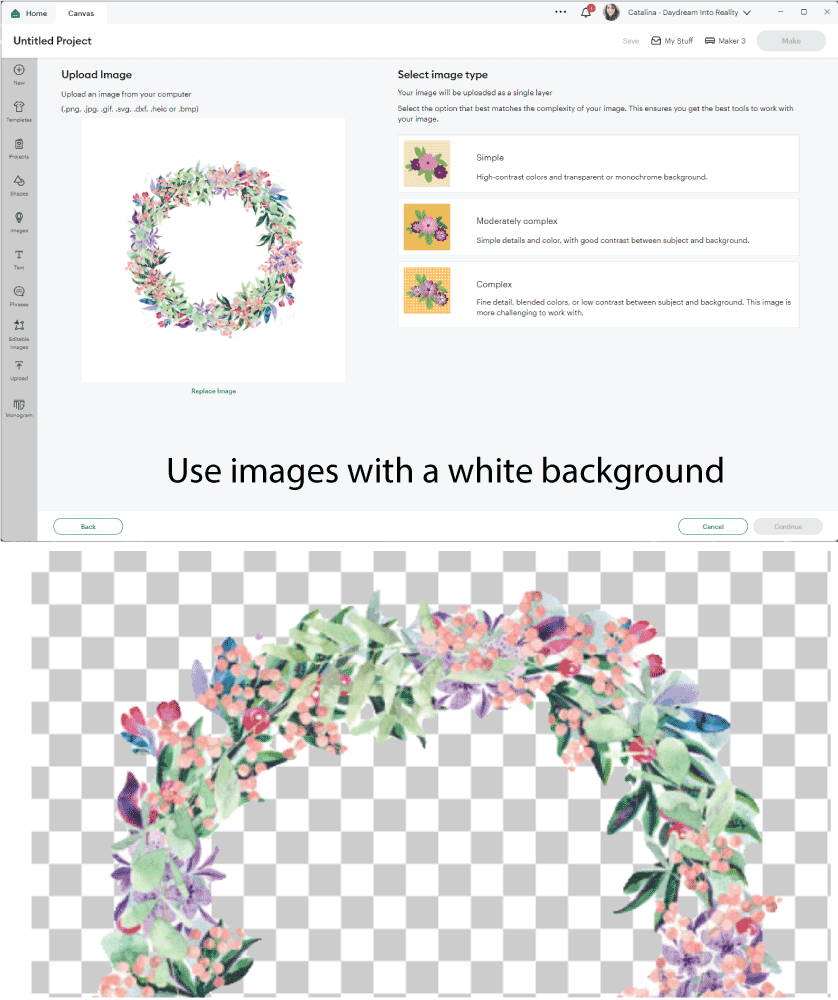
Only do very complex images as is or when they are over a white background, like the screenshot below.
How to Upload Images to iOS (iPad – iPhone) or Android
Uploading images on the Cricut app is very easy as well. The process of how to edit them and the types of images you can upload is pretty much the same.
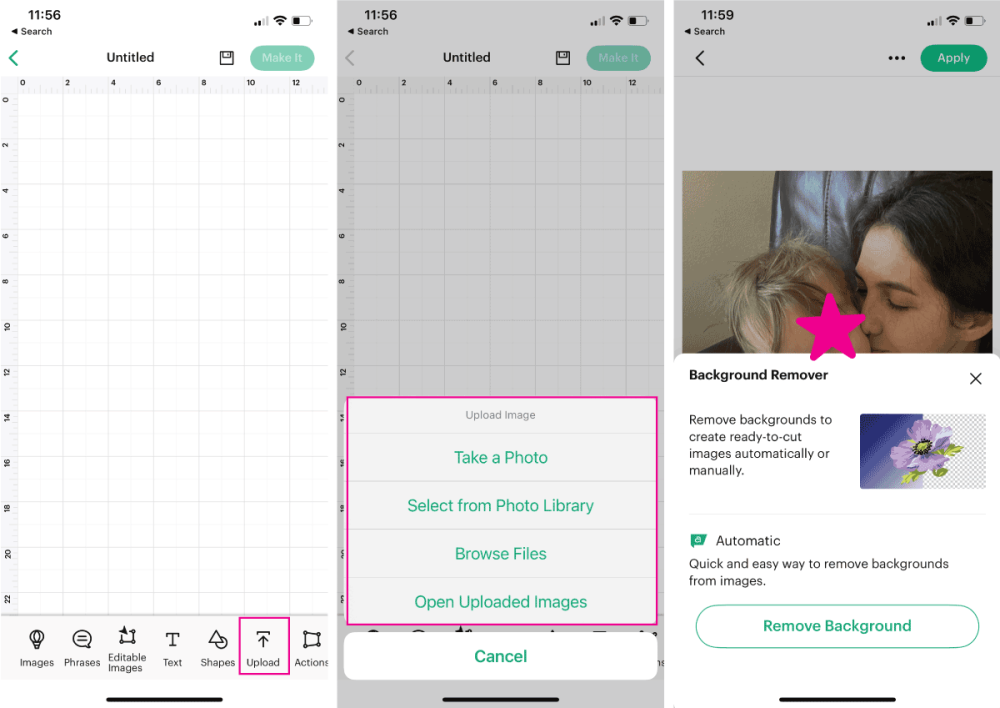
To upload, you need to be in the canvas area and tap on the “Upload” icon at the bottom of the app. After tapping, a menu will slide open with all your options.
You can take a photo and upload it, search for pictures from your photo library, browse files in a different storage folder on your phone, or open uploaded images.
Once you pick a file, the app will let you remove the background automatically or use other tools, such as a magic wand or eraser.
Related: Learn how to use the Cricut App.
Other FAQ About Uploading Images
How can I upload multiple images to Design Space?
Unfortunately, you can only upload one picture at a time.
Why does my image look grey/black?
Remember that once you clean your image (remove the background and erase certain areas), you need to save it as a “Print then Cut” image.
If your image looks grey, you likely saved it as a “Cut Image.”
Why does my image look blurry?
When you use a raster image (jpg, png, etc.), you can’t increase its size unless it’s really high quality.
Remember that raster images are made of tiny blocks of color, and increasing the size of the image also increases the size of the blocks, making your picture look pixelated.
Cricut has gotten smarter, and a warning will appear on the layers panel if it detects that the print will be of bad quality.
I wanted to know how to make your own template from your own creation and post them