Hello Daydreamers!
Today, you’ll learn everything you need to know about “Print then Cut” with your Cricut machine.
The “Print Then Cut” operation lets you print your designs and cut around them. When you select an element or design to be printed and cut, Design Space sends it to your printer, and subsequently, it is cut.
This feature is one of my favorites because I can make stickers, do homeschooling activities for my kids, create printables, etc.
Since I don’t want you to get lost, these are the topics I’ll cover in today’s tutorial:
- Machine Specifications
- Types of images you can use for “Print Then Cut”
- Design Space tutorial with all sorts of examples
- Printing and cutting process
- Troubleshooting if you’re having issues with your project
Tip: This tutorial builds upon the skills I teach in every step, so if you’re just starting with your machine, I suggest you read/follow each step.
If you are a beginner still figuring out Cricut’s software, I recommend this comprehensive and easy Design Space tutorial.
Machine Specifications
The first thing to consider is your machine’s capabilities.
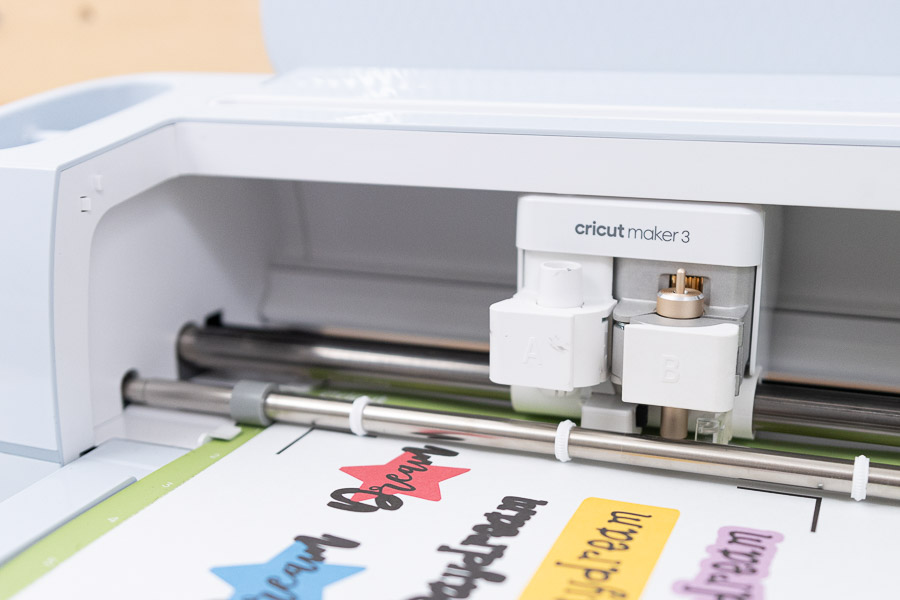
All Cricut machines except the Cricut Joy can “Print Then Cut,” and Cricut Explore 2 and older machines can only cut on white and matte-finished paper, although you may also be able to cut very light pastel colors. The newer Cricuts (Joy Xtra, Maker, Explore 3, Maker 3, and Venture) can cut matte and glossy materials.
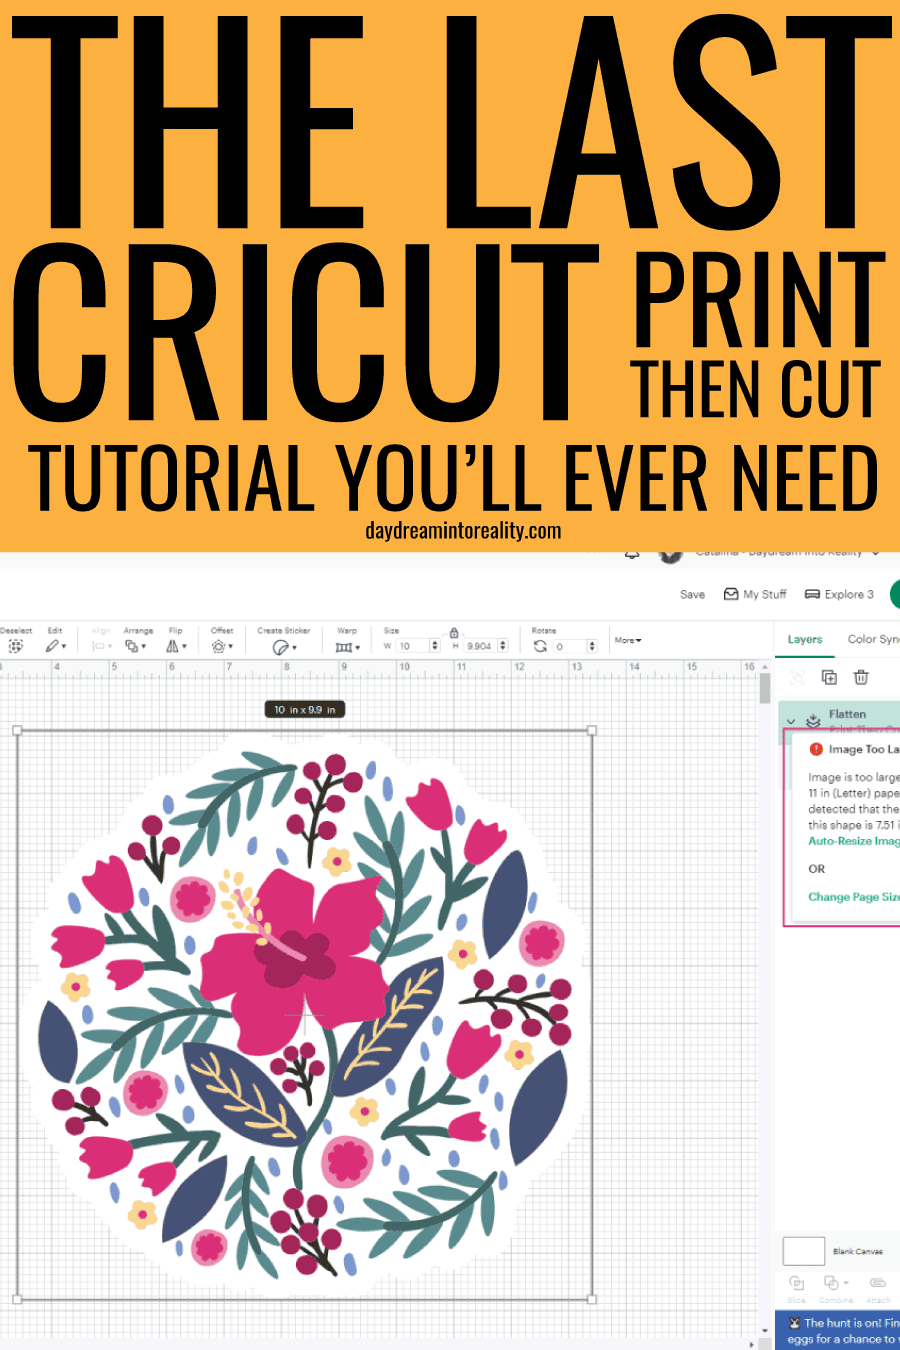
The second thing to consider is the paper size you want to use and the overall size of your design. Depending on the machine you own, Cricut allows you to use different sizes of paper.
To take advantage of this large print area, your printer must be able to print on large-size paper.
The following table shows what type of paper you can use considering all the machines Cricut has. I also included a “Max Project Size” so you can have an idea of how big a project can be.
| Paper Size (in) | Max Project Size (in) | Joy Xtra | Explore | Maker | Venture |
| 8.5 x 11 (Letter) | 6.75 x 9.25 | x | x | x | x |
| 8.3 x 11.7 (A4) | 6.51 x 9.93 | x | x | x | x |
| 8.5 x 14 (Legal) | 6.75 x 12.25 | x | x | x | |
| 9 x 12 | 7.25 x 10.25 | x | |||
| 11 x 11 | 9.25 x 9.25 | x | |||
| 11 x 17 (tabloid) | 9.25 x 15.25 | x | x | x | |
| 11.7 x 16.5 (A3) | 9.95 x 14.75 | x | x | x | |
| 12 x 12 | 10.25 x 10.25 | x | |||
| 12 x 18 | 10.25 x 16.25 | x | |||
| 13 x 19 | 11.25 x 17.25 | x | |||
| 16.5 x 23.4 (ISO A2) | 14.75 x 21.65 | x | |||
| 24 x 12 | 22.25 x 10.25 | x | |||
| 24 x 28 | 22.25 x 26.25 | x |
This “Max Project Size” is a little tricky because while I moved between machines, I could sometimes increase it just a tad more.
For instance, I noticed I could do a 7.5 x 7.4 in project for letter-sized paper but not a 7.5 x 9.25 in. This means that your project size can increase either in width or length depending on the type of shape (rectangular, circular) you want to print.
I want to give you accurate information, but you are welcome to increase your project size by 0.01 inches to see how big you can make it.
I am quite disappointed that Cricut didn’t allow “Print then Cut” on 12 x 12 paper for the Maker and Explore Machines. Hopefully, they do at some point.
Change the Size of Paper
You can change the type of paper size you want to print for your project in two ways.
The first way is to click on the top drop-down menu and go to settings. A small window will open. Click on “Load Type” and choose the “Print Then Cut Page Size” you want to work with.
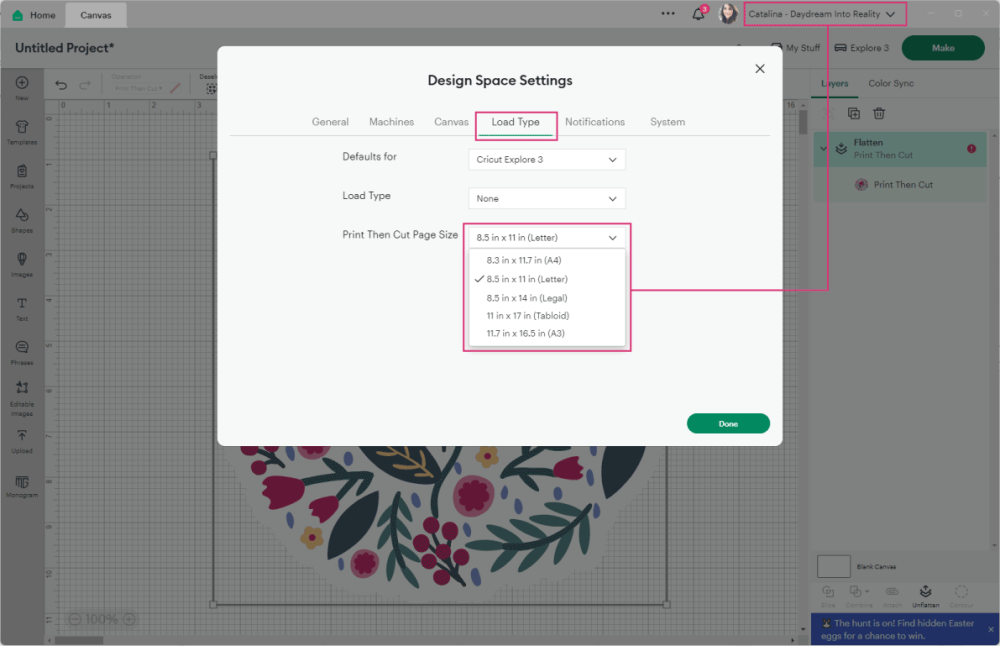

All my paper is 8.5 x 11 in, so I will stick with letter paper.
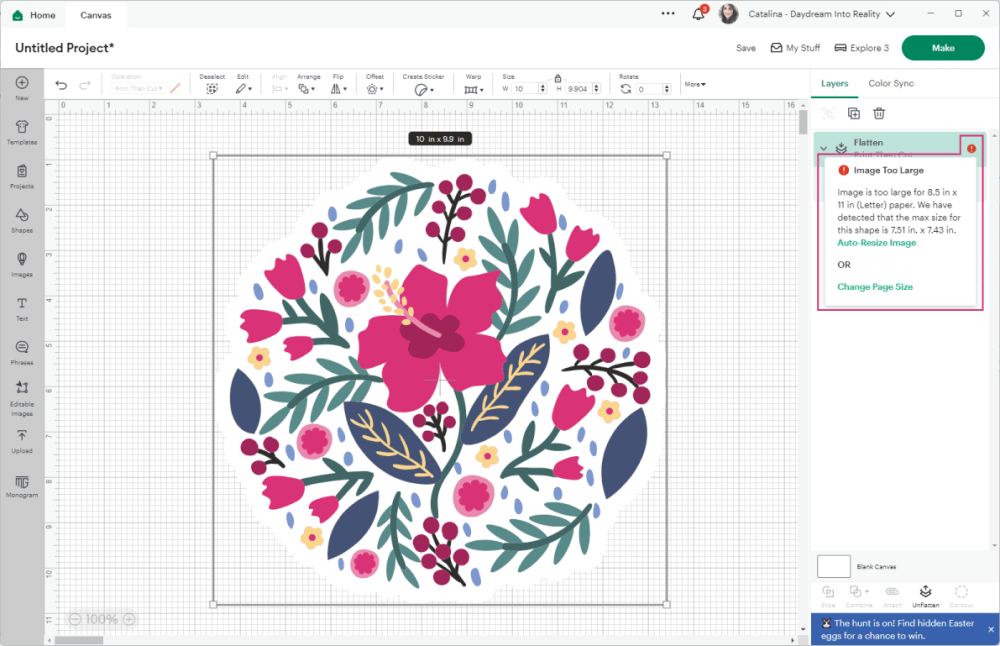
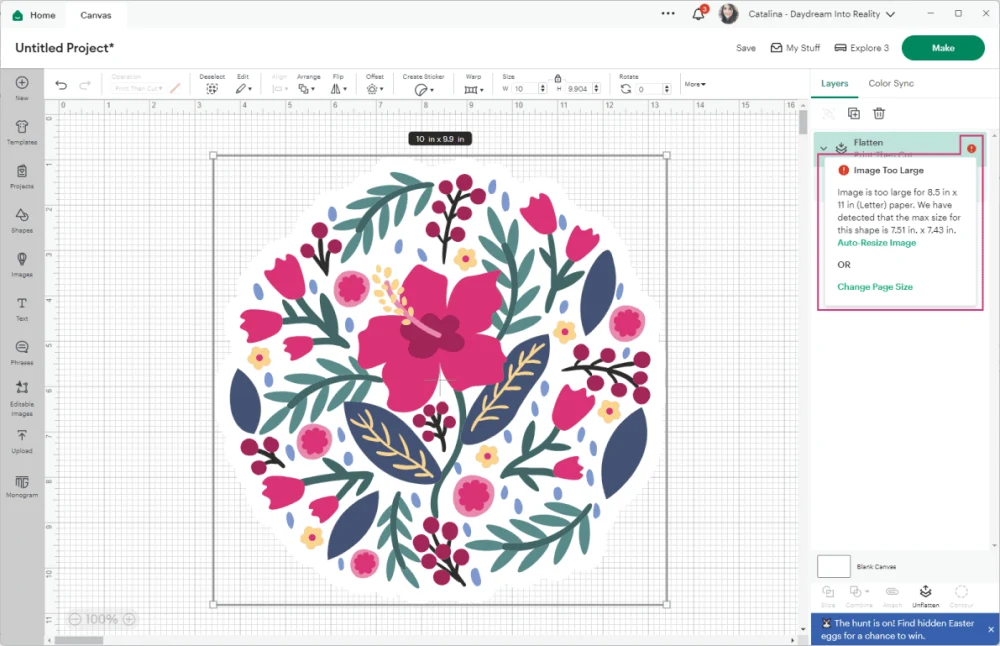
The second way is through the layers panel. If your image is bigger than what your machine can support, you’ll have an error notice, and Cricut will prompt you with a message to resize your project and open the “Load Type” settings window.
What types of images can I use?
You can “Print Then Cut” any image you upload to Design Space or from Cricut Access.
I won’t go into detail on how to upload each type of image to Design Space because I have a great tutorial on how do it. However, I want to mention three types of images and the differences you need to know to have a good experience with “Print Then Cut.”
- Images With a Solid Background – JPG: These types of images are often very busy and usually have a solid background. They require extra work because you must isolate the image you want to cut.
These images have specific extensions; you can recognize them when they end in .jpg, .gif, or .bmp. - Images with a Transparent Background: These images are a great fit because the main image, text, or element you want to cut is isolated and placed on a transparent background. However, if you try to make them bigger, they can lose some of their quality and look pixelated.
You can recognize them when they end in .png. - Vector Images: These are the best images you can use across Cricut Design Space. They are also called SVG or Cut files. The good thing about SVG files is that you can resize them without losing quality.
You can recognize these images when they end in .svg or .dxf
Step-by-step Tutorial
This is a functional tutorial, and It’s not meant to look super pretty or anything like that. It’s intended to teach you all your possibilities with “Print Then Cut.”
These are the following things we are going to use:
- Uploading Images
- JPG Image
- PNG Image
- SVG File
- Shapes
- Patterns
- Images
- Text
- Offset
Upload Images to Cricut Design Space
Use the following images to follow along.
To download the file(s), you NEED to be on a desktop or laptop, and you must click on the button to trigger a download file on your PC.
Depending on your browser settings, your PC sometimes asks where to save the file, although most files will be in your download folder.
If the image opens in a new window (this may happen because of your browser settings), right-click on it, select the option “Save Image As,” and choose where you want to save the file.
SVG files look like web page files when you download them.


Oh!
Just so you know, I also have a library full of free SVG files and Printables for all my subscribers, a.k.a. Daydreamers. You can see a preview right here or get access by filling out this form.
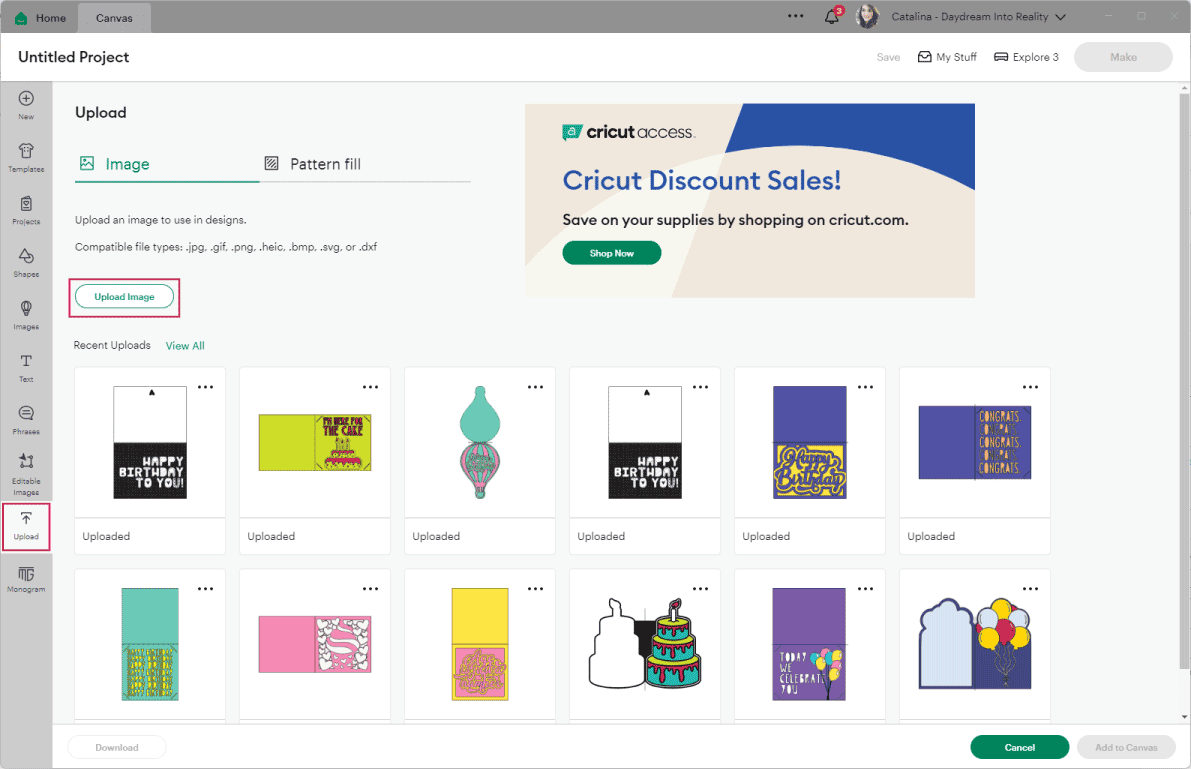
After saving the images on your computer, log in to Design Space and click “Upload” on the left panel; then click on the “Upload Image.”
A new window will pop up, asking you to locate the file on your computer. Search for the image and double-click on it to upload it.

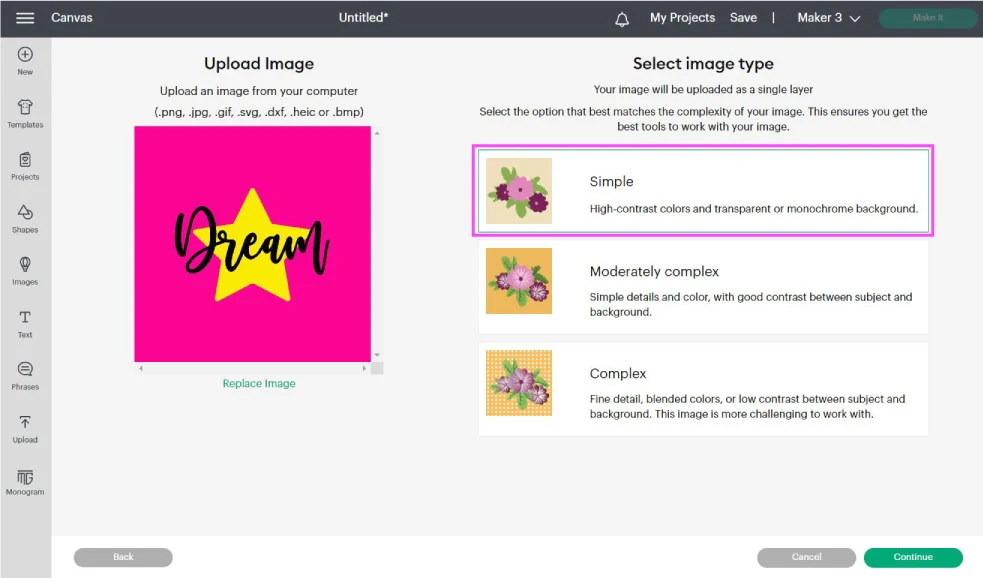
We are working with a JPG file; therefore, Cricut doesn’t recognize all of the elements that make the image. The only thing Cricut can detect is a big square.
Since this design has only three high-contrast colors, select “Simple” and click on “Continue.”

In this section, you have different options for cleaning up the file. I suggest you play with them to see which is better for your image.
My favorite way to clean up JPG images is by using the “Remove Background” button. However, depending on the type of image you have, you can also use the wand and eraser. For this tutorial, I am choosing to keep the image as is.

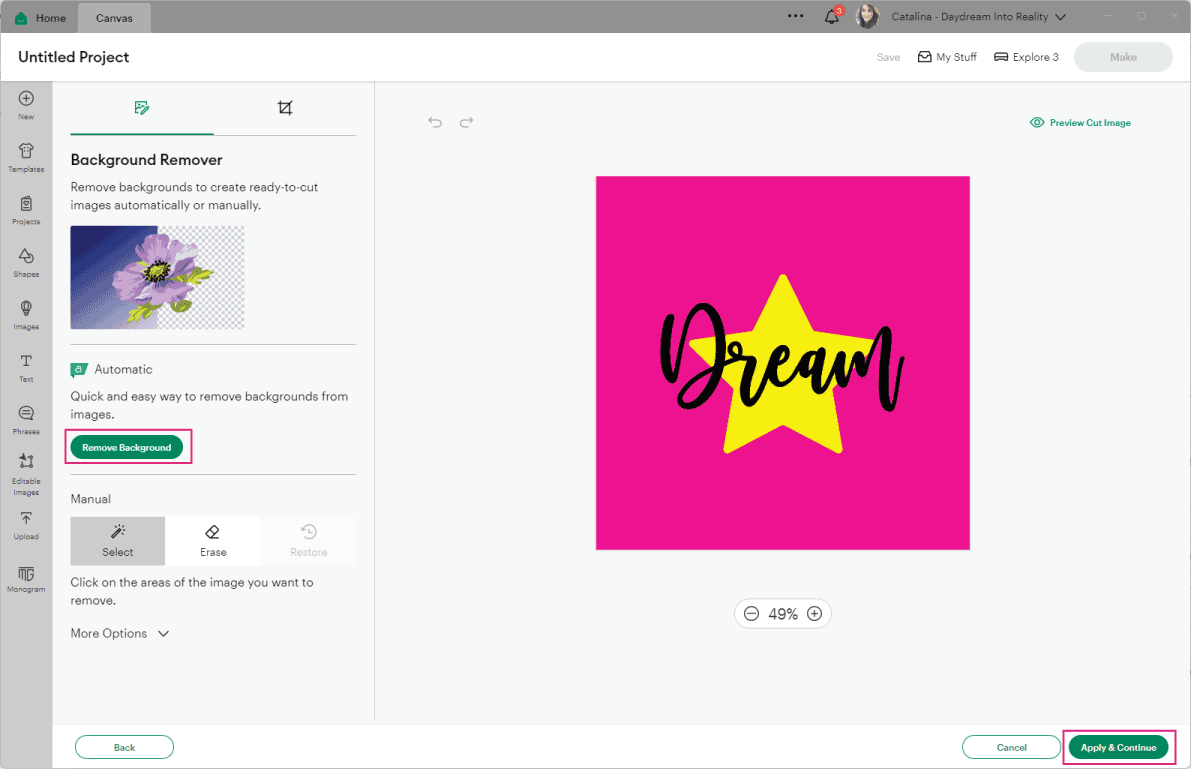
In the next step, you will see that you have two options. The first is to save the file as a “Cut Image,” and the second is to save the file as a “Print Then Cut Image.”
Select “Print Then Cut.”

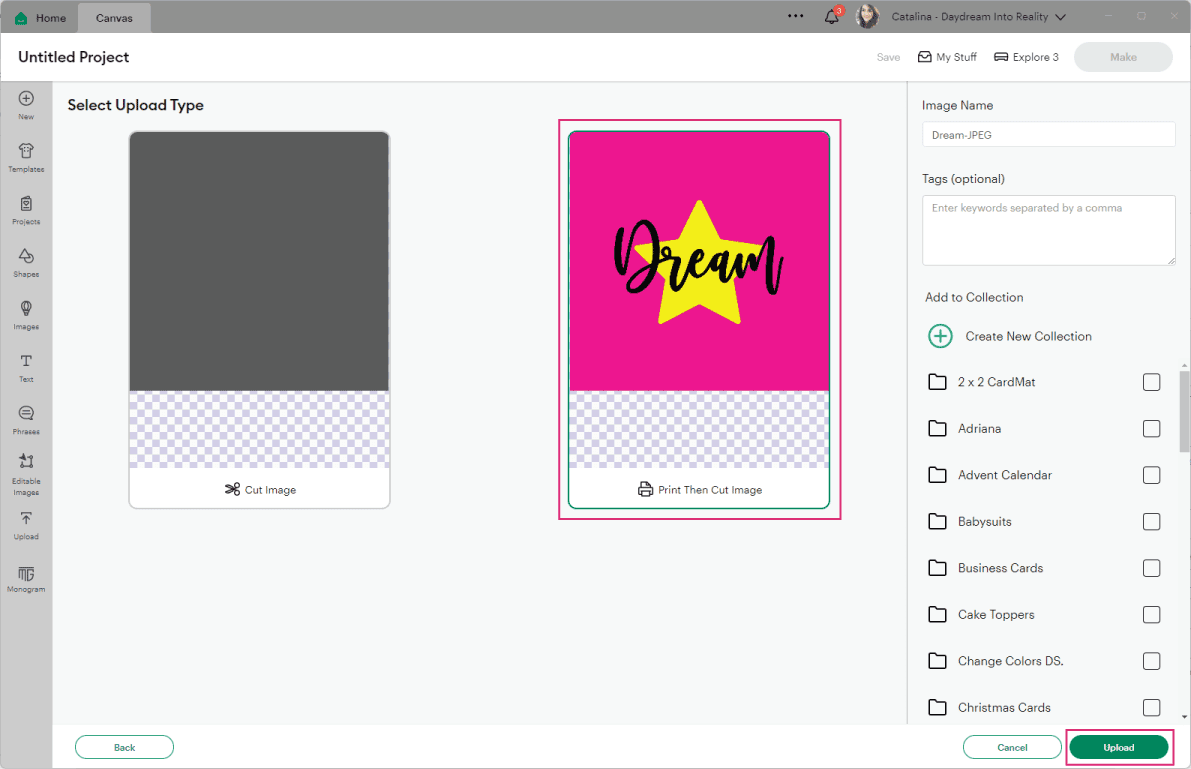
The PNG image – dream and pink star – already has a transparent background, so there’s no need to delete anything:
- Upload image
- Select “Simple”
- Click on continue.
- Save as a “Print Then Cut.”
The SVG file is the easiest to upload. You only need to upload it, name it (optional), and finally save it.
After uploading the third file, select all three images and click “Add to Canvas.”

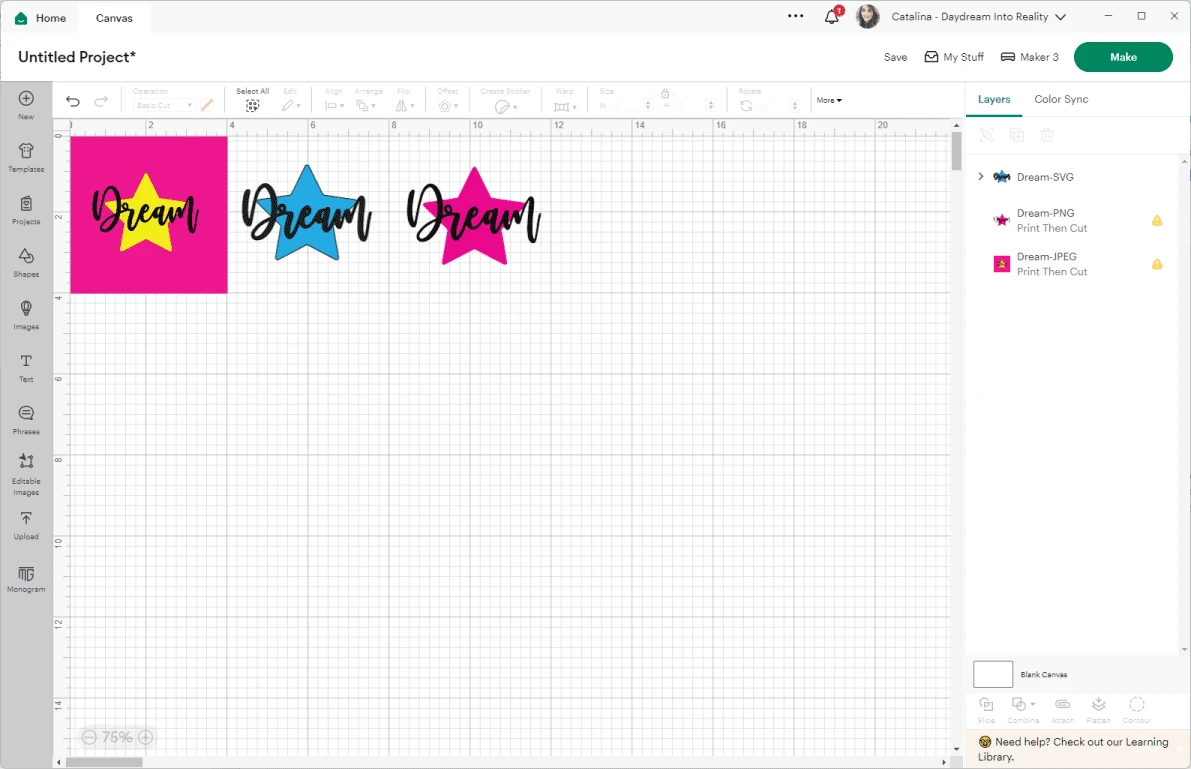
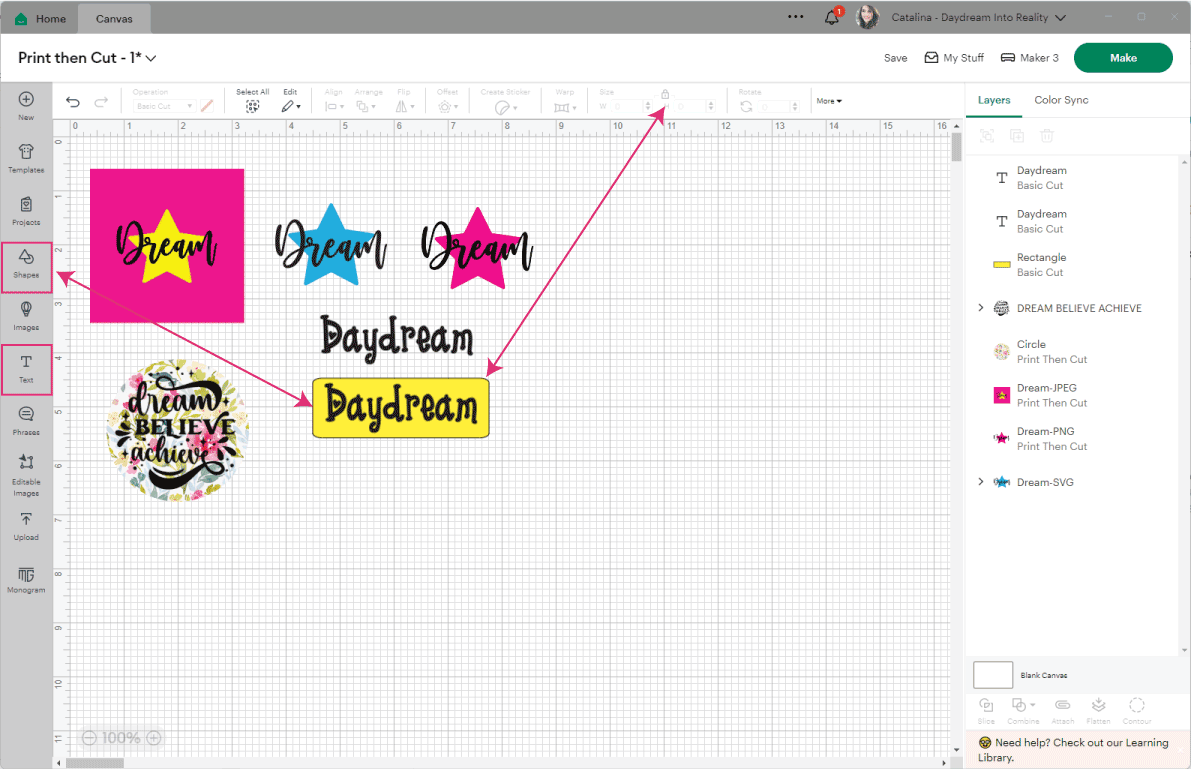
All files should now be on the canvas; they are most likely scattered around, overlapping each other, and in different sizes.
Go ahead and tidy up the canvas area so it looks like the screenshot is down below.
Watch out! You are about to read the most IMPORTANT part of this tutorial.
If you were going to do this project right now, your machine would only “Print Then Cut” the designs with the yellow and pink stars. (Remember, we saved them with this option in mind)
Why wouldn’t Cricut print and cut the design with the blue star?
The ANSWER is quite simple. This file is a CUT or SVG file. Whenever you upload these files, your Cricut will assume you want to cut and nothing else.
How do you tell your machine to “Print Then Cut?“
There are two ways to tell your machine that something needs to be printed and then cut. The first is through “Operation,” and the second is “Flatten.”


Most beginners will change the “Operation” to “Print The Cut,” but this is not how you usually “Print then Cut” an entire project.
The problem with “Print Then Cut” as an “Operation” is that if you have cut files (blue star and word dream) that overlap each other or have different colors, instead of cutting around the edges as a whole, your Cricut will cut each design on a different mat; and, even if you try attaching them, one of the elements will cut through the other one.
When using “Print Then Cut,” add all of your elements (text, patterns, shapes, offsets, etc.). At the end, select them all and click on the “Flatten” tool at the bottom of the Layers panel.
I want to explain the logic behind how things work, even though it may not seem easy.
Attaching and “Print Then Cut” as an operation can be used together to accomplish other projects like printing and not cutting a part of your project or adding a background to a sticker sheet.
Add extra touches – Cricut Images, Text, Shapes, Patterns, and Offsets
It’s been a lot, right?
Take a moment to stretch out, maybe grab some tea or a snack, and let’s explore more things you can “Print Then Cut.” As I just mentioned, don’t worry about “Operation.” yet.
Cricut Images
All Cricut Images can be used with the “Print Then Cut” operation. Cricut has really cute stuff in its library. If you have Cricut Access, your possibilities are almost endless—there are over 250,000 images for you to pick from!
To access them, click on the “Images” icon on the canvas’s left panel. Cricut has multiple filters, which I often use to narrow my search on some of my projects.
If you want to use something free, click “Ownership” and check the option “Free.”
To find the exact image I used, type in “Dream Believe” in the search box.

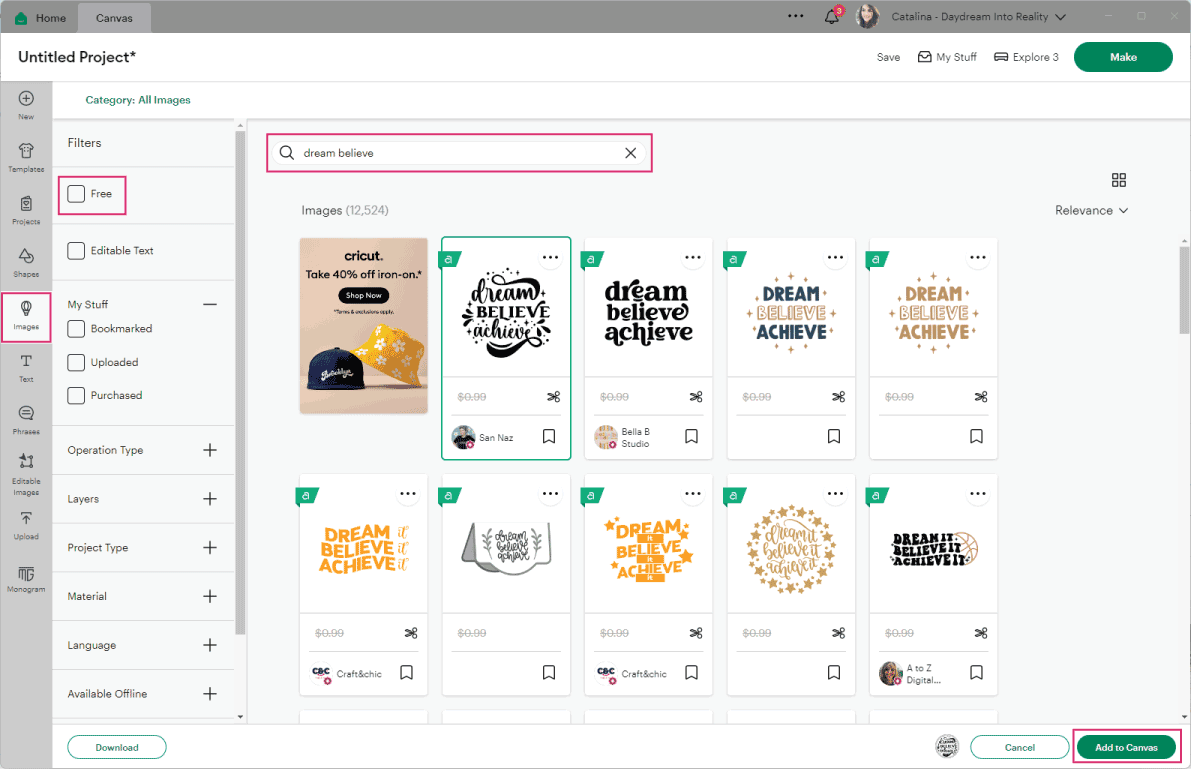
Once you find your favorite image, select it and click “Add to Canvas.”
Add Shapes and Patterns
I want my image to be on top of a beautiful patterned circle.
To add a circle to the canvas area, click on the “Shapes” icon on the left panel. Then select the circle and change the “Operation” from “Basic” to “Print Then Cut.” Then click on the color box to change the “Print type” to “Pattern.”
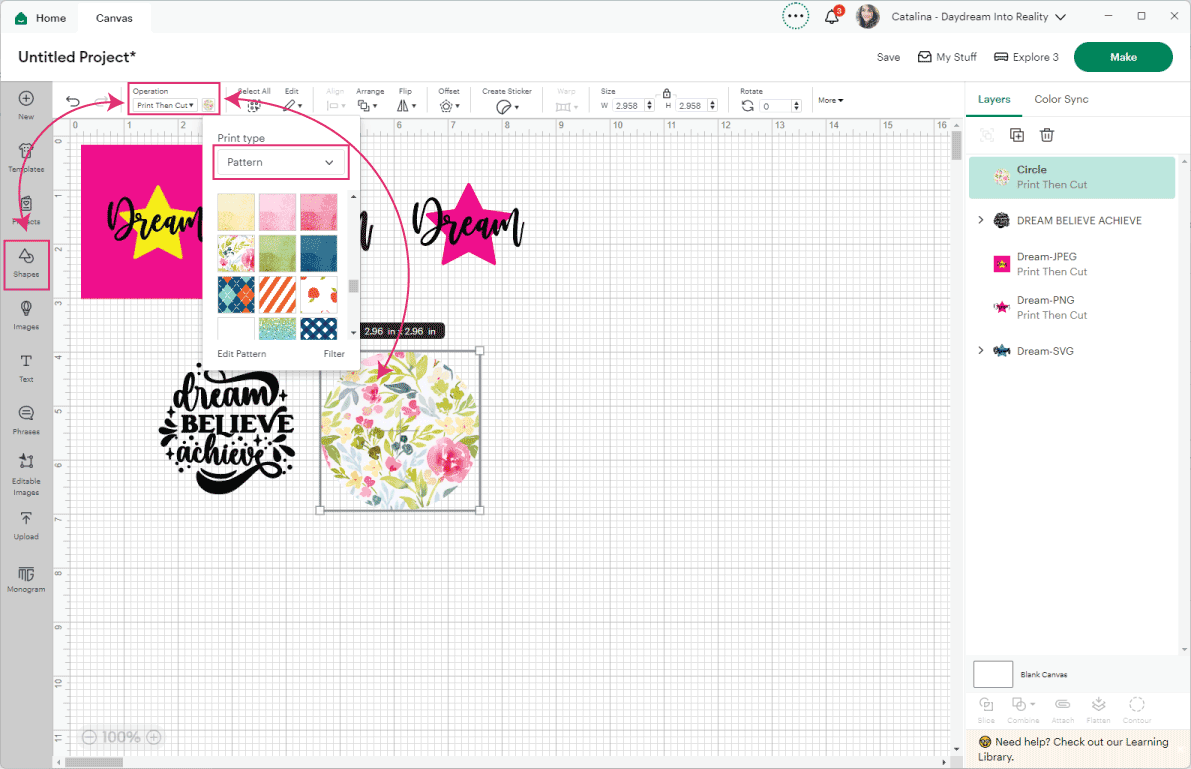

Now, you get to pick your favorite pattern. Cricut has hundreds of them, and they seem to be free for now, so take advantage of this!
After picking your pattern, center the image (Dream, Believe, Achieve) on top of the circle.
Tip: The circle will most likely be on top. Right-click on the image and select “Move Forward” to bring it forward.
Add text
Text adds so much value to any design! To add it, click on the text icon on the canvas’s left panel.
I added the same word twice to share a point with you.
If you are using paper, you most likely want the text to be together. If you leave the word on its own, Cricut will cut each letter, and If this is what you want, great. However, if you want the entire word to remain together, you need to place it on top of a shape.

In this case, I added a square and unlocked its proportions to make a rectangle; then, I changed the color to yellow and typed daydream on it.
Add Offset
One of the coolest tools for “Print Then Cut” is the “Offset” tool.
The “Offset” tool allows you to create a proportional outline inside and outside of text, images, and shapes, and it’s perfect for making all sorts of stickers and other “Print Then Cut” projects.
Take a look at the following screenshot.

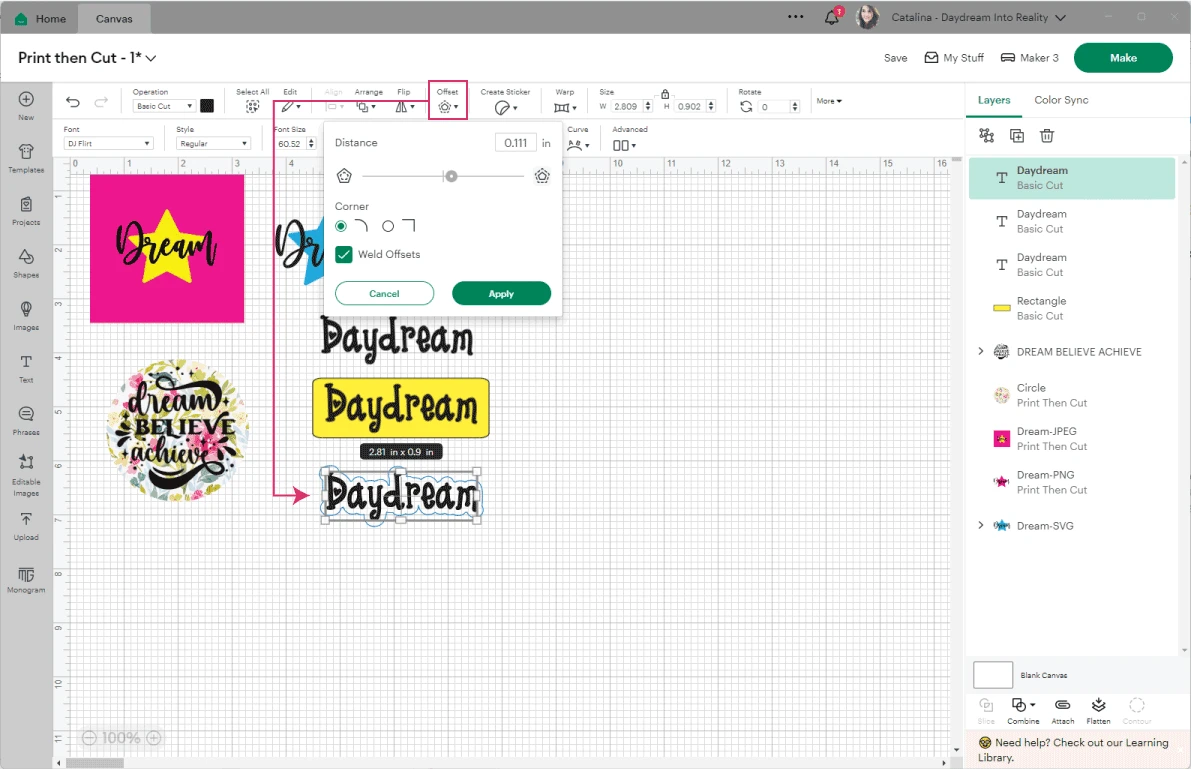
Make a copy or “Duplicate” the text we just used in the previous step.
Select the copy and click on “Offset.” Adjust the slider and click “Apply” to create a proportional outline of the text.
When you first create the offset, it will be grey or black. As you can see, I added the same pattern that I used on the circle.
I invite you to play with the “Offset” tool and see what looks good together.
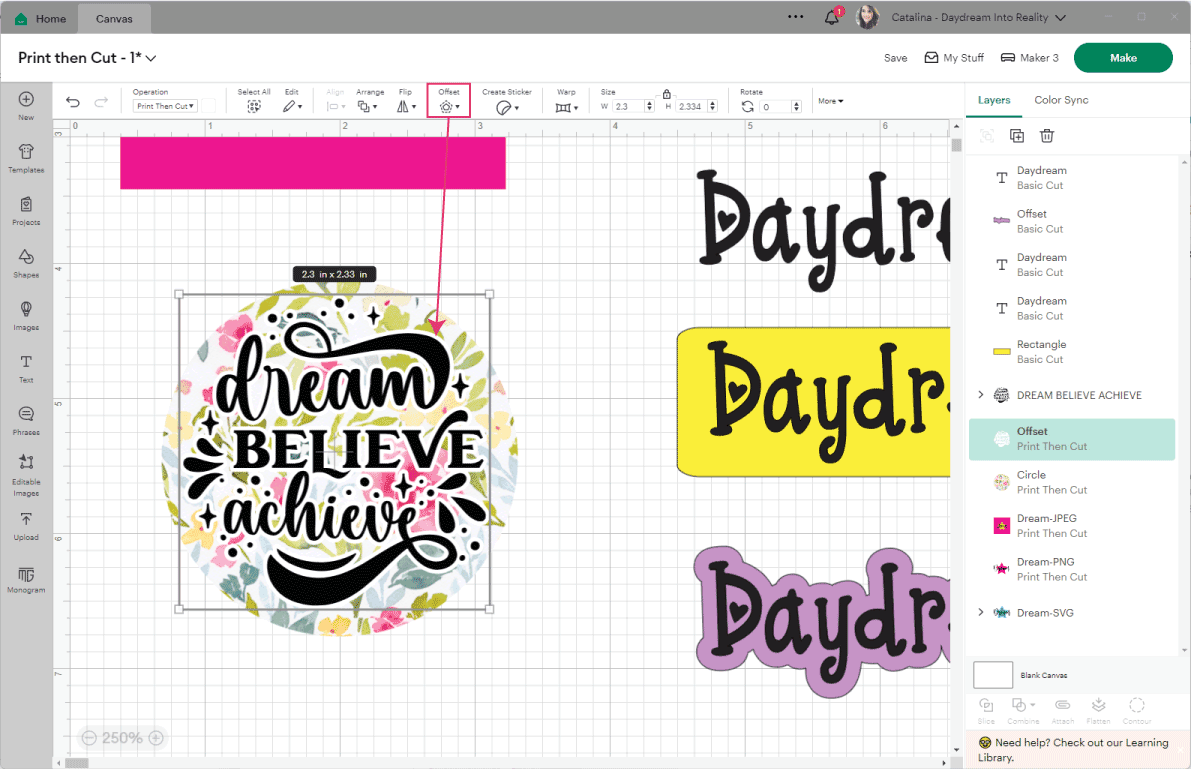
Check out my offset tutorial for more ideas.
I also added an offset to the “Dream Believe Achieve” image to increase the pattern’s contrast with the image.
Flatten and Resize your Design
Do you remember the talk we had about “Operation” and “Flatten”? Since we are done with all the designing, we need to tell Cricut that all images, text, and shapes need to be “Print Then Cut.”
If you look at the layers panel (on the right), you will see that not all the elements have the “Print Then Cut” attribute; some are set to “Basic Cut.”
However, as I explained before, you can’t just change the operation from “Cut” to “Print Then Cut.” You need to compress all elements that make this project into ONE SINGLE LAYER.
To do this, click on “Select All” and then on the “Flatten” icon at the bottom of the layer’s panel.
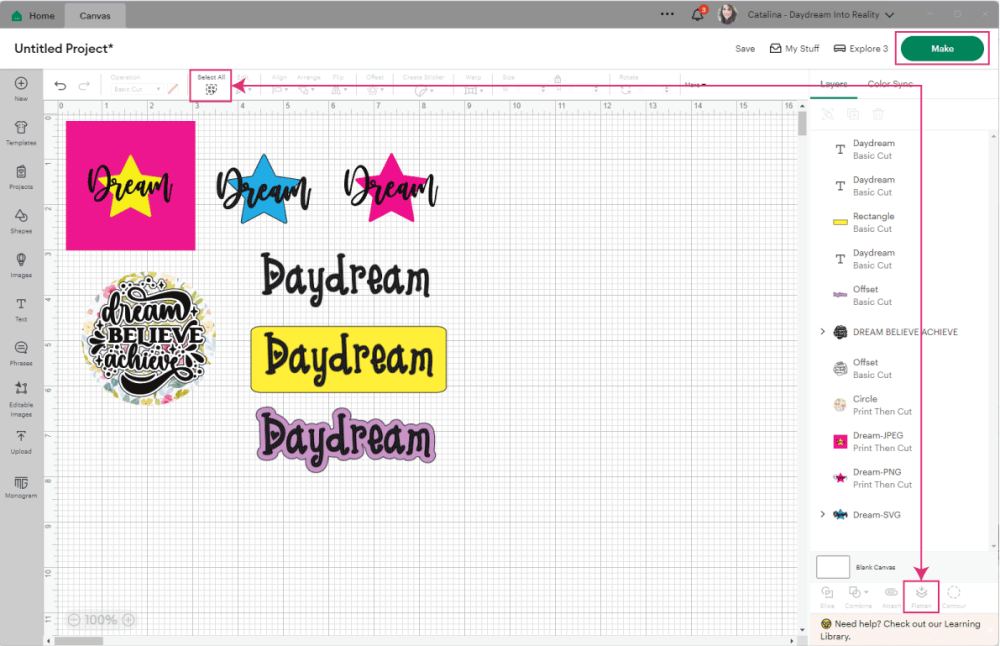
Notice that after flattening, you only have ONE layer!
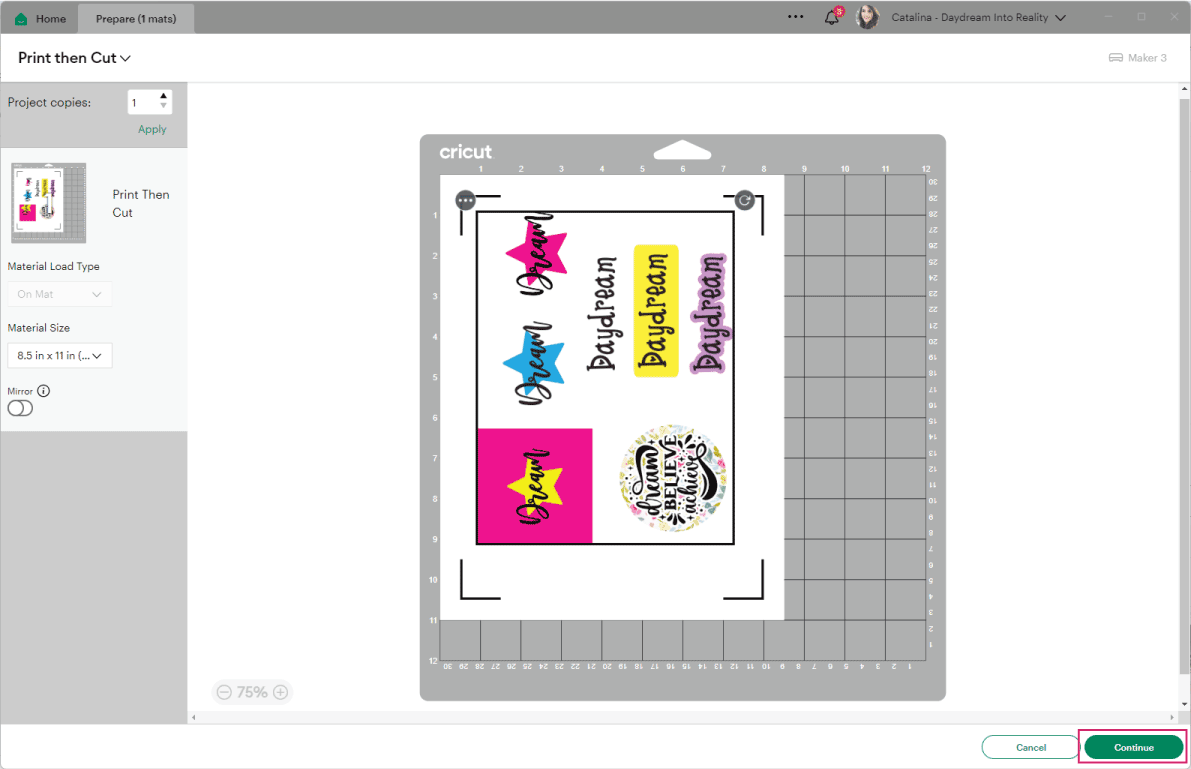
Now that we finished with the designing process, click “Make.”
Note: When using letter-sized paper, the final size can’t be larger than 9.25 x 6.75 in. If your design is bigger, select the already flattened layer so you can continue.
Print and Cutting Instructions
Finally.
It’s cutting time!
The following screenshot shows you what your print should look like.
After you are done printing, you need to make sure that you place the paper on your Cricut Mat exactly as you see it here.
Tip: on “Material Size,” if your design is small enough to be printed in either A4 or letter paper, you can change the paper size you’re going to use.
One of the questions I get asked the most is how to get rid of the black lines when I “Print Then Cut.”
Unfortunately, you can’t get rid of it!
The black corners serve as a reference for your Cricut to know where to cut.
Printer Set-Up and Printing Process
After leaving the mat preview, you will be given the step by step to cut your project.
The first option is “Print,” and it has a button that says “Send to Printer.” Go ahead and click there.
A small window named “Print Setup” will open. From this window, you can choose your printer, add extra copies to your project, turn on bleed, and/or use your system dialog box.
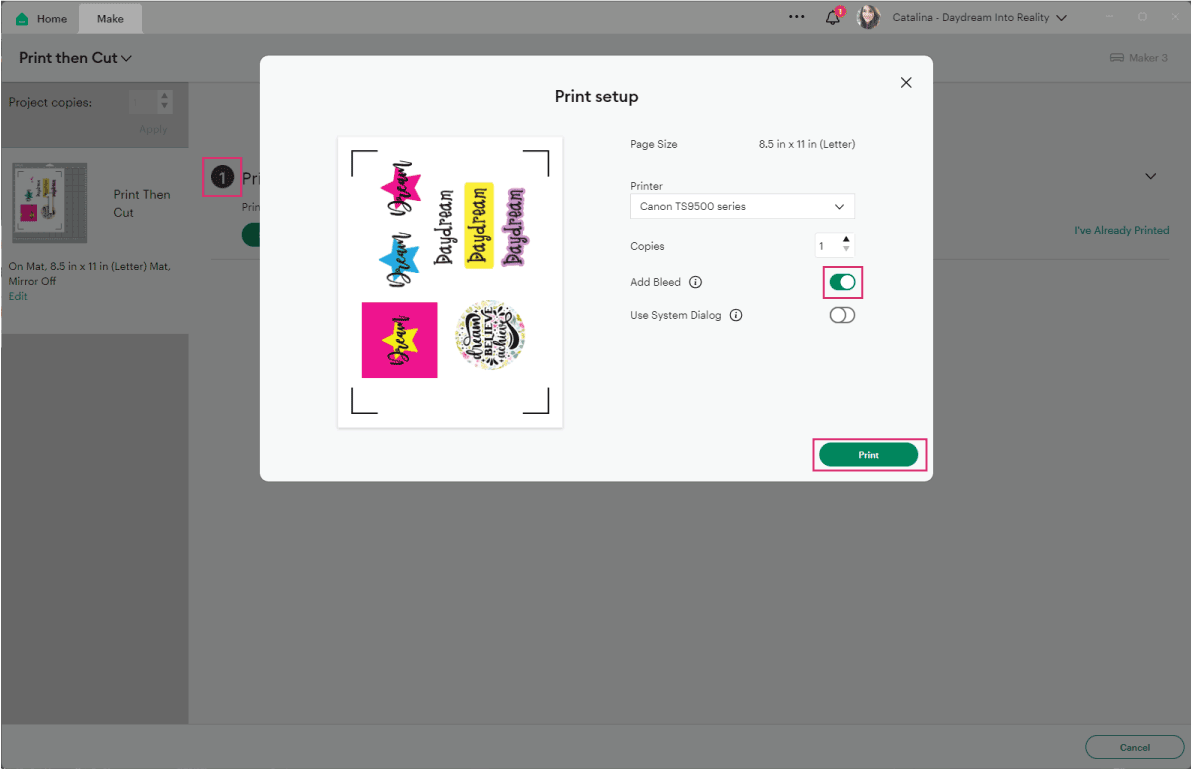
The “System Dialog” is useful if you need to find your printer, change the type of paper you are using, or want to save your project as a PDF and print it in a different location.
If your printer is already connected to your computer, you can leave this option off.
I usually have “Bleed” on and “System Dialog” off.
Now…
Can we just talk about “bleed” for a little bit?
Understand Bleeding
I printed this project with “bleed on” and “Bleed off.” So, let’s take a break to see the results and resume with our step-by-step tutorial.
“Bleed extends ink slightly beyond the border of the image to eliminate a white margin once the image is cut.”
Check out the following photos, and let’s chat about the results.
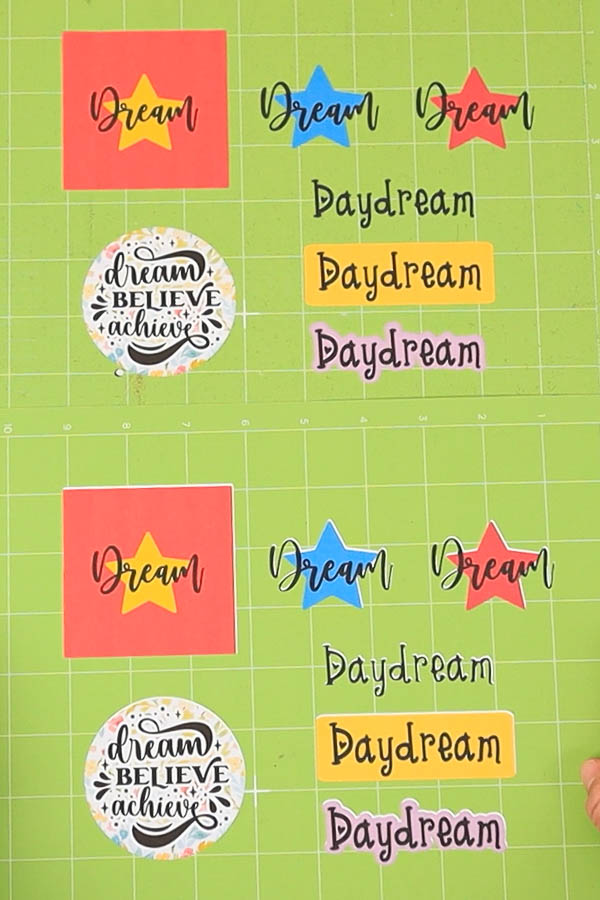
The following picture with “bleed on” may shock you or may not because I am warning you. But the first time I saw this, I thought my “Print Then Cut” wasn’t working at all.
Don’t you think it looks extremely weird?
Thankfully, I was wrong. As you can see, Design Space extended the ink in every place the blade was supposed to go. Notice that the fonts look just fine inside the designs.
Although Cricut’s sensor is pretty good, there’s little room for error. The bleed prevents your machine from cutting inside and outside of the place where it is supposed to.
When I turned Bleed-off, all of the designs had a white border on some parts of the cut.
So which one should you choose? That’s up to you to decide. I like the bleed-on for all of my projects.
Now, let’s get back into our step-by-step tutorial.
Select Materials, Arrange Mat & Cut
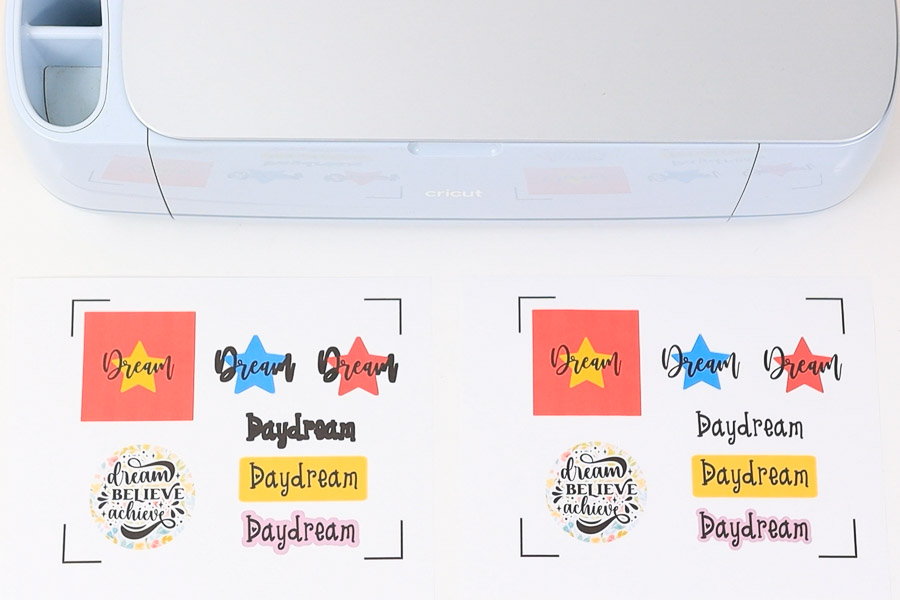
After you print, it’s time for you to choose the material you printed on.
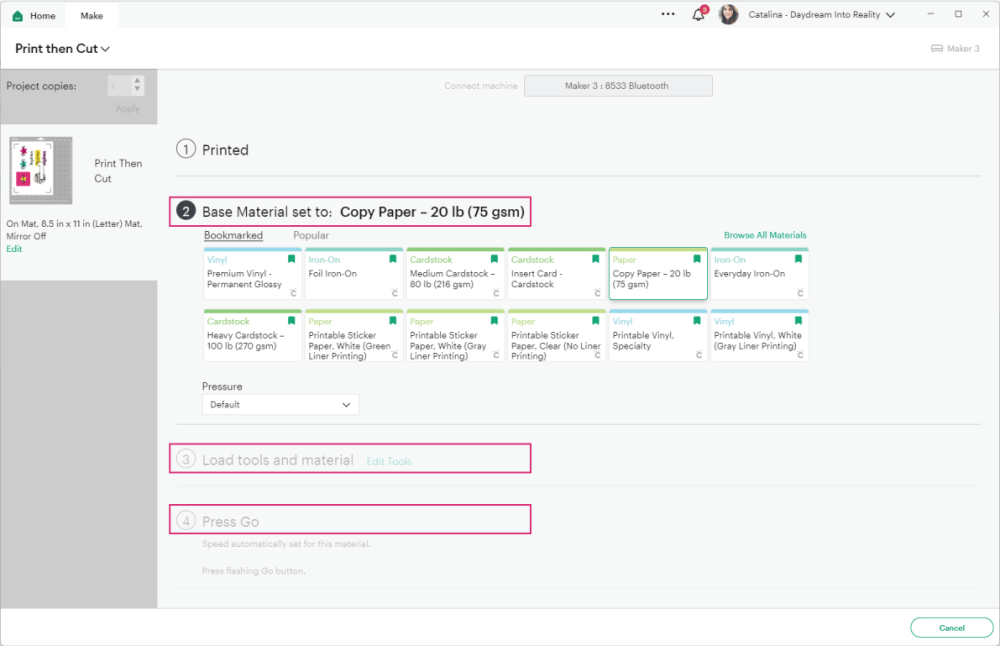
Choose the material from Cricut Design Space. For machines with a smart set dial, move to “Custom” to follow along. For this project, I used copy paper.
Install the fine point blade, place the printed project on the mat, and load it into the Cricut machine. Remember that it has to look like in the preview.
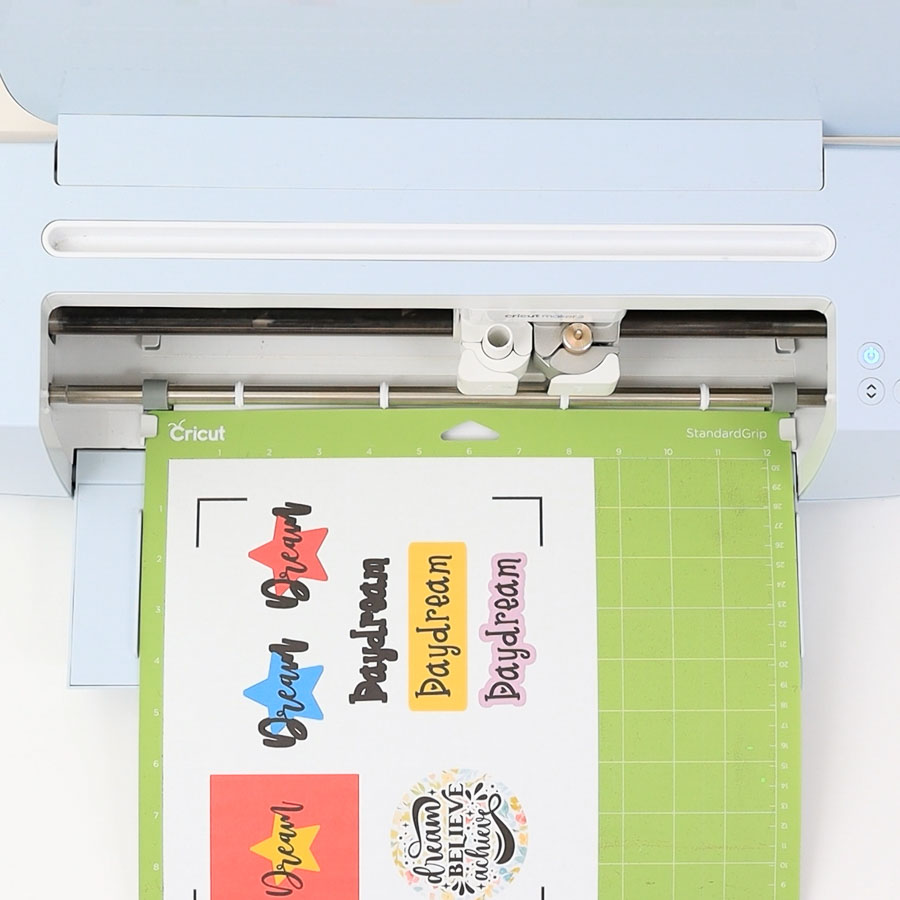
After loading your mat, go ahead and press the flashing go button to start the cut.
At this very moment, you will see the beauty happen!
The “Print Then Cut” sensor will turn on and start reading the black corners surrounding the project. Once it’s done reading, Cricut will proceed to cut.
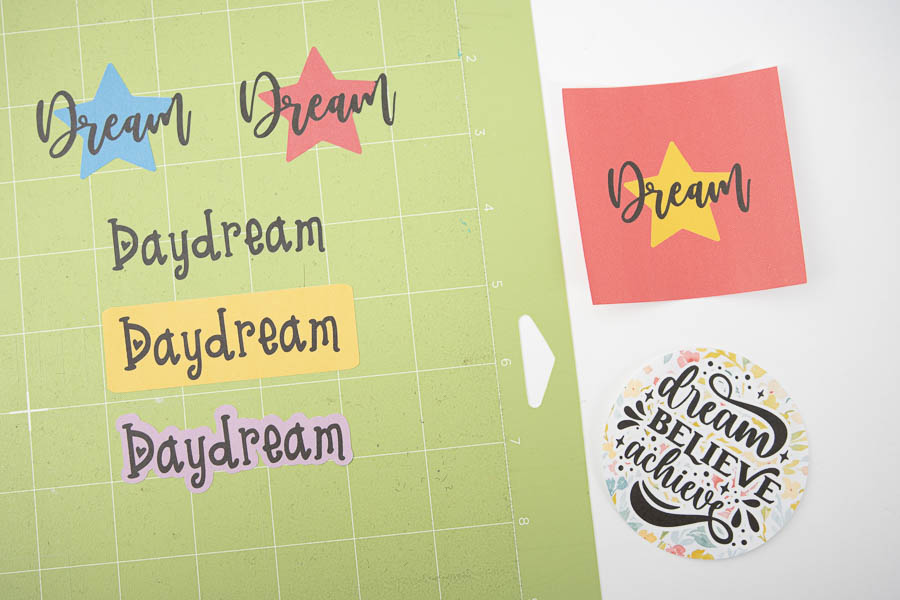
When Design Space tells you the cut is done, unload your mat and remove the project from it.
Having trouble?
We are on our final stretch!
I hope your machine is running smoothly, but I wanted to point you to good resources if it isn’t.
If you are having any of these problems, check out Cricut’s following steps.
LIZ
Saturday 10th of December 2022
This tutorial was amazing , thank you
Kay
Tuesday 15th of November 2022
What type of printer do you recommend for the print and cut? I really would like to start printing stickers for my grandkids. I need to buy a new printer.
davidwilliams
Monday 14th of November 2022
I'm new to all this was wanting to know what the Cricut model for Birthday toppers is? Saved By God's Grace.
Catalina
Wednesday 4th of January 2023
Any of the big machines will do. If you want to make wooden toppers, you would need the Maker.
Shirleen
Sunday 23rd of October 2022
I downloaded your christmas tags that are png files and I keep getting a warning sign in design space when I want to print and cut the file. What can I do?
Catalina
Sunday 23rd of October 2022
You need to resize them so they are the size Cricut allows
Hilda
Tuesday 18th of October 2022
Hola Catalina. You are the best. Your tutorials are very explicit. Thank you very much for your time and effort. I still have a few questions but I want to practice before.